Back-to-School Lunch Prep: A Week of School Lunches You Can Pack in 10 Minutes
Learn how to pack a week of school lunches in just 10 minutes each morning by dedicating one hour to batch prep on Sunday. You'll get a five-slot formula and a sample week plan.
- Dedicate 60 minutes on Sunday for a week of easy lunch assembly.
- Follow a five-slot formula (protein, carb, fruit, veggie, fun) for quick packing.
- Prioritize the protein slot to help your kids stay full longer.
- Don't force variety; repetition is fine if your child is happy with it.
- Batch cook proteins like chicken and eggs, and prep veggies on Sunday.
This post contains affiliate links. As an Amazon Associate I earn from qualifying purchases.
Last year I stood in my kitchen at 7:12 a.m. with three open lunchboxes and no plan. One kid left with a granola bar and a bruised banana. This guide moves the deciding to one calm Sunday hour. You’ll get a prep session, a five-slot lunch formula, a full sample week, storage times and cold-pack safety.
Free printable: the toddler-size version of this plan.
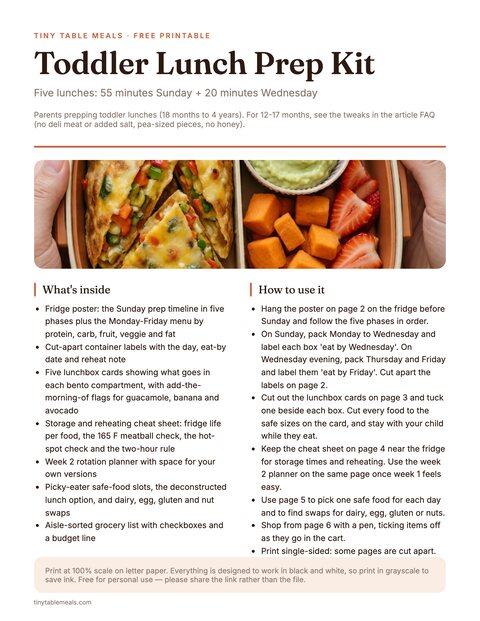
Free printable · 6 pages
Toddler Lunch Prep Kit: A Week in 55 Minutes
A Sunday prep timeline poster with container labels, Monday-Friday lunchbox cards, a storage and reheating cheat sheet, a picky-eater and allergy swap sheet, a week 2 planner and an aisle-sorted grocery list for toddler lunches.
Free. Your download link appears right here. You'll also join the Sunday Supper Plan. Unsubscribe anytime. Privacy
For school-age kids, follow the same Sunday plan with bigger portions; our toddler lunch prep guide covers the under-4 details.
In this article (10 sections)
- Why Sunday Batch Prep Beats Daily Lunch-Making
- The 10-Minute School Lunch Formula
- How to Meal Prep School Lunches in One Sunday Hour
- A Full Week of 10-Minute Lunches
- Set Up a Grab-and-Go Lunch Station
- Pack Lunches Safely: Ice Packs and Thermos Rules
- What to Do When Your Kid Rejects the Lunch
- Budget and Nutrition Tweaks for School Lunches
- Start Small This Week
- Frequently Asked Questions
Why Sunday Batch Prep Beats Daily Lunch-Making
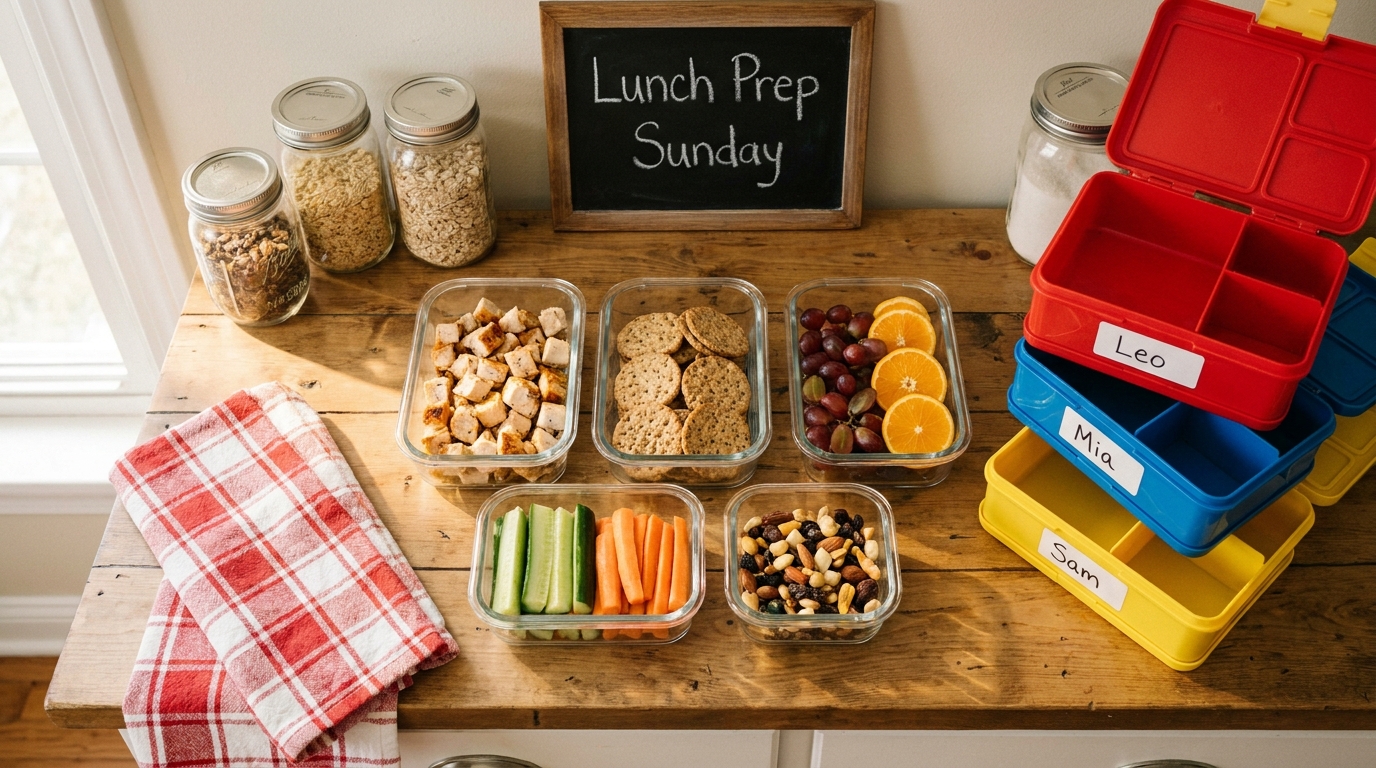
My school mornings fall apart at the open fridge. I’m working out what goes with what while someone hunts for a missing shoe. So I split the job in two. Planning and cooking happen once, on a calm Sunday. Weekday mornings are only assembly: grab labeled containers from a bin and fill the box.
It saves time too. Lunch from scratch takes me 8-10 minutes on a smooth morning. With interruptions it’s closer to 15-20. One 60-minute Sunday session replaces five rushed ones.
The 10-Minute School Lunch Formula
Before you batch anything, you need a formula simple enough that you just fill in the blanks. I use a five-slot grid. Once you know it, building a lunch is almost automatic.
| Slot | Purpose | Examples |
|---|---|---|
| Protein | Helps kids stay full longer | Diced chicken, hard-boiled eggs, turkey roll-ups, hummus, cheese cubes, edamame |
| Carb/Grain | Energy for the afternoon | Whole-grain bread, tortilla, crackers, pasta, leftover rice |
| Fruit | Sweetness without added sugar | Grapes, berries, apple slices, orange segments, melon |
| Veggie/Crunch | Texture + micronutrients | Carrot sticks, cucumber coins, snap peas, bell pepper strips |
| Fun/Treat | Morale (small portion) | A few crackers with dip, mini muffin, dark chocolate chips, seed mix |
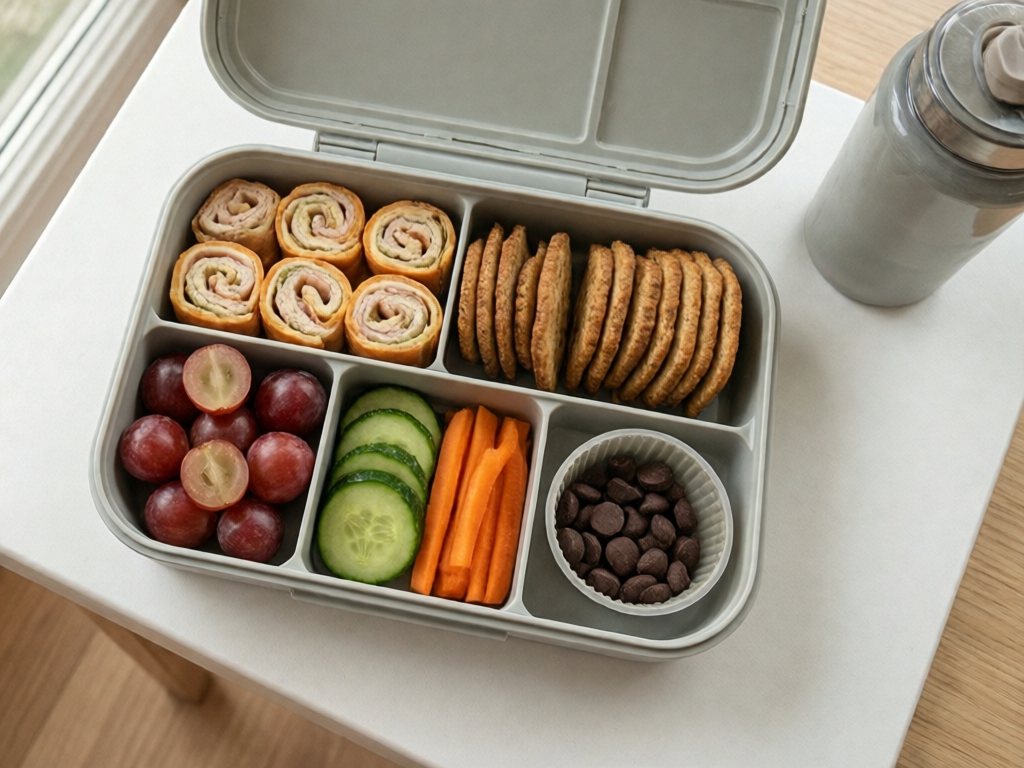
Once each slot has 3-4 pre-approved options, packing lunch means picking one item per slot. You never invent a meal from scratch. Our Bento Box Lunch Ideas for Kids use the same logic: small compartments, no single main dish, just a few grab-and-go components.
Packing for a child under 4? Several of these examples need cutting, smashing or cooking first. The under-4 chart in the sample week below shows how.
Three notes on the formula:
- You don’t need all five slots every day. Four is fine. Aim for balance across the week, not perfection in every single box.
- Repetition is fine. If your kid happily eats the same turkey-and-cheese roll-up four days a week, that’s a win. Don’t add variety they didn’t ask for.
- Protein is the slot that helps kids stay full longer. If you only get one slot right, make it this one. For amounts, see our age-by-age protein guide for kids.
How to Meal Prep School Lunches in One Sunday Hour
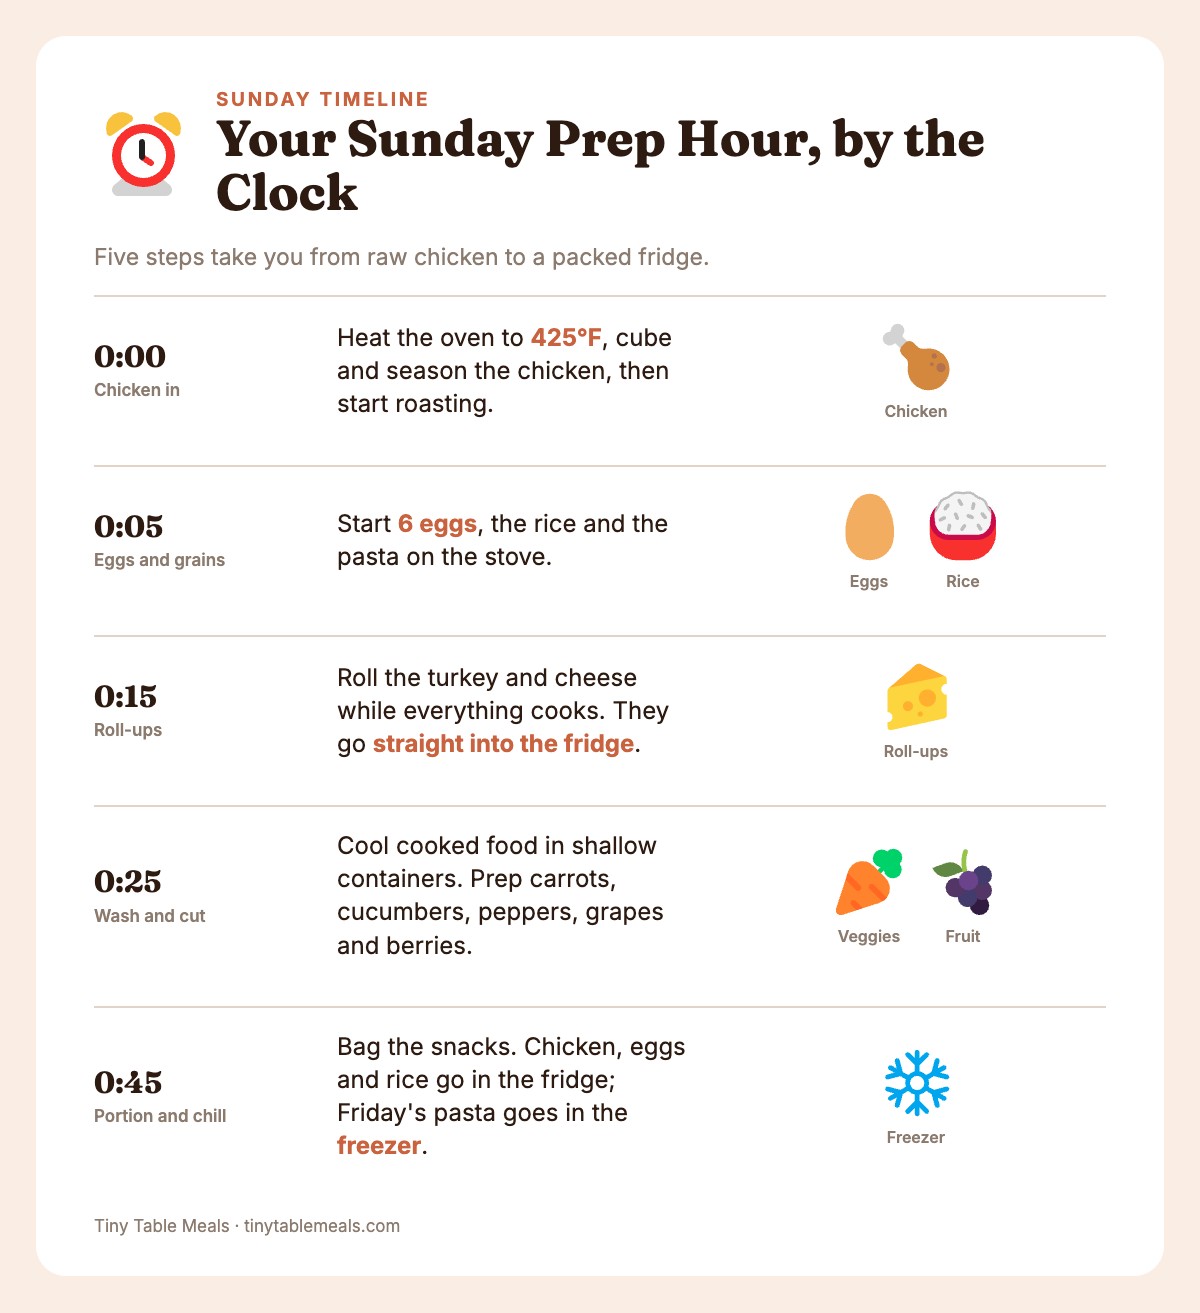
This is the one hour that buys you the whole week back. I break it into three phases so it doesn’t feel endless. Here’s the hour by the clock. The details for each phase follow.
- 0:00 Chicken in. Heat the oven to 425°F. Cube and season the chicken, then get it roasting.
- 0:05 Eggs and grains on. Start 6 eggs, the rice and the pasta on the stove.
- 0:15 Roll-ups. Roll the turkey and cheese while everything cooks. They go straight into the fridge.
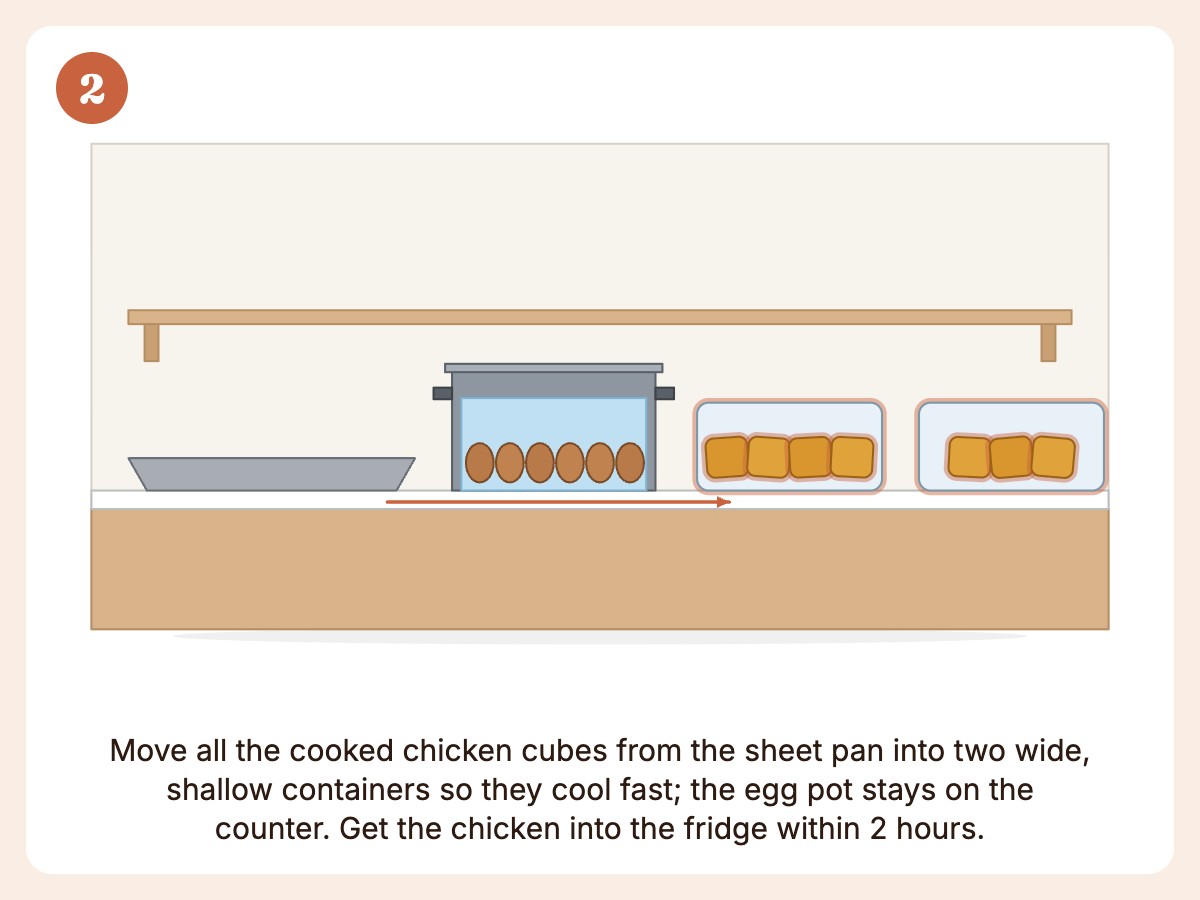
- 0:25 Wash and cut. Spread the cooked food in shallow containers to cool. Prep the carrots, cucumbers, peppers, grapes and berries.
- 0:45 Portion, label and chill. Bag the snacks. Chicken, eggs and rice go in the fridge. Friday’s pasta goes in the freezer.
Phase 1: Cook the Proteins and Grains (25 minutes)
Get the chicken into the oven first, then work down this list while it roasts.
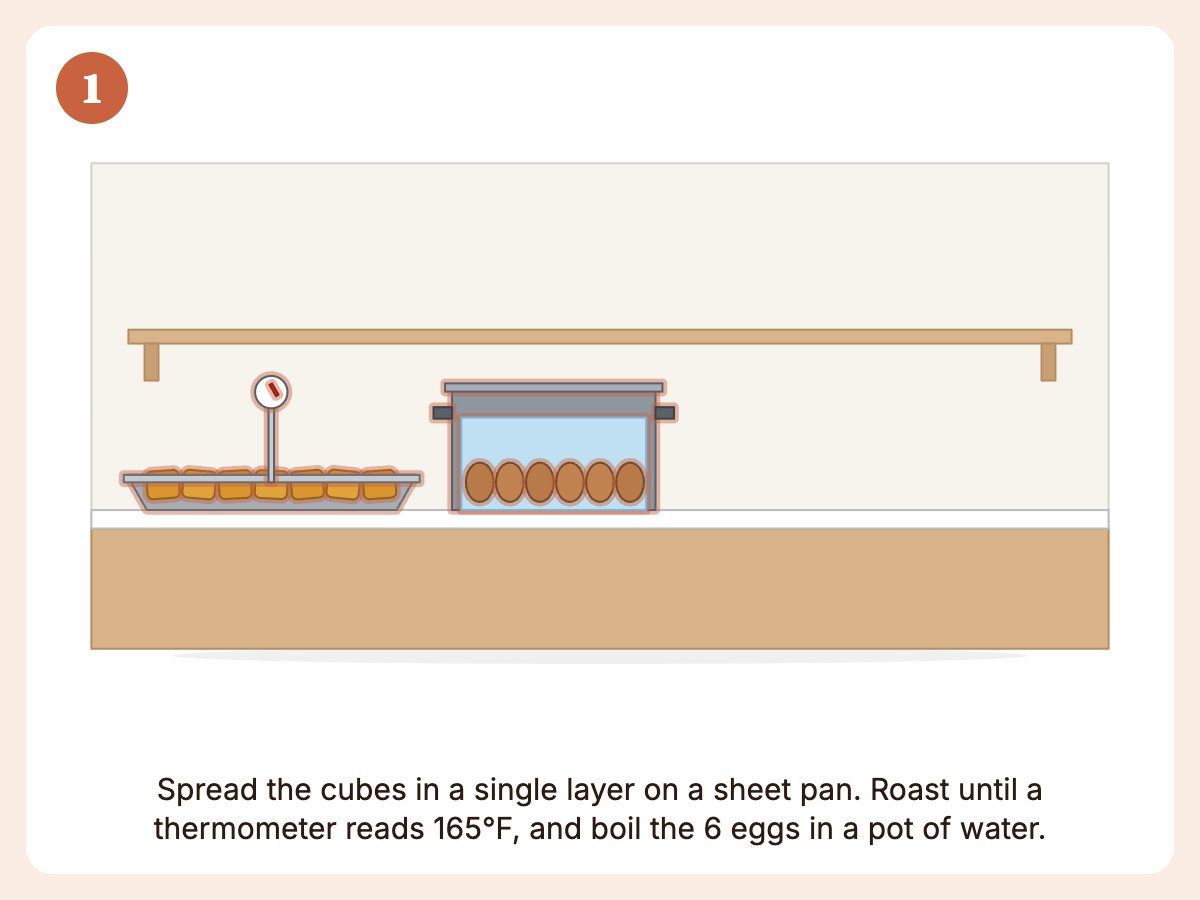
- Sheet-pan chicken. Toss about 1.5 lbs of cubed chicken thighs with oil and simple seasoning. Roast in a single layer at 425°F for 15-20 minutes, and start checking at 15. It’s done when a food thermometer reads 165°F in the thickest piece. That makes 5-6 kid-size portions: Tuesday’s lunches plus extra. Eat it by Wednesday or freeze what’s left.
- Hard-boil 6 eggs. That covers Wednesday’s lunches plus a few for snacks. Kept cold and unpeeled, they keep up to 7 days in the fridge (USDA).
- Turkey or ham roll-ups. No cooking here. Roll deli meat around a cheese stick; no pick needed. Make only what you’ll pack Monday and Tuesday, and keep them in a sealed container in the fridge. Opened deli meat keeps 3-5 days, so roll a fresh batch midweek if you want more. Always pack them with ice packs.
- Rice for Tuesday, pasta for Friday. Plan about 1 cup cooked per lunch. Cool both quickly in shallow containers and get them cold within 2 hours of cooking. The rice goes in the fridge. Friday’s pasta goes in the freezer and moves to the fridge on Thursday night. Reheat the rice to 165°F before it goes in a thermos.
Phase 2: Wash, Cut, and Portion Produce (20 minutes)
This is the step people skip and then regret every morning. If produce isn’t cut and portioned, it won’t make it into the lunchbox on a rushed Tuesday.
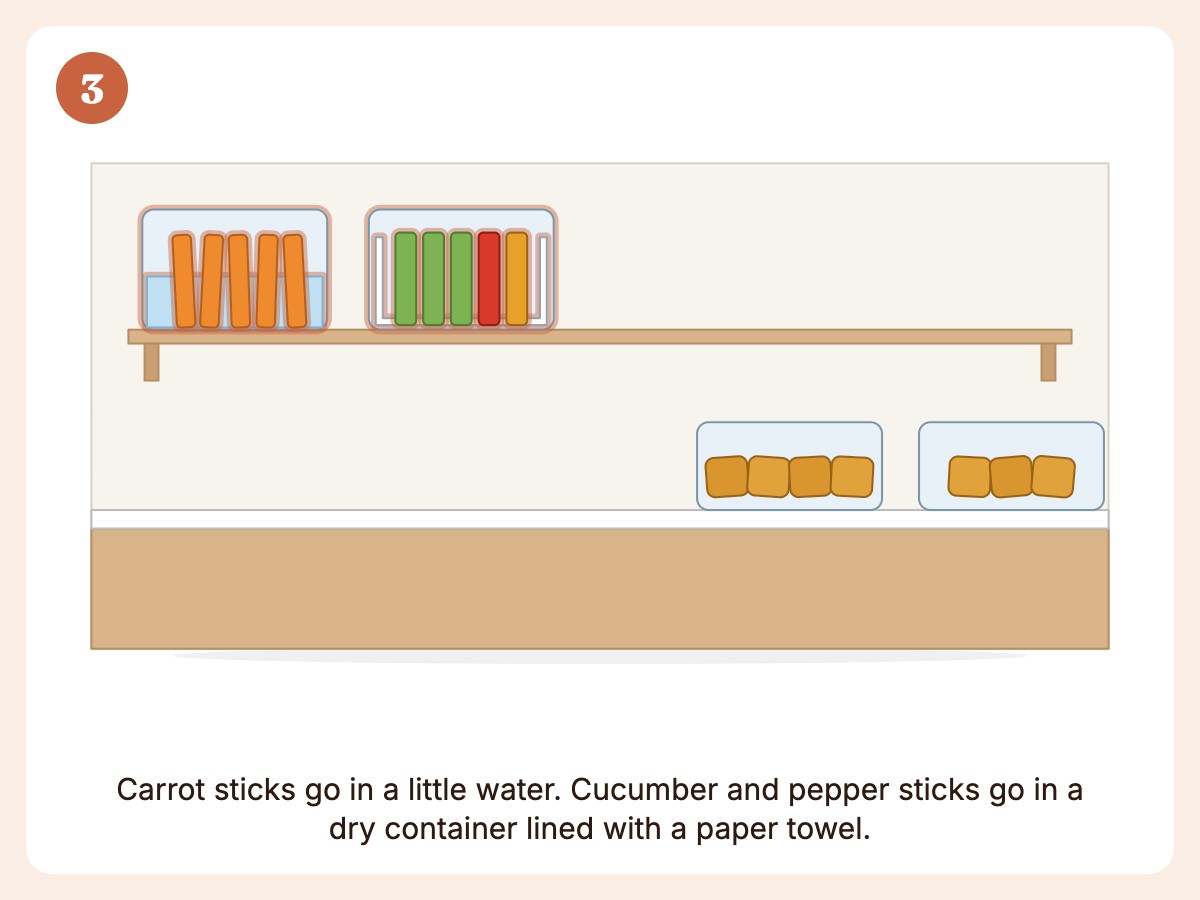
- Sunday: wash all the fruit and cut the sturdy veggies. Carrot sticks keep 4-5 days in a little water in a sealed container; change the water every day or two. Cucumber and pepper keep 3-4 days in a dry container lined with a paper towel.
- Sunday: portion the grapes and berries. Small containers mean nobody’s counting out grapes at 7 a.m. Quarter grapes lengthwise for children under 4, and halve or smash blueberries and other round berries.
- Tuesday evening: slice the apples for Wednesday. Toss the slices in a little lemon juice or cold water to slow browning.
- Wednesday or Thursday evening: cut the melon for Friday. Scrub the rind first. Keep cut melon at 40°F or below and use it within 3-4 days.
At back-to-school time, lean into stone fruit, melon and early apples. Our Fall Produce Guide for Families shows what’s in season. Packing in spring? Use the spring produce guide instead.
Phase 3: Portion Snacks, Pack and Chill (15 minutes)
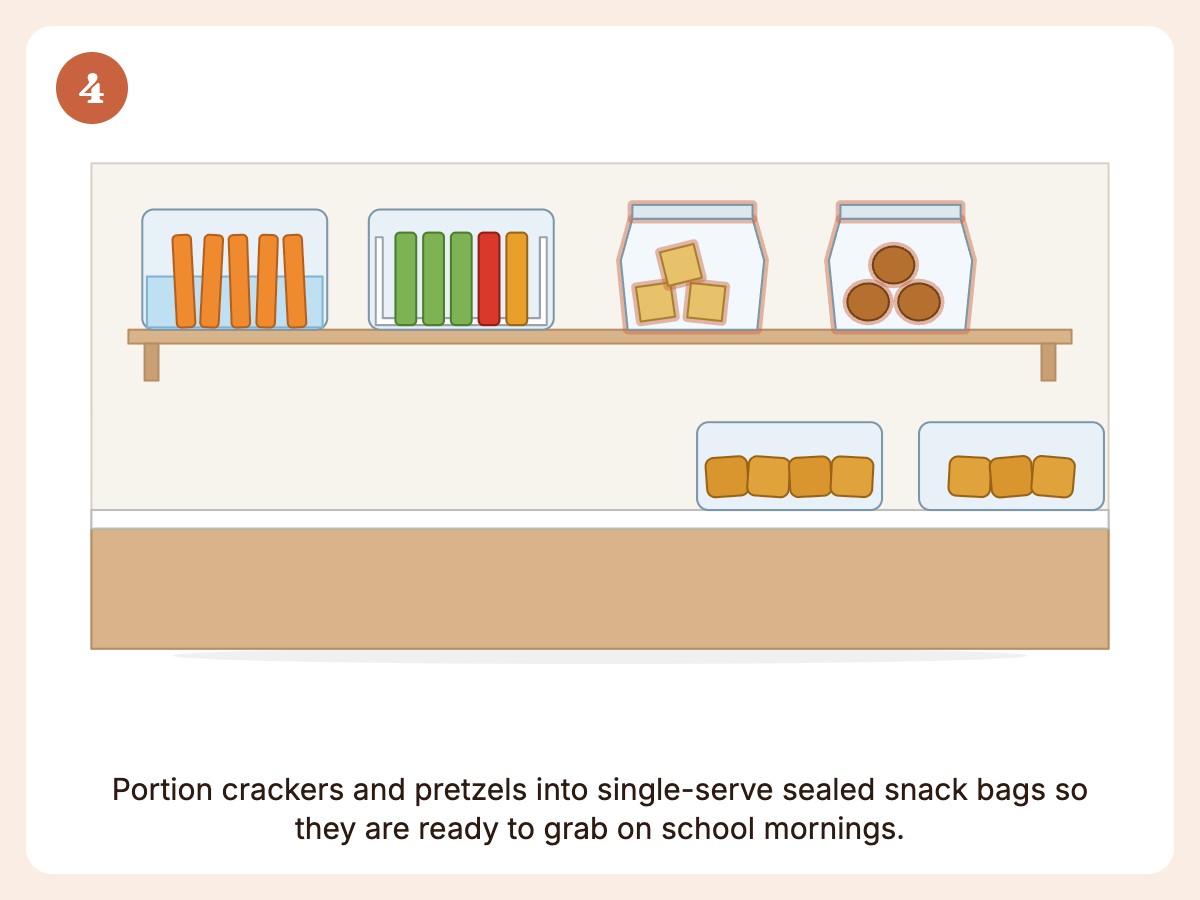
Divide crackers, pretzels, cereal, dried fruit and cheese cubes into single-serving containers or snack bags. Nuts and seeds go in only if your school allows them. For children under 4, skip whole nuts, seeds and whole dried fruit, and cut cheese cubes into thin sticks or small pieces.
This step probably saves more morning minutes than anything else here. Grabbing a pre-portioned bag takes two seconds. Portioning crackers from a family-size box while you hunt for a sock takes minutes you don’t have.
Finish by packing the cooled chicken, eggs, rice and pasta into labeled containers. Cooked food needs to be in the fridge or freezer within 2 hours of cooking. Chicken, eggs and rice go in the fridge. Friday’s pasta goes in the freezer.
Here’s how long each food keeps after a Sunday prep. Count Monday as day 1, so Wednesday is day 3.
| Food | Keeps in the fridge | Sunday prep: eat by | Freezer plan |
|---|---|---|---|
| Cooked chicken | 3-4 days | Wednesday | Freeze extra on Sunday; thaw overnight in the fridge |
| Cooked rice | 3-4 days | Wednesday (the sample week uses it Tuesday) | Freeze extra on Sunday; thaw overnight in the fridge |
| Cooked pasta | 3-4 days | Wednesday, if it stays in the fridge | Friday’s portion: freeze Sunday, move to the fridge Thursday night |
| Deli-meat roll-ups | 3-5 days once the deli pack is open | Tuesday; roll a fresh batch midweek | No |
| Hard-boiled eggs (unpeeled) | Up to 7 days | Friday | No |
| Carrot sticks in water | 4-5 days (change the water) | Thursday | No |
| Cucumber or pepper, dry | 3-4 days | Wednesday | No |
| Cut apples or melon | 3-4 days | Cut midweek; eat within 3-4 days | No |
Good to knowSunday’s chicken and rice stay in the fridge and get eaten by Wednesday. Thursday’s lunch has no cooked food in it. So the only thing this sample week freezes is Friday’s pasta: into the freezer on Sunday, into the fridge on Thursday night. Any chicken you won’t eat by Wednesday goes in the freezer too.
A Full Week of 10-Minute Lunches
This sample week comes from one Sunday session and the formula above. Nothing needs cooking in the morning. You’re just pulling pre-made components together. Monday’s box is the one I pack every single week: roll-ups, crackers and grapes.
Safety firstThis week is built without nut ingredients, but that isn’t the same as nut-free. Muffins, cookies, crackers, pretzels, chocolate chips and seed mixes often carry nut or cross-contact warnings, so check every label, every time. Hummus contains sesame (tahini), which is another major allergen. If you pack a seed mix, buy one labeled nut-free.
| Day | Protein | Carb | Fruit | Veggie/Crunch | Treat |
|---|---|---|---|---|---|
| Monday | Turkey & cheese roll-ups | Whole-grain crackers | Grapes (quartered for under 4) | Cucumber coins + ranch cup (quartered or cut into thin sticks for under 4) | 2-3 chocolate chips or a mini cookie |
| Tuesday | Sheet-pan chicken cubes (cold, or reheated in a thermos) | Sunday’s rice, reheated, in a thermos | Orange segments | Carrot sticks (shredded or steamed until soft for under 4) | Pretzel twists |
| Wednesday | Hard-boiled egg, halved | Tortilla for wrapping | Apple slices (very thin or cooked soft for under 4) | Bell pepper strips (thinly sliced or steamed for under 4) | Nut-free seed mix, if your school allows seeds (skip for under 4) |
| Thursday | Hummus (contains sesame) | Pita triangles | Berries (halved or smashed for under 4) | Snap peas (halved lengthwise or steamed for under 4) | Cheese crackers |
| Friday | Pasta with peas mixed in (Sunday’s frozen portion, thawed in the fridge from Thursday night) | (built into the pasta) | Melon cubes | Cherry tomatoes (quartered for under 4) | Mini muffin |
The why matters more than the specific menu:
- Tuesday and Friday reuse Sunday’s cooking. Tuesday’s chicken and rice come from the fridge, two days after cooking. Friday’s pasta went into the freezer on Sunday and moves to the fridge on Thursday night.
- Wednesday and Thursday keep it simple. Wednesday’s egg gets wrapped in the tortilla, and Thursday’s pita carries the hummus.
- Fruit gets cut midweek. Slice apples on Tuesday evening and melon on Wednesday or Thursday evening so they’re fresh.
- Nothing here needs cooking on a weekday morning. Every item is already cooked, already cut, or shelf-stable and pre-portioned. The only optional heat is reheating Tuesday’s thermos food.
- This is a template, not a rulebook. Swap in whatever your kid actually eats. Bell pepper strips came home untouched at my house two weeks running, so Wednesday now gets cucumber again.
- The honest trade-off: batch prep means similar foods all week. Friday is the weakest lunch because the pasta has been frozen and thawed, and it gets the most grumbles at my house. If thawed pasta is a no-go for your kid, boil a fresh pot on Thursday night instead.
Safety firstPacking for a child under 4? Round, firm and small hard foods are choking risks. Cut or cook each one as shown in the chart below, leave out the foods in the last row, and always supervise eating.
How to prep each food for a child under 4:
| Food | For children under 4 |
|---|---|
| Grapes, cherry tomatoes | Quarter lengthwise |
| Cucumber coins | Quarter each coin, or cut into thin sticks |
| Raw carrots | Shred, or steam or cook until soft (no raw sticks or slices) |
| Apple slices | Slice very thinly, or cook until soft |
| Bell pepper strips | Slice thinly, or steam until soft |
| Snap peas | Halve lengthwise, or steam until soft |
| Cheese cubes, cheese sticks, roll-ups | Slice lengthwise, then into thin sticks or small pieces |
| Chicken cubes | Shred or cut into small pieces |
| Edamame, blueberries and other round berries | Smash or halve |
| Hot dogs, if you swap them in | Cut lengthwise, then into small pieces, never rounds |
| Leave out | Whole nuts, seeds and seed mix, whole dried fruit, whole popcorn, sticky fruit snacks |
The grocery list for this sample week. Check each label for nut or cross-contact warnings as you shop:
- Deli turkey and cheese sticks
- About 1.5 lbs chicken thighs
- 6 eggs
- Hummus (contains sesame), pita and tortillas
- Pasta, rice and frozen peas
- Whole-grain crackers, pretzels, cheese crackers
- Grapes, oranges, apples, berries, melon
- Cucumbers, carrots, bell peppers, snap peas, cherry tomatoes
- Ranch dip, mini muffins, chocolate chips or mini cookies
- Nut-free seed mix, if your school allows seeds
Want more variety without more prep time? Our no-fuss picnic lunch ideas are no-reheat combos that slot into this same formula.
Set Up a Grab-and-Go Lunch Station
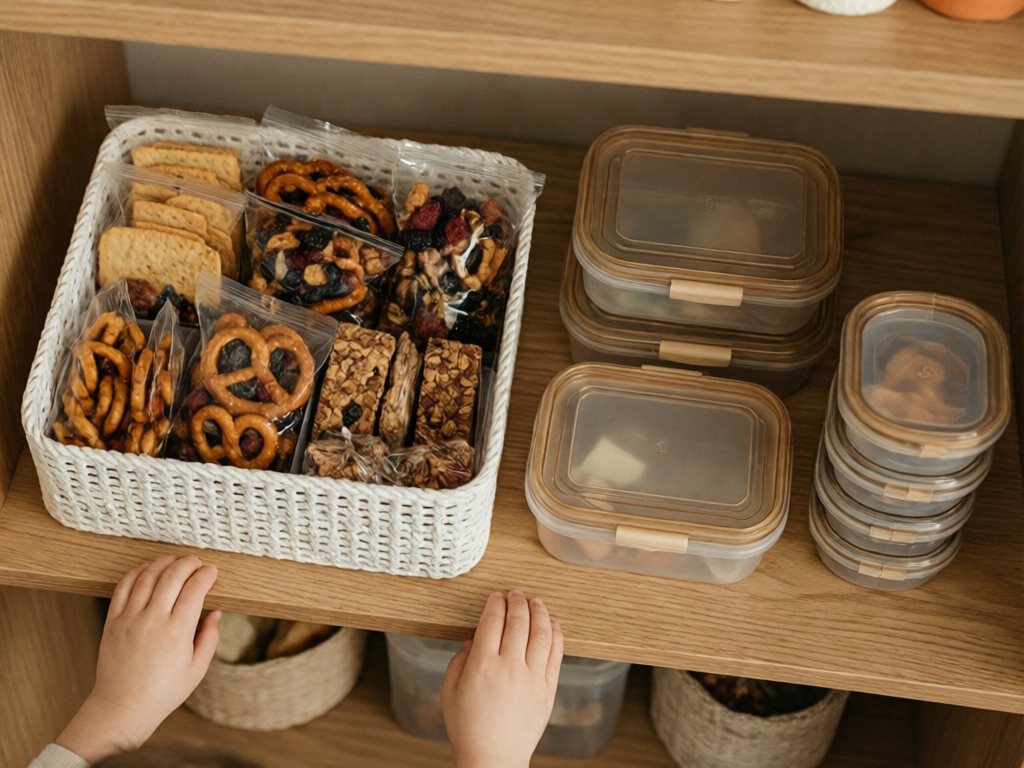
A batch-prep session is wasted if everything goes back into a chaotic fridge you have to search every morning. You need a lunch station: one dedicated, visible zone where finding ingredients becomes grabbing a bin. This setup works for us:
- One fridge shelf or drawer labeled Lunch. Nothing else lives there. Prepped proteins, cut produce and portioned dairy all go in this one spot. Use clear containers so kids can see what’s available and pull their own components.
- One pantry bin for shelf-stable snacks. Crackers, pretzel bags, granola bars and dried fruit go here, already portioned. Same rule: nothing else lives in the bin.
- Lunchboxes staged the night before. Set out boxes and containers after dinner cleanup instead of pulling them from the dishwasher at 7 a.m. It takes about 90 seconds.
- A packing checklist taped inside a cabinet door. List protein, carb, fruit, veggie, treat and water bottle. Many 7-year-olds can pack from pre-cut items with a little help; adults still do the cutting. For more on building independence, see our age-by-age guide to teaching kids to cook.
Pack Lunches Safely: Ice Packs and Thermos Rules
Back-to-school season often overlaps with the last stretch of summer heat, so food safety deserves a real mention.
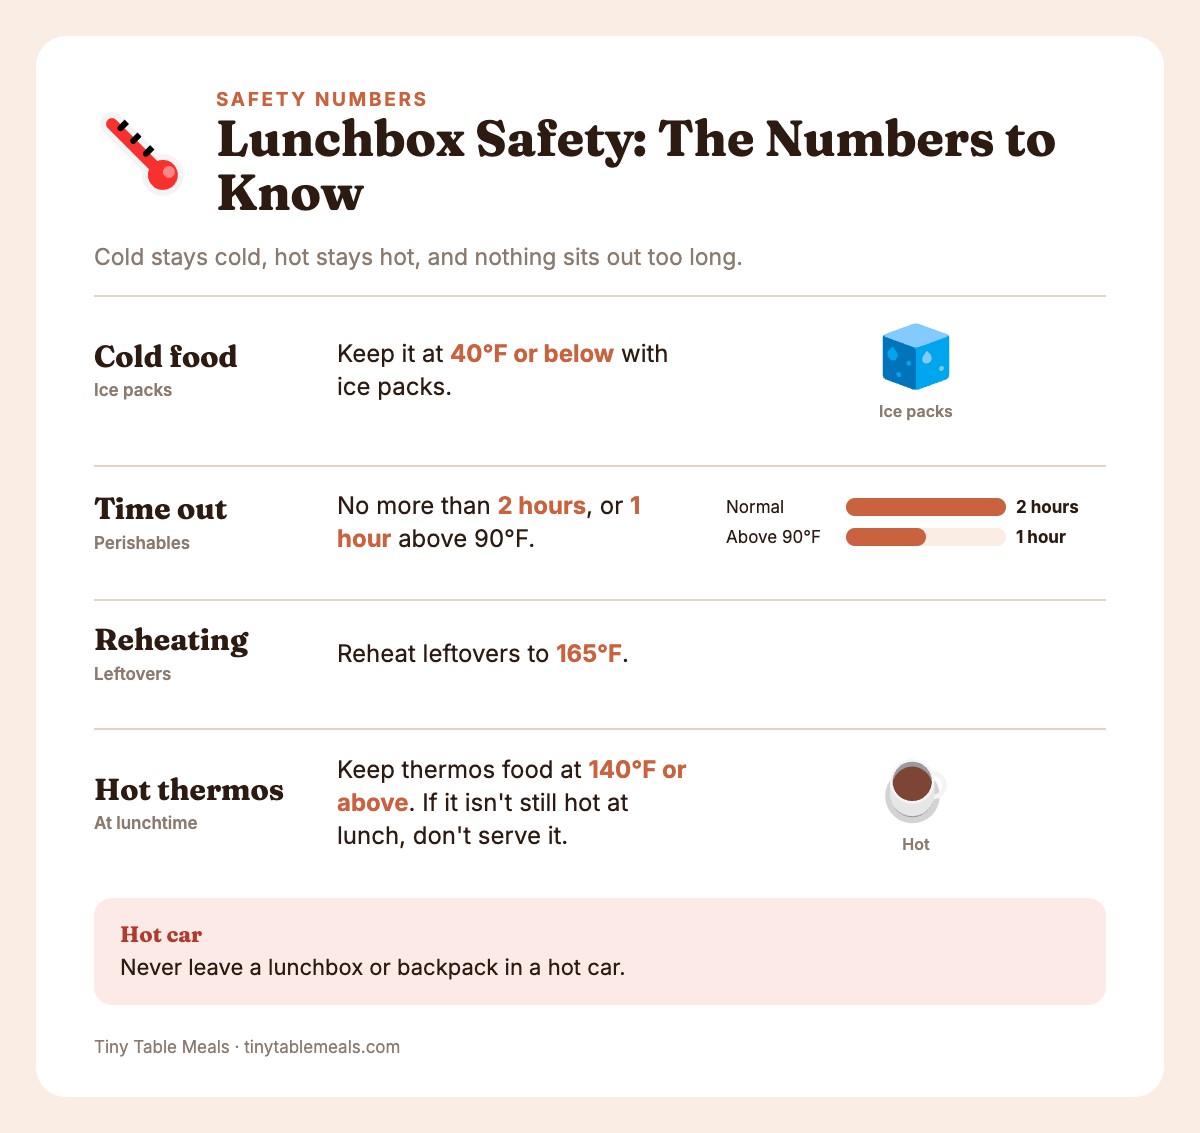
Safety firstKeep cold food at 40°F or below with ice packs. Perishables shouldn’t sit out more than 2 hours, or 1 hour above 90°F. Never leave a lunchbox or backpack in a hot car. Reheat leftovers to 165°F and keep thermos food at 140°F or above. If it isn’t still hot at lunch, don’t serve it.
Here’s my morning packing check.
- Two ice packs from the freezer for cold food
- Thermos preheated for hot food, or pre-chilled for cold
- Snacks that fit the school’s allergy rules
- Water bottle
How I set up cold and hot lunches.
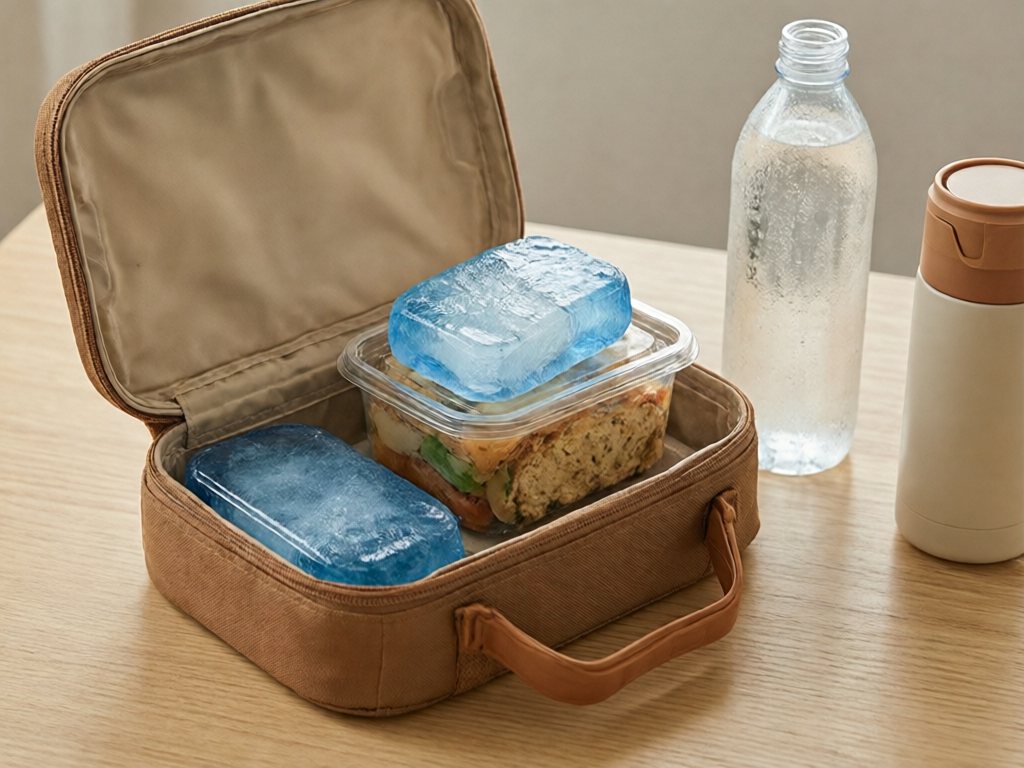
- Use two ice packs, not one. Put one on top of the food and one underneath, so perishables sit between two cold sources.
- A frozen water bottle can stand in for one ice pack. Use a plastic (not glass) water bottle, filled about 3/4 full so it can expand, and freeze it overnight. Don’t rely on a frozen drink as the only cold source.
- Cold thermos: Pre-chill it with ice water for a few minutes, or in the fridge, then add the cold food. It still needs an ice pack next to it in an insulated box.
- Hot thermos: Fill it with boiling water for a minute, then dump it out. Add the reheated food right away and close the lid.
What to Do When Your Kid Rejects the Lunch
Sooner or later your kid will decide they hate the sandwich they loved in June. That’s normal, especially around a new grade or a new school. It doesn’t mean your system is broken. The first weeks back bring a few other snags too.
A few things that help:
- Keep one safe item in every lunch. A kid who knows there’s one guaranteed-good bite is more likely to try the rest. Test new foods on weekends, when you have time to offer an alternative.
- Let them build their own lunch from the pre-approved bins. Choice within limits (pick 2 from this bin, 1 from that bin) usually means less pushback than a lunch that just appears.
- Food keeps coming home uneaten? Note which item it is and swap it out next week. It’s data, not a verdict on your parenting.
- “Everyone else has hot lunch.” Pack a wide-mouth thermos with mac and cheese, leftover soup, or warmed rice and chicken. No school microwave needed. See our hot lunch ideas for a thermos.
- Don’t know the classroom allergy rules yet? Pack nut-free until the school’s written policy comes home. Read labels every time, and follow your child’s allergy action plan if they have one. For diagnosed allergies, talk to the school nurse or allergist. Our nut-free school lunch ideas can fill the gap.
- Mornings still chaotic? Pack the night before, while the dinner dishes are still out. Keep the packed lunchbox in the fridge overnight and add the ice packs in the morning.
If lunch fights are a recurring theme, not just a back-to-school blip, try our Picky Eater Quiz. Sensory issues, control-seeking and plain dislike each call for a different strategy.
Budget and Nutrition Tweaks for School Lunches
Lunch supplies for multiple kids add up fast. Batch prep helps control that cost as well as your time.
- Buy proteins in bulk and portion them yourself. A family pack of chicken thighs usually costs less per pound than pre-portioned cuts. About 1.5 lbs already gives you 5-6 kid-size portions.
- Skip individually wrapped snacks and portion your own. A large bag of pretzels or crackers divided into reusable containers usually costs less per ounce than single-serve packs.
- Repeat proteins across meals. Cook a bigger batch of Sunday’s sheet-pan chicken and it covers Tuesday’s lunch and Tuesday’s dinner.
To stretch your grocery budget further, see our budget meal planning guide for families. The same batch-buying principles apply to lunch supplies.
Easy Fiber and Protein Swaps
Two swaps that add fiber or protein without adding prep time:
- Swap white crackers for a whole-grain version — same crunch, same speed, more fiber.
- Keep shelled edamame in the freezer. Move a portion to the fridge the night before so it thaws cold, then pack it next to an ice pack like any perishable. Smash or halve the beans for children under 4. Shelled only; the pods aren’t eaten, and soy is an allergen.
For more, see our fiber-rich meals and snacks for kids. They slot straight into the lunchbox formula above.
Start Small This Week
You don’t need a Pinterest-perfect bento box or new gadgets to get through back-to-school lunches. You need one calm hour on Sunday, a handful of pre-approved components in five categories, and one organized fridge shelf.
This Sunday, prep just three days: roast one tray of chicken, boil six eggs and portion the snacks. Add more days next week as it gets easier.
Frequently Asked Questions
How far in advance can I prep school lunches?
Cooked chicken, pasta and rice keep 3-4 days in the fridge, so use Sunday’s batch by Wednesday. Freeze anything cooked that’s meant for Thursday or Friday, and move it to the fridge the night before.
For eggs, roll-ups and cut produce, see the storage table in Phase 3 above.
What if my kid’s school has a nut-free policy?
Swap peanut or almond butter for sunflower seed butter or a bean-based dip like hummus. Hummus contains sesame (tahini), another major allergen, so check whether your school restricts it. Read the label on every packaged snack each time, since facility statements alone aren’t enough for severe allergies. Follow the school’s written policy and your child’s allergy action plan, and talk to the school nurse or allergist for diagnosed allergies. Cheese, yogurt, hummus, seeds (if allowed) and deli roll-ups all work as proteins made without nuts.
How do I keep sandwiches from getting soggy by lunchtime?
Spread a thin layer of butter or cream cheese on the bread before adding wetter ingredients like tomato or cucumber — it acts as a moisture barrier. Pack sauces, dressings and anything juicy in a separate small container. Your child can add it right before eating.
My kid refuses to eat cold lunches. Do I need a whole new system?
No — a good thermos solves most of this without adding real prep time. Cook a slightly larger dinner batch a few nights a week (pasta, rice bowls, soup) and refrigerate the extra. In the morning, reheat it to 165°F and pack it in a preheated thermos. It still comes from your existing batch-cooking, just served hot instead of cold.
How much food should actually go in an elementary schooler’s lunchbox?
Portions vary by age, appetite and activity, so treat the five slots as a starting point and let your child follow their hunger cues. Four slots is fine too. It’s better to slightly underpack and let them ask for more at home than to send a lunchbox so full it feels overwhelming.
Can I freeze prepped lunch components to save even more time?
Yes, for cooked chicken, pasta, rice and muffins. Thaw chicken, pasta, rice and sandwiches overnight in the fridge, never on the counter, then pack them with ice packs. Muffins can go in frozen. Thaw frozen shelled edamame in the fridge overnight as well, and keep it next to an ice pack like any perishable. Fresh-cut produce and hard-boiled eggs don’t freeze well, so keep those in the weekly fresh rotation.
What’s the single best thing to prep on Sunday if I only have 20 minutes?
Batch-cook one protein and pre-portion your snacks. Those two steps remove the biggest morning bottlenecks: deciding on a protein and digging through a big bag of crackers. You can cut produce later in the week.