5 One-Pan Spring Dinners the Whole Family Will Love (Ready in 30 Minutes)
Discover 5 family-loved, one-pan spring dinners ready in 30 minutes. You'll learn how this strategy reduces cleanup, enhances flavor, and leverages seasonal produce for stress-free weeknights.
- Reduce cleanup to just one pan (or zero with parchment paper).
- Enhance flavors as ingredients roast and caramelize together.
- Leverage spring produce for naturally delicious, budget-friendly meals.
- Easily batch cook for leftovers and simple meal prep.
It’s 5:32 PM on a Wednesday. I know this because I just looked at my phone in a moment of rising panic, standing in front of an open refrigerator, with a toddler attached to my leg and a seven-year-old asking if we can have “the good noodles” for dinner.
I have half a bunch of asparagus that’s starting to look questioning. A lemon that’s been rolling around the fruit bowl for a week. Some chicken thighs that I optimistically defrosted this morning. And approximately zero desire to dirty more than one pan.
Sound familiar?
Here’s what I’ve learned after years of weeknight dinner panic: the gap between “I have no plan” and “dinner is on the table” doesn’t have to be filled with stress, four different pots, and a sink full of dishes. It can be filled with one pan, thirty minutes, and whatever seasonal produce your fridge happens to contain.
I used to think one-pan dinners were a compromise — the kind of meal you make when you’ve given up on cooking “real” food. I was wrong. One-pan dinners are a strategy. They concentrate flavors because everything roasts and caramelizes together. They use seasonal ingredients that don’t need much fussing. And they leave you with exactly one pan to wash, which on a Wednesday night feels like a genuine gift from the universe.
This spring, I’ve been rotating five one-pan dinners that my entire family loves — both kids, my husband, and me. Not “tolerates.” Not “eats after extensive negotiation.” Actually loves. Asks for seconds. Requests by name. These are the five, and I’m giving you everything: full recipes, kid modifications, nutrition info, storage tips, and the honest truth about which ones my picky eater fought me on (and how I won).
Why One-Pan Dinners Are a Game Changer for Families
Before we get into the recipes, let me make the case for why one-pan cooking should be your default weeknight strategy, especially during spring when the produce is doing most of the work for you.
Less Cleanup, More Evening
Let’s start with the most obvious benefit: dishes. The average family dinner generates 4-6 pots, pans, and cooking vessels. A one-pan dinner generates one. If you line that pan with parchment paper (which I do about 80% of the time), you generate effectively zero. The time you save on cleanup is time you get back for baths, bedtime stories, or sitting on the couch staring at a wall — all equally valid uses of your evening.
Better Flavor Through Simplicity
When you roast vegetables alongside protein on a single sheet pan, the juices mingle. Fat from the chicken bastes the potatoes. The natural sugars in asparagus caramelize against the heat of the pan. Garlic perfumes everything it touches. You get depth of flavor that actually requires less effort than cooking components separately, because the oven is doing the work of combining flavors that would otherwise need sauces, reductions, or time.
Naturally Batch-Friendly
Every recipe in this article makes 4-6 servings. Leftovers reheat beautifully for lunch the next day. If you’re already into meal prep, one-pan dinners are the easiest thing to double — just use two sheet pans and add five minutes of prep time. You’ve now got dinner tonight and lunch for two days.
Spring Produce Does the Heavy Lifting
Spring vegetables are so naturally flavorful that they need almost nothing to taste incredible. A drizzle of olive oil, some salt, and high heat is enough to turn asparagus, snap peas, new potatoes, and spring onions into something that tastes restaurant-quality. You’re not masking flavor with heavy sauces — you’re showcasing ingredients at their peak. This is the easiest time of year to make simple food taste extraordinary.
Spring Produce That Makes Everything Better
Cooking seasonally isn’t just a foodie trend. It’s a practical strategy for making weeknight dinners taste better while spending less money. Produce that’s in season is cheaper (supply and demand), more nutritious (shorter time from harvest to plate), and vastly more flavorful than out-of-season alternatives that were picked early and shipped across the planet.
Here’s what’s at peak season right now and how it shows up in the recipes below. For a deeper dive into what’s available and how to use it all, check out my full spring produce guide for families.
| Produce | Peak Season | Flavor Profile | Best Cooking Method | Kid Appeal |
|---|---|---|---|---|
| Asparagus | April-June | Earthy, slightly sweet, grassy | Roasted at high heat (425F) until tips are crispy | Medium — crispy tips are the gateway |
| Snap peas | April-June | Sweet, crunchy, fresh | Quick sautee or raw | High — naturally sweet, fun to snap open |
| New potatoes | April-July | Creamy, buttery, mild | Roasted until golden and crispy | Very high — it’s potatoes |
| English peas | April-June | Sweet, bright, delicate | Briefly blanched or added at the end | High — frozen peas are already a kid staple |
| Artichokes | March-May | Nutty, buttery, complex | Roasted, braised, or jarred (marinated) | Medium — start with marinated hearts |
| Spring onions | March-June | Mild, sweet, less sharp than regular onions | Roasted whole or sliced into rings | Medium — milder than they expect |
| Spinach | March-June | Mild, slightly earthy, wilts quickly | Stirred into pasta/grains at the end | Low raw, medium cooked (disappears into sauces) |
| Radishes | April-June | Peppery raw, sweet roasted | Roasted (transforms the flavor completely) | Low raw, high roasted (they turn buttery) |
| Fava beans | April-June | Creamy, nutty, slightly bitter | Blanched and peeled, then sauteed | Medium — similar texture to edamame |
| Strawberries | April-June | Sweet, juicy, fragrant | Fresh for dessert after dinner | Extremely high — obviously |
Now let’s cook.
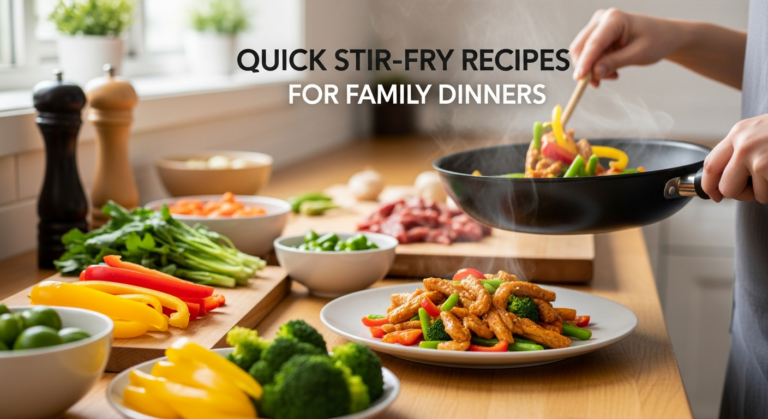
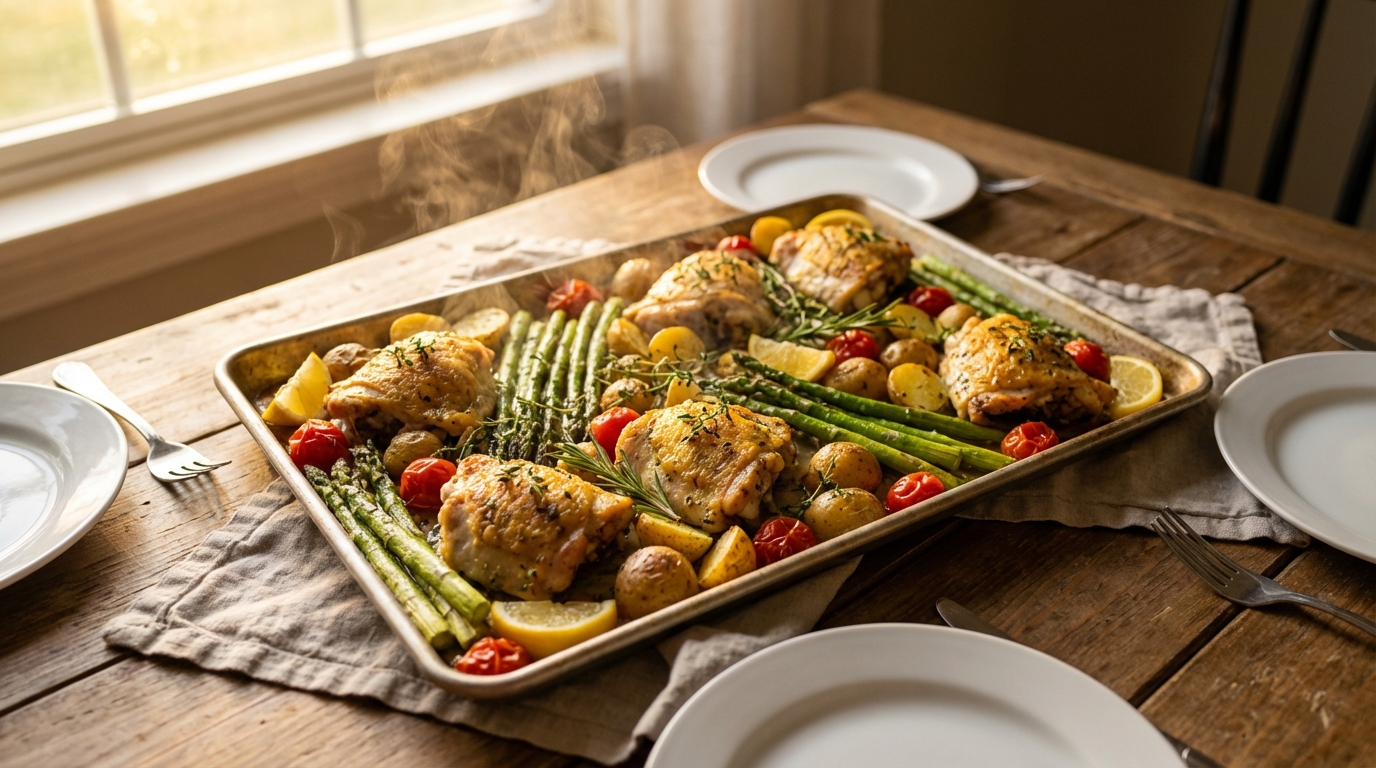
Recipe 1: Lemon Herb Chicken with Asparagus and New Potatoes
This is the one that started it all for me. The first time I made it, I was just trying to use up what I had. It turned out so good that it’s become our Tuesday-night staple. The lemon brightens everything, the herbs make the kitchen smell incredible, and the chicken thighs get impossibly crispy while the potatoes turn golden and creamy inside.
Ingredients
For the chicken and vegetables:
- 6 bone-in, skin-on chicken thighs (about 2.5 lbs)
- 1.5 lbs baby new potatoes, halved (quartered if large)
- 1 bunch asparagus (about 1 lb), tough ends snapped off, cut into 2-inch pieces
- 4 cloves garlic, smashed
- 1 lemon, half juiced and half sliced into thin rounds
For the seasoning:
- 3 tbsp olive oil, divided
- 1 tsp dried oregano
- 1 tsp dried thyme
- 1/2 tsp garlic powder
- 1/2 tsp onion powder
- 1/2 tsp smoked paprika
- 1 tsp salt
- 1/2 tsp black pepper
- Fresh parsley for serving (optional but pretty)
Instructions
- Preheat your oven to 425F. Line a large sheet pan (18×13 rimmed baking sheet) with parchment paper. This isn’t optional — the lemon juice will bond to an unlined pan like cement.
- Prep the potatoes. Toss halved potatoes with 1 tbsp olive oil, half the salt, and a pinch of pepper. Spread on the sheet pan in a single layer. Roast for 10 minutes while you prep everything else. (This head start is key — potatoes take longer than everything else, and starting them early means everything finishes together.)
- Season the chicken. Pat chicken thighs very dry with paper towels (this is the secret to crispy skin). Mix remaining 2 tbsp olive oil with the lemon juice, oregano, thyme, garlic powder, onion powder, smoked paprika, remaining salt, and pepper. Rub all over the chicken thighs.
- Assemble the pan. Remove the pan from the oven. Push the potatoes to the edges. Nestle chicken thighs skin-side up in the center. Scatter smashed garlic and lemon slices around the chicken.
- Roast for 20 minutes at 425F.
- Add the asparagus. Remove pan, scatter asparagus pieces in any available space, and return to the oven for 8-10 more minutes, until the chicken reaches 165F internally, the potatoes are golden, and the asparagus tips are crispy.
- Rest and serve. Let the pan rest for 5 minutes. Squeeze any remaining lemon over the top, sprinkle with fresh parsley, and serve directly from the pan.
Total active time: 12 minutes. Total cook time: 38-40 minutes.
Kid-Friendly Modifications
- Asparagus resistance: If your kids won’t touch asparagus, cut the spears very short (1-inch pieces) so the tips get extra crispy. Crispy asparagus tips taste more like a chip than a vegetable. Alternatively, swap in green beans or broccoli florets.
- Lemon sensitivity: Some kids find lemon too tart. Use half the lemon juice in the seasoning and skip the lemon slices on their portion. The herbs and garlic carry plenty of flavor without it.
- Bone-in chicken: If your kids prefer boneless, use boneless skinless thighs instead. Reduce the roasting time by 5 minutes. The result is slightly less flavorful but still delicious and easier for small hands.
Nutrition Highlights
Each serving (1 chicken thigh + potatoes + asparagus) provides approximately:
- 380 calories
- 32g protein
- 18g fat
- 22g carbohydrates
- Excellent source of vitamin C (lemon + asparagus), potassium (potatoes), and B vitamins (chicken thighs)
Chicken thighs are one of the most affordable high-protein options for families, and they’re more forgiving than breasts — nearly impossible to overcook.
Storage and Reheating
- Fridge: Store leftovers in an airtight container for up to 4 days.
- Reheat: 375F oven for 10-12 minutes to re-crisp the skin. Microwave works but sacrifices the crispy skin and makes the asparagus a bit limp.
- Freezer: Not recommended — the potatoes and asparagus don’t freeze well. The chicken alone freezes beautifully for up to 3 months.
Recipe 2: Honey Garlic Salmon with Snap Peas and Rice
This is the dinner I make when I want my kids to eat fish without realizing they’re eating fish. The honey garlic glaze is sweet enough to win over even die-hard fish skeptics, and snap peas are one of those rare vegetables that kids eat voluntarily because they’re sweet, crunchy, and fun to pop open.
Ingredients
For the salmon:
- 4 salmon fillets (about 6 oz each, skin-on)
- 2 cups sugar snap peas, strings removed
- 1 cup shelled edamame (frozen is fine)
- 2 green onions, thinly sliced
For the honey garlic sauce:
- 3 tbsp honey
- 2 tbsp soy sauce (or tamari for gluten-free)
- 1 tbsp rice vinegar
- 3 cloves garlic, minced
- 1 tsp fresh ginger, grated (or 1/2 tsp ground)
- 1 tsp sesame oil
- Pinch of red pepper flakes (omit for kids)
For the rice:
- 2 cups jasmine rice
- Sesame seeds for garnish
Instructions
- Start the rice. Rinse 2 cups jasmine rice until the water runs mostly clear. Cook according to your preferred method (rice cooker, stovetop, or Instant Pot). This runs in the background while you handle the pan.
- Make the sauce. Whisk together honey, soy sauce, rice vinegar, garlic, ginger, sesame oil, and red pepper flakes (if using). Set aside.
- Preheat your oven to 400F. Line a sheet pan with parchment paper.
- Prep the salmon. Pat fillets dry. Place skin-side down on the prepared sheet pan, leaving space between each fillet. Pour half the sauce over the salmon, brushing to coat evenly.
- Roast for 10 minutes. Remove the pan, scatter snap peas and edamame around the salmon, and drizzle the remaining sauce over everything.
- Roast for 8-10 more minutes, until the salmon flakes easily with a fork and the snap peas are bright green and just tender.
- Serve over rice. Spoon any pan sauce over the top. Garnish with sliced green onions and sesame seeds.
Total active time: 10 minutes. Total cook time: 20-22 minutes (plus rice time).
Kid-Friendly Modifications
- “I don’t like fish”: The honey garlic glaze is your secret weapon. It caramelizes during roasting and creates a sweet, sticky coating that masks any “fishy” flavor. If your child is truly fish-averse, start with a small portion alongside foods they already love. No pressure, no commentary.
- Texture concerns: Some kids dislike the flaky texture of salmon. Try pressing the cooked salmon gently with a fork to break it into smaller pieces and mixing it into the rice. “Salmon rice bowls” feel completely different from “a piece of fish on a plate.”
- Snap pea strings: Those fibrous strings along the seam of snap peas bother some kids. Remove them before cooking — just snap the tip and pull. It takes two minutes for the whole batch and removes the most common texture complaint.
- Spice level: Omit the red pepper flakes entirely for young kids. The honey and garlic carry all the flavor you need.
Nutrition Highlights
Each serving (1 salmon fillet + snap peas + edamame + 3/4 cup rice) provides approximately:
- 520 calories
- 38g protein
- 16g fat
- 52g carbohydrates
- Excellent source of omega-3 fatty acids (salmon), vitamin C and K (snap peas), and complete plant protein (edamame)
Salmon is one of the best sources of DHA omega-3s, which support brain development in children. The American Academy of Pediatrics recommends kids eat fish 1-2 times per week. This recipe makes that recommendation actually achievable.
Storage and Reheating
- Fridge: Store salmon and vegetables separate from rice for up to 3 days.
- Reheat: Gently — 300F oven for 8 minutes, or microwave at 50% power. Salmon dries out quickly when overheated.
- Freezer: Cooked salmon freezes well for up to 2 months. Rice freezes separately for up to 3 months. Snap peas don’t freeze well after cooking.
Recipe 3: Sheet Pan Sausage with Spring Vegetables
This is the one I make when I’m too tired to think. It requires approximately four decisions (choose sausage, choose vegetables, add oil, set oven) and rewards you with a hearty, flavorful dinner that looks like you tried way harder than you did. It’s also the most flexible recipe in this collection — swap any vegetable, any sausage, any seasoning, and it still works.
Ingredients
For the sheet pan:
- 1.5 lbs Italian sausage links (sweet or mild — I use chicken sausage for a lighter option)
- 1 lb new potatoes, quartered
- 1 bunch asparagus, cut into 2-inch pieces
- 1 large red bell pepper, cut into thick strips
- 1 medium zucchini, sliced into half-moons
- 1 pint cherry tomatoes
- 4-5 spring onions, trimmed and halved lengthwise
- 5 cloves garlic, peeled and left whole
For the seasoning:
- 3 tbsp olive oil
- 1 tsp Italian seasoning
- 1/2 tsp garlic powder
- 1/2 tsp smoked paprika
- 1 tsp salt
- 1/2 tsp black pepper
- Fresh basil for serving
Instructions
- Preheat oven to 400F. Line two sheet pans with parchment paper (or use one very large pan if you have one — crowding leads to steaming instead of roasting).
- Prep and par-roast the potatoes. Toss quartered potatoes with 1 tbsp olive oil and a pinch of salt. Spread on one pan and roast for 10 minutes. (Same head-start trick as Recipe 1.)
- Prep the sausage and vegetables. While potatoes par-roast, slice sausage links into 1-inch rounds (or leave whole and slice after cooking for juicier results). Toss asparagus, bell pepper, zucchini, cherry tomatoes, spring onions, and garlic with remaining 2 tbsp olive oil, Italian seasoning, garlic powder, smoked paprika, salt, and pepper in a large bowl.
- Assemble. Remove the potatoes from the oven. Add the sausage rounds and seasoned vegetables to the pan(s), spreading everything in a single layer. Don’t crowd — airflow is what creates caramelization.
- Roast for 20-25 minutes, tossing once halfway through, until sausage is cooked through (165F internal) and vegetables are golden at the edges.
- Finish and serve. Remove from oven, tear fresh basil over the top, and serve directly from the pan. Optional: a drizzle of balsamic glaze takes this to another level.
Total active time: 10 minutes. Total cook time: 30-35 minutes.
Kid-Friendly Modifications
- Sausage choice matters: Mild Italian chicken sausage is the most universally kid-friendly option. Avoid hot sausage or anything with visible fennel seeds, which some kids find surprising. Pre-cooked sausages (like Aidells brand) work too and reduce cook time.
- Vegetable negotiations: If your kids won’t eat “mixed vegetables,” try this: give them a section of the pan with just potatoes and sausage, plus one vegetable of their choice. Exposure without pressure. Over time, the other vegetables start looking more interesting when they see you eating them.
- Cherry tomato caution: Roasted cherry tomatoes burst and release hot juice. For young kids, let them cool for several minutes and/or cut in half before serving.
- Dipping sauce: Ketchup. I know. But a small cup of ketchup for dipping sausage and potatoes turns this from “dinner” into “fun dinner” for many kids. Choose your battles.
Nutrition Highlights
Each serving (approximately 1/4 of the pan) provides:
- 420 calories
- 28g protein
- 22g fat
- 30g carbohydrates
- Excellent source of vitamins A and C (bell pepper, tomatoes), potassium (potatoes), and B vitamins (sausage)
Using chicken or turkey sausage instead of pork cuts the fat by about 40% with minimal flavor difference, especially when you have all these roasted vegetables contributing flavor.
Storage and Reheating
- Fridge: Store everything together in an airtight container for up to 4 days. This is genuinely great as leftovers.
- Reheat: 400F oven for 10 minutes. The vegetables re-crisp nicely. Microwave works in a pinch but the textures suffer.
- Freezer: The sausage and potatoes freeze well for up to 3 months. The vegetables get soft but are still good mixed into pasta or grain bowls.
- Meal prep note: This is the easiest recipe in this collection to double. Two sheet pans, same oven, same time — now you have lunch for the week.
Recipe 4: One-Pan Creamy Lemon Pasta with Peas and Spinach
Every family needs a pasta recipe that takes less time than ordering delivery and tastes like you spent an hour on it. This is that recipe. It’s creamy without being heavy, bright with lemon, and packed with more vegetables than your kids will realize because the spinach literally melts into the sauce. I call this my “stealth vegetable” dinner.
This one uses a large skillet or saute pan on the stovetop rather than the oven — still one pan, still thirty minutes, still minimal cleanup.
Ingredients
For the pasta:
- 1 lb short pasta (penne, rotini, or orecchiette)
- 2 tbsp butter
- 3 cloves garlic, minced
- 2 cups chicken or vegetable broth
- 1 cup whole milk (or half-and-half for extra richness)
- 1 cup frozen peas
- 3 big handfuls fresh baby spinach (about 4 cups, loosely packed)
- 1/2 cup freshly grated Parmesan cheese, plus more for serving
- Zest and juice of 1 large lemon
- Salt and pepper to taste
- Fresh basil, torn (optional)
Instructions
- Melt butter in a large, deep skillet or saute pan (12-inch with high sides works best) over medium heat. Add garlic and cook for 30 seconds until fragrant — don’t let it brown.
- Add the broth, milk, and pasta. Yes, raw pasta straight into the liquid. Stir to combine. The pasta will cook directly in the sauce, absorbing all that flavor and releasing starch that makes the sauce creamy without cream.
- Bring to a boil, then reduce to a steady simmer. Cook uncovered, stirring every 2-3 minutes to prevent sticking, for 12-15 minutes until the pasta is al dente and most of the liquid has been absorbed. The sauce should be creamy and coating the pasta, not soupy. If it’s too thick, add a splash of broth. If it’s too thin, cook another minute or two.
- Add the peas and spinach. Stir the frozen peas directly into the hot pasta — they’ll thaw in about a minute. Add spinach by the handful, stirring each addition until it wilts before adding the next. This takes about 2 minutes total.
- Finish with lemon and cheese. Remove from heat. Stir in Parmesan, lemon zest, and lemon juice. Season with salt and pepper. The sauce will thicken as it sits, so serve promptly.
- Serve in bowls with extra Parmesan and torn basil on top.
Total active time: 15 minutes (mostly stirring). Total cook time: 18-20 minutes.
Kid-Friendly Modifications
- Spinach visibility: If your kids pick out green things, chop the spinach very finely before adding it to the pasta. It will melt into the sauce almost completely, turning it slightly green but with no identifiable spinach leaves. My son ate three bowls of this before he noticed it was “green pasta,” and by then he’d already decided he liked it.
- Lemon intensity: Start with half the lemon juice and taste. Some kids love the brightness; others find it too sour. You can always add more to individual adult servings.
- Pea texture: If your kids dislike the texture of whole peas (common in toddlers), pulse the frozen peas briefly in a food processor before adding them. They’ll blend into the sauce as tiny green specks — invisible but nutritious.
- Protein boost: Add shredded rotisserie chicken, diced cooked ham, or sauteed shrimp at the same time you add the peas. This turns a side-dish-level pasta into a complete protein-heavy dinner.
Nutrition Highlights
Each serving (approximately 1.5 cups) provides:
- 410 calories
- 18g protein
- 12g fat
- 58g carbohydrates
- Good source of calcium (Parmesan, milk), vitamin A (spinach), vitamin C (peas, lemon), and iron (spinach, pasta)
The combination of Parmesan and milk gives this dish a calcium content that rivals a glass of milk — good news for kids who won’t drink the stuff.
Storage and Reheating
- Fridge: Store in an airtight container for up to 3 days. The pasta will absorb the sauce as it sits, which is normal.
- Reheat: Add a splash of milk or broth when reheating (stovetop over medium-low or microwave) to restore the creamy consistency. Stir well.
- Freezer: Not ideal — cream-based pasta sauces can separate when frozen and reheated. If you must, freeze in portions and expect a slightly different texture.
Recipe 5: Mediterranean Chickpea Bake with Artichokes and Feta
This is the recipe I’m proudest of because it’s the one I least expected my kids to eat. Chickpeas. Artichokes. Feta. Olives. On paper, this is an adult dinner. In practice, something about the way everything roasts together — the chickpeas getting crispy, the feta going soft and salty, the artichokes turning golden — made it a family favorite. My seven-year-old calls it “the crunchy bean dinner” and requests it weekly.
It’s also the most budget-friendly recipe in this collection. Canned chickpeas, jarred artichokes, and frozen spinach do most of the work, and the whole thing costs about $8 to make for a family of four. If budget-friendly family meals are your priority, this one should be in heavy rotation.
Ingredients
For the bake:
- 2 cans (15 oz each) chickpeas, drained, rinsed, and patted dry
- 1 jar (14 oz) marinated artichoke hearts, drained and quartered
- 1 pint cherry tomatoes, halved
- 1/2 red onion, sliced into thin half-moons
- 4 cloves garlic, sliced
- 4 cups fresh baby spinach (or 1 cup frozen, thawed and squeezed dry)
- 6 oz feta cheese, cut into large cubes or crumbled
- 1/3 cup Kalamata olives, halved (optional — leave out for kids who aren’t olive fans)
For the seasoning:
- 3 tbsp olive oil
- 1 tsp dried oregano
- 1 tsp ground cumin
- 1/2 tsp smoked paprika
- 1/2 tsp garlic powder
- 1 tsp salt
- 1/2 tsp black pepper
- Squeeze of lemon juice
- Fresh herbs for serving (parsley, dill, or mint)
For serving:
- Warm pita bread, crusty bread, or cooked couscous
- A dollop of plain yogurt or tzatziki
Instructions
- Preheat oven to 425F. Line a large sheet pan with parchment paper.
- Season the chickpeas. Toss dried chickpeas with 2 tbsp olive oil, oregano, cumin, smoked paprika, garlic powder, salt, and pepper. Spread on the sheet pan in a single layer.
- Roast chickpeas for 15 minutes. You want them to start getting crispy on the outside — this is where the magic happens. Chickpeas that are merely warm are boring. Chickpeas that are roasted until crunchy are addictive.
- Add the vegetables. Remove pan from oven. Add artichoke hearts, cherry tomatoes, red onion, and sliced garlic. Toss with remaining 1 tbsp olive oil. Spread in a single layer (use two pans if needed to avoid crowding).
- Roast for 10 more minutes. The tomatoes should be blistered and the artichokes golden at the edges.
- Add spinach and feta. Scatter fresh spinach over the hot vegetables (it will wilt almost immediately from the residual heat). Dot large cubes of feta over the top. Return to the oven for 3-5 minutes, just until the feta softens and starts to get golden spots.
- Finish and serve. Remove from oven, squeeze lemon juice over the top, scatter with fresh herbs and olives (if using). Serve with warm pita, crusty bread, or over couscous, with a dollop of yogurt.
Total active time: 10 minutes. Total cook time: 28-30 minutes.
Kid-Friendly Modifications
- Chickpea skeptics: The key is getting them genuinely crispy in step 3. Crispy roasted chickpeas have more in common with croutons than with the mushy canned beans kids might be imagining. Let kids snack on a few crispy chickpeas before the full dish is assembled — once they realize these are crunchy and savory, they’re usually on board.
- Feta too strong: Feta can be intense for young palates. Substitute small cubes of mozzarella, which melt into mild, stretchy pockets that kids love. Or use a milder feta (French feta is creamier and less salty than Greek).
- Artichoke resistance: Some kids are wary of artichokes because they look unfamiliar. Cut them small so they blend in with the other vegetables rather than being a distinct, identifiable thing. Marinated artichoke hearts are much milder than fresh artichokes and have a texture similar to roasted zucchini.
- Olive aversion: Just leave them out. Olives are divisive even among adults. The dish doesn’t need them.
- Serving style: Instead of presenting this as a “bake,” serve it deconstructed for kids: a pile of crispy chickpeas, a few tomatoes, some warm pita torn into pieces, and a little bowl of feta cubes. Let them build their own bites. Same ingredients, completely different reception.
Nutrition Highlights
Each serving (approximately 1/4 of the pan + bread) provides:
- 380 calories
- 18g protein
- 19g fat
- 38g carbohydrates
- Excellent source of fiber (chickpeas — 12g per serving!), vitamin K (spinach), vitamin C (tomatoes), calcium (feta), and iron (chickpeas, spinach)
This is one of the most nutritionally dense recipes in this collection. Chickpeas are a powerhouse legume — high in protein, high in fiber, and one of the most affordable protein sources available. If you’re trying to incorporate more plant-based meals into your family’s rotation, this is the gateway recipe.
Storage and Reheating
- Fridge: Store in an airtight container for up to 4 days. The chickpeas will lose some crispiness but the overall flavor remains excellent.
- Reheat: 400F oven for 10 minutes to restore some crispiness. Alternatively, reheat in a skillet over medium heat — this actually re-crisps the chickpeas better than the oven.
- Freezer: Freezes well for up to 3 months (minus the feta — add fresh feta after reheating).
- Repurpose: Leftover chickpea bake is incredible stuffed into pita with fresh greens and tzatziki for lunch the next day.
Tips for Making One-Pan Dinners Work Every Night
After years of one-pan cooking, I’ve accumulated a collection of tricks that make the difference between “this is fine” and “this is genuinely great.”
Master the Sheet Pan Basics
- Don’t crowd the pan. This is the single most important rule. Vegetables that are touching each other steam rather than roast. Use two pans if you need to. The extra pan is still less cleanup than a multi-pot dinner.
- Use parchment paper. Always. It prevents sticking, makes cleanup trivial, and means you don’t have to grease the pan (fewer calories, less mess).
- Pat proteins dry. Whether it’s chicken, salmon, or tofu — dry surfaces brown. Wet surfaces steam. That crispy golden exterior comes from removing moisture before cooking.
- Stagger additions by cook time. Dense vegetables (potatoes, carrots, beets) go in first. Quick-cooking items (asparagus tips, spinach, cherry tomatoes) go in last. This way everything finishes at the same time.
- Hot oven, lower rack. 400-425F is the sweet spot for one-pan dinners. Position your rack in the lower third of the oven for maximum bottom heat, which is where caramelization happens.
The “Two Plus Three” Formula
If you need to improvise a one-pan dinner without a recipe, use this formula:
- One protein (chicken thighs, sausage, salmon, chickpeas, tofu)
- One starchy vegetable (potatoes, sweet potatoes, winter squash)
- Two non-starchy vegetables (whatever’s in season or in your fridge)
- One flavor base (lemon-herb, honey-garlic, Italian, Mediterranean, Asian-inspired)
- One finishing touch (fresh herbs, cheese, a drizzle of sauce, a squeeze of citrus)
That’s it. Choose one from each category, toss with olive oil and salt on a sheet pan, and roast at 425F. You will produce a credible, balanced dinner every single time.
Prep on Weekends, Coast on Weeknights
If you spend 30 minutes on a Sunday doing the following, your weeknight one-pan dinners take about 5 minutes to assemble:
- Wash and chop vegetables, store in containers in the fridge
- Make 2-3 sauce/seasoning blends, store in small jars
- Marinate proteins in zip bags (they’ll be extra flavorful by Tuesday)
- Pre-cook grains (rice, couscous, quinoa) to serve alongside sheet pan meals
This is the overlap between one-pan cooking and meal prep strategy — you’re not prepping full meals, just prepping ingredients that make cooking nearly effortless.
Getting Kids Involved in Spring Dinner Prep
One of the unexpected benefits of one-pan dinners is that they’re incredibly accessible for kids who want to help cook. Most of the prep work is washing, tearing, tossing, and arranging — tasks that even toddlers can participate in safely.
Age-Appropriate Tasks
Toddlers (2-3 years):
- Washing vegetables in a bowl of water
- Tearing spinach and basil leaves
- Putting cherry tomatoes on the pan (one at a time — this will take a while, and that’s fine)
- Shaking the seasoning container
Preschoolers (4-5 years):
- Snapping asparagus ends
- Tossing vegetables with oil in a bowl (expect mess)
- Arranging items on the sheet pan
- Squeezing lemons (with a handheld juicer)
- Sprinkling cheese on top
School-age (6-9 years):
- Measuring seasonings
- Cutting soft vegetables with a kid-safe knife (cherry tomatoes, zucchini, mushrooms)
- Making sauces and dressings
- Setting the timer and monitoring cooking progress
- Plating and garnishing
Tweens (10+ years):
- Following a recipe independently with supervision
- Handling the oven (with clear safety rules)
- Modifying recipes based on preference
- Planning the week’s one-pan dinner menu
If you want a more comprehensive framework for kitchen skills by age, my guide to teaching kids to cook goes into much more detail.
Why It Matters
Kids who help cook are more likely to eat what’s served. A 2021 study in the journal Public Health Nutrition found that children who participated in meal preparation consumed 15% more vegetables than children who didn’t. Not because the food tasted different, but because they felt ownership over it.
My daughter used to refuse asparagus. The first time she snapped the ends herself, she tried a bite. Now she eats it. I’m not saying it’s magic, but I’m also not saying it’s not magic.
The other benefit is less obvious but equally important: when kids participate in cooking, they begin to understand where food comes from and how flavors work together. That understanding builds a foundation for a healthy relationship with food that extends far beyond childhood. The one-pan dinner is the vehicle, but the real meal is the experience of making something together.
For parents of very young children who find the kitchen overwhelming enough without adding small humans to the mix — I get it. I wrote about one-handed meals for new parents specifically for the season of life where cooking with a baby in one arm is the reality. One-pan dinners work for that too. Prep with baby in a carrier, slide the pan in the oven, and use the 25-minute cook time for whatever you need most — feeding, playing, or just sitting down.
Frequently Asked Questions
Can I use frozen vegetables instead of fresh for one-pan dinners?
Yes, with caveats. Frozen vegetables release a lot of moisture when they thaw, which can make your sheet pan dinner steam instead of roast. The fix: spread frozen vegetables on a paper towel-lined plate for 10 minutes to absorb excess moisture before adding them to the pan. Alternatively, add them in the last 10-12 minutes of cooking so they heat through without overcooking. Frozen peas, corn, and green beans work best. Frozen spinach should be thawed and squeezed very dry first.
What if my oven runs hot or cold? How do I adjust?
An oven thermometer ($7 on Amazon) is one of the most useful kitchen tools you can buy. If your oven runs hot, reduce the temperature by 15-25 degrees and check for doneness 5 minutes early. If it runs cold, increase by 15-25 degrees and add 5-10 minutes. Visual cues matter more than exact times: you’re looking for golden-brown edges on vegetables, crispy skin on chicken, and internal temperatures of 165F for poultry and 145F for salmon.
How do I prevent different items from cooking at different rates on one pan?
Cut everything to similar sizes — smaller pieces cook faster, larger pieces cook slower. Dense vegetables (potatoes, carrots) should be cut smaller than quick-cooking ones (zucchini, cherry tomatoes). You can also stagger additions: put slow-cooking items in first, and add fast-cooking items partway through. Every recipe in this article uses this staggering technique. Once you internalize the principle, you can apply it to any one-pan dinner you improvise.
Are one-pan dinners nutritionally complete for kids?
The five recipes in this article each contain protein, complex carbohydrates, vegetables, and healthy fats — hitting all the major food groups in a single pan. For growing kids, the main thing to watch is protein adequacy. If you’re making the vegetarian chickpea bake, pair it with yogurt or cheese on the side to boost the protein. For the other recipes, the protein content (28-38g per serving) exceeds the recommended daily amount for children aged 4-8 (19g) and approaches the recommendation for 9-13-year-olds (34g).
Can I meal prep these recipes for the whole week?
Absolutely. Recipes 1, 3, and 5 reheat particularly well and taste great as leftovers for 3-4 days. My strategy: make one recipe on Sunday and another on Wednesday. Sunday’s dinner provides Monday and Tuesday lunches. Wednesday’s dinner provides Thursday and Friday lunches. You’ve now covered five dinners and five lunches with exactly two cooking sessions and two pans to wash. That’s the kind of math I can get behind.
What’s the best sheet pan to use?
A heavy-duty, rimmed half-sheet pan (18×13 inches) is the gold standard. Nordic Ware’s natural aluminum sheet pans are about $15 each and will last essentially forever. Avoid dark-colored or nonstick pans for sheet-pan dinners — they can cause the bottoms to burn before the tops are done. Aluminum conducts heat evenly and gives you that beautiful golden caramelization. I own four of them and use them more than any other piece of cookware in my kitchen.
My partner and I like spicier food than our kids. How do we handle that with one-pan cooking?
Season the entire pan with kid-friendly flavors (herbs, garlic, lemon, mild spices), then designate one corner of the pan as the “adult zone.” Add chili flakes, hot sauce, harissa, or sliced jalapenos to just that section before roasting. After serving, drizzle adult plates with sriracha, chili crisp, or hot honey. You can also keep a few “finishing” sauces at the table — kids get ranch or yogurt, adults get something with heat. Same base meal, customized intensity levels.