15 No-Fuss Picnic Lunch Ideas Kids Will Actually Eat (No Soggy Sandwiches)
Discover 15 no-fuss picnic lunch ideas kids will actually eat, avoiding common pitfalls like soggy sandwiches. You'll learn why traditional picnic foods fail due to temperature, texture, and portability issues, ensuring your outdoor meals are a success.
- Avoid soggy sandwiches by understanding how temperature and condensation affect food.
- Choose foods that maintain distinct textures; kids reject "uniform mush."
- Pack self-contained, finger-friendly foods that require no assembly or utensils.
- Prevent spoilage and unappetizing textures by selecting ingredients that travel well.
I need to tell you about the picnic that broke me.
It was last May. One of those perfect spring Saturdays where the sky looks like a screensaver and the air smells like freshly cut grass. I’d been promising my kids a park picnic for weeks, and I finally committed. I packed what I thought was a solid spread: turkey and cheese sandwiches on whole wheat, cut into careful triangles. A bag of baby carrots. Grapes. Juice boxes. Maybe a few cookies for good measure. Gold star, Mama Munch. You’ve got this.
We drove twenty minutes to the park. We found the perfect spot under a big oak tree. The kids were vibrating with excitement. I opened the cooler like I was unveiling a masterpiece and… the sandwiches had turned into something between wet bread and a science experiment. The ice pack had shifted, condensation had pooled at the bottom of the bag, and every single sandwich was soggy on one side and warm on the other. The cheese had that sad, sweaty look. The bread was basically a sponge.
My four-year-old took one bite, made a face that could curdle milk, and said, “I don’t like picnics.”
My seven-year-old ate three cookies and a juice box and declared herself full.
I sat on that picnic blanket watching ants discover my carefully cut sandwich triangles before my children did, and I thought: there has to be a better way.
Spoiler: there is. It just took me a humbling number of mediocre picnics to figure it out. And now I’m going to save you from every single one of those mistakes with 15 picnic lunch ideas that actually travel well, taste great at outdoor temperatures, and — most importantly — get eaten by real kids in real life.
Why Traditional Picnic Lunches Fail Kids
Before we get into the good stuff, let’s talk about why the “throw some sandwiches in a bag” approach consistently disappoints. Understanding the problem helps you avoid it, even when you’re improvising.
The Temperature Problem
Here’s the thing nobody tells you about packing lunch for outdoor eating: you’re fighting thermodynamics, and thermodynamics always wins. A traditional sandwich is engineered to be eaten within about twenty minutes of being made, ideally at room temperature or slightly cool. But a picnic lunch lives in a bag, in a car, in the sun, sometimes for hours. Cold foods get warm. Warm foods get cold. Everything lands in that unappetizing middle zone.
Condiments are the worst offenders. Mayo-based salads get dangerous above 40 degrees Fahrenheit. Mustard separates and makes bread soggy. Lettuce wilts. Tomato slices release water. That beautiful sandwich you assembled at 10 AM is basically compost by noon.
The Texture Problem
Kids are texture-sensitive creatures. Research from the University of Copenhagen found that children reject foods based on texture more than any other sensory quality — more than taste, more than appearance, more than smell. A sandwich that’s been sitting in a cooler bag develops what I call “uniform mush texture.” The bread gets soft, the fillings compress together, everything becomes one homogeneous mass. Even adults find this unappealing. For kids with heightened texture sensitivity, it’s a dealbreaker.
The best picnic foods maintain distinct textures. Things that are meant to be crunchy stay crunchy. Things that are meant to be soft stay soft. Nothing bleeds into anything else.
The Portability Problem
Picnic food has to survive being carried, jostled, set down on uneven ground, potentially knocked over by a toddler, and eaten without a table, proper plates, or real utensils. Most regular meals aren’t designed for any of this. Soup? Obviously out. But even things like rice bowls, regular salads, or anything requiring a knife fall apart in the picnic context.
The best picnic foods are essentially finger foods or fork-only foods. They’re self-contained. They don’t require assembly at the site. They can be eaten one-handed if necessary, because let’s be honest — you’re going to be holding a baby, a kite string, or a juice box in the other hand.
The “Kid Factor”
Finally, there’s the reality that kids at a park are fundamentally different creatures than kids at a dinner table. They’re overstimulated. They’re excited. They want to eat fast and get back to playing. They’re not going to sit and methodically work through a composed meal. They want food they can grab, eat in a few bites, and put down. They want things that look fun. They want autonomy — the ability to choose what they eat and in what order.
This is actually great news, because it means picnic food can be simpler than regular meals. You’re not trying to get a kid to sit through a three-course dinner. You’re assembling a collection of grab-and-go options that they can graze on between sprints to the swings.
The Picnic Packing Cheat Sheet
Before we get to the specific ideas, here’s my hard-won system for keeping picnic food fresh, safe, and actually appetizing by the time you eat it. This works whether you’re heading to the park for an hour or spending a whole afternoon at the beach.
Essential Gear
You don’t need fancy equipment, but a few smart investments make everything easier.
| Item | Why You Need It | My Recommendation | Approximate Cost |
|---|---|---|---|
| Insulated cooler bag | Keeps cold food cold for 4-6 hours | A soft-sided bag with thick insulation (not a tote with thin lining) | $20-35 |
| Reusable ice packs | More reliable than ice, no mess | Flat, thin packs that stack between containers | $8-12 for a 4-pack |
| Leak-proof containers | Prevents cross-contamination and sogginess | Small, individual containers with snap lids (not press-on) | $15-25 for a set |
| Silicone muffin cups | Perfect for separating small items in a bento or container | Reusable, easy to clean, kids love the colors | $8-10 for a set of 12 |
| Beeswax or silicone wraps | Wrapping individual items without plastic waste | Better grip than plastic wrap, keeps shape | $12-18 |
| Damp cloth in a zip bag | Hand-washing without a sink | Way more effective than dry napkins for sticky fingers | Free |
| A dedicated “picnic bag” | Keeps all your gear together so packing takes minutes, not half an hour | Any tote that fits your cooler bag, blanket, and utensils | Whatever you have |
The Packing Order
This makes a bigger difference than you’d think:
- Chill your cooler bag for 30 minutes in the freezer before packing (or toss an ice pack in it while you prep).
- Pack heavy, cold items on the bottom — containers with dips, yogurt, cheese.
- Layer flat ice packs between rows of containers. I use three thin packs: bottom, middle, top.
- Put delicate items on top — berries, crackers, anything that crushes.
- Keep “dry” and “wet” foods separate — always. Crackers in one container, hummus in another. Bread-based items sealed individually.
- Pack drinks separately from food if possible. Frozen water bottles double as extra ice packs and thaw into cold drinks by lunchtime.
Timing Tips
- Prep the night before if possible. Most of the ideas below taste better when the flavors have had time to meld overnight in the fridge.
- Pack the cooler right before you leave, not an hour before. Every minute at room temperature counts.
- Plan to eat within 3 hours of packing for maximum quality. Within 4 hours for food safety if your ice pack game is strong.
- Bring the cooler bag into the shade immediately at your destination. A cooler bag in direct sun is just a warm bag with ambition.
If you’re looking for more portable lunch ideas beyond picnics, my bento box lunch ideas for kids use a lot of the same principles — the key is thinking in components rather than in single composed dishes.
15 Picnic Lunch Ideas That Actually Work
Alright, here’s the good stuff. Every one of these has been tested at actual parks, on actual blankets, by actual picky children. I’ve noted which ones travel best, which ones are most popular with younger kids versus older kids, and which ones you can batch-prep ahead of time.
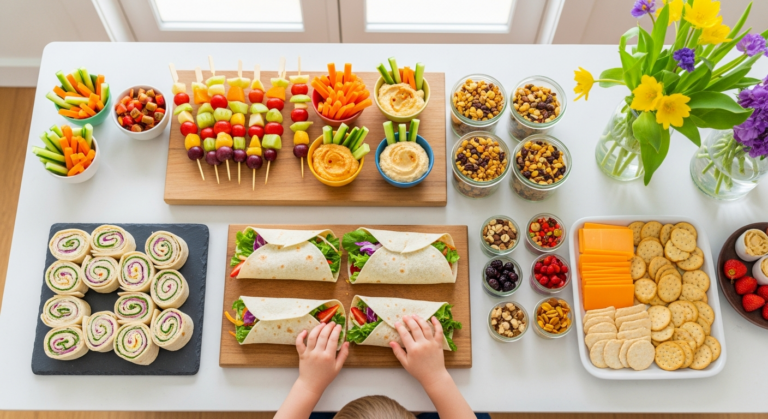
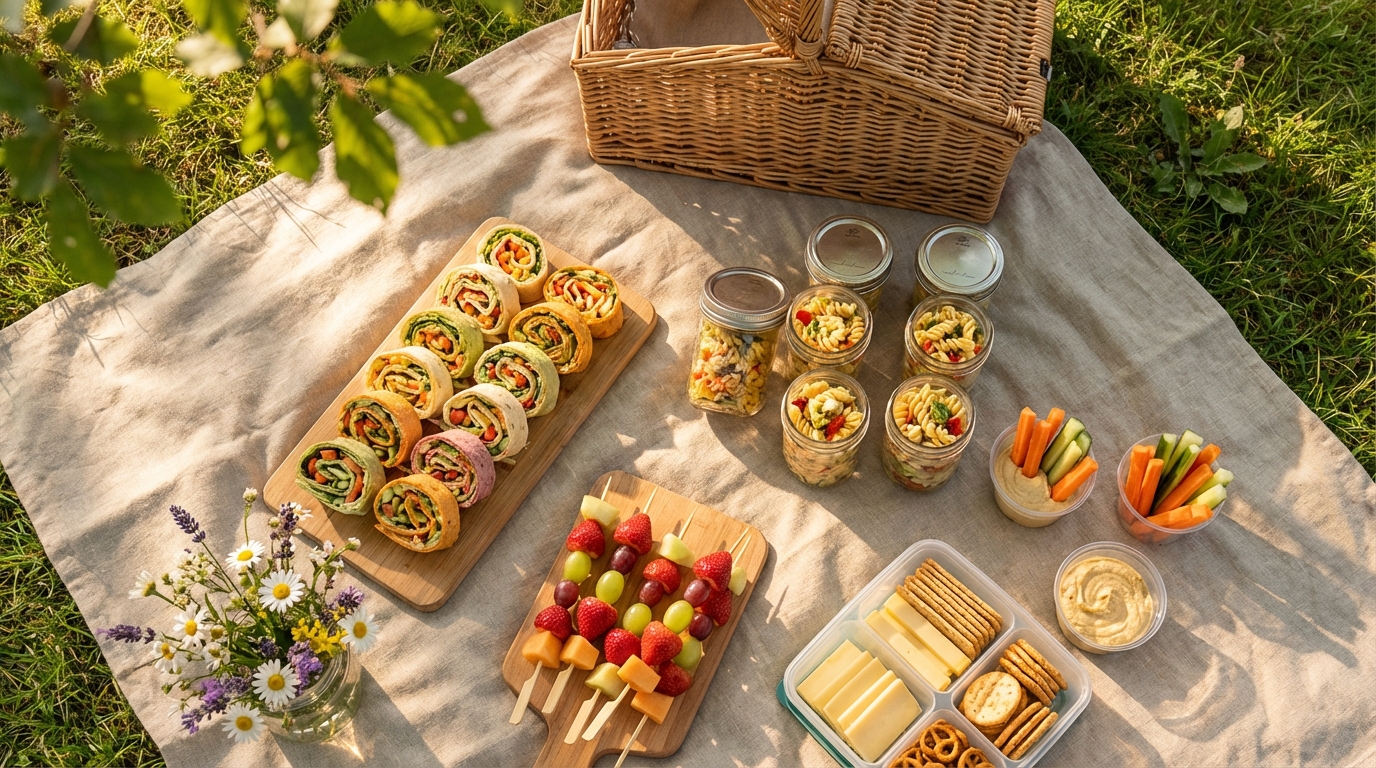
1. Pinwheel Wraps
This is my number one picnic food. If you make nothing else on this list, make these.
Why they work: Pinwheels stay compact, don’t get soggy (because the tortilla is a moisture barrier), and kids can eat them one-handed. Plus, they look fancy with minimal effort, and you can customize every single roll for different preferences.
How to make them:
- Lay a large flour tortilla flat. Spread a thin layer of cream cheese all the way to the edges (this is your “glue” and moisture barrier).
- Layer thin deli turkey or ham, a slice of cheese, and thinly sliced cucumber or bell pepper strips.
- Roll tightly, starting from one edge. Wrap in plastic or beeswax wrap and refrigerate for at least an hour.
- Slice into 1-inch rounds just before packing (or at the picnic site for maximum freshness).
Variations kids love:
- Pizza pinwheels: cream cheese + pepperoni + mozzarella + a thin spread of marinara
- “Rainbow” pinwheels: cream cheese + shredded carrots, purple cabbage, and spinach
- PB&J pinwheels: peanut butter + a thin line of jam (don’t spread the jam all the way to the edges or it’ll ooze)
Prep time: 10 minutes. Keeps well for 4-5 hours in a cooler.
2. Pasta Salad Cups
Individual cups of pasta salad solve every problem that big-batch pasta salad creates at picnics — no communal bowl getting warm, no serving spoons, no fighting over who got more of the good stuff.
Why they work: Pasta salad is specifically designed to be eaten cold. The dressing actually tastes better after the pasta has absorbed it overnight. And serving it in individual cups (I use small mason jars or 8-oz deli containers) means every kid gets their own portion with zero drama.
How to make them:
- Cook 1 lb short pasta (rotini, penne, or bowtie) until al dente. Drain and rinse with cold water.
- Toss with 2 tbsp olive oil to prevent sticking.
- Add: halved cherry tomatoes, diced cucumber, cubed mozzarella, sliced olives, and diced bell pepper.
- Dress with Italian vinaigrette (oil-based dressings travel better than creamy ones).
- Divide into individual containers. Refrigerate overnight.
Kid-friendly tip: Let kids pick their own mix-ins before you assemble. My daughter hates olives but loves corn, so her cups get corn instead. Customization means everyone eats.
Prep time: 20 minutes. Keeps well for 6+ hours in a cooler — this is one of the most forgiving picnic foods.
3. Chicken Skewers
Something about food on a stick makes kids think it’s a special occasion. I have no scientific explanation for this. I just know that the same piece of grilled chicken my son would ignore on a plate becomes irresistible on a wooden skewer.
Why they work: Pre-cooked and pre-skewered, these are truly grab-and-go. They’re high in protein, which is important because park energy is real — if you want to learn more about high-protein meals and snacks for kids, I’ve got a whole guide on that. Skewers are also easy to dip, and dipping is basically a sport for kids.
How to make them:
- Cut 1.5 lbs boneless, skinless chicken thighs into 1-inch cubes.
- Marinate in: 2 tbsp olive oil, 1 tbsp lemon juice, 1 tsp garlic powder, 1 tsp paprika, salt, and pepper. Minimum 30 minutes, overnight is better.
- Thread onto wooden skewers (soak the skewers in water for 20 minutes first if grilling; skip soaking if baking).
- Grill on medium-high for 3-4 minutes per side, or bake at 400F for 18-20 minutes.
- Cool completely before packing. Pack a small container of ranch, honey mustard, or BBQ sauce for dipping.
Safety note for young kids: For toddlers and preschoolers, slide the chicken off the skewers before packing. Pointed sticks and excited toddlers are not a combination I recommend.
Prep time: 30 minutes (plus marinating). Keeps well for 3-4 hours in a cooler.
4. Veggie Spring Rolls
These look incredibly impressive for the amount of effort they actually require. Which is basically none if you buy the rice paper wrappers and pre-shred your veggies.
Why they work: Spring rolls are light, refreshing, and completely customizable. They’re wrapped tight enough to travel well, and the rice paper wrapper keeps everything contained without getting soggy the way bread does. They’re also a fantastic way to sneak in vegetables that kids might not eat on their own.
How to make them:
- Fill a shallow dish with warm water. Dip one rice paper wrapper until just pliable (about 15 seconds — don’t over-soak or it tears).
- Lay flat and arrange in the center: a few rice noodles (cooked and cooled), julienned carrots, cucumber matchsticks, thinly sliced avocado, and a few mint or cilantro leaves.
- Fold the bottom edge over the filling, fold in the sides, and roll tightly upward (like a burrito).
- Pack with a damp paper towel between rolls to prevent sticking. Include peanut sauce or sweet chili sauce for dipping.
Kid-friendly tip: Let older kids help roll their own. It’s slightly messy and completely fun. If you’re looking for more ways to get kids involved in the kitchen, my age-by-age guide to teaching kids to cook has tons of ideas.
Prep time: 25 minutes. Best eaten within 3 hours (rice paper can dry out).
5. Mini Muffin Tin Quiches
These are a regular in our house, and they’re not just for picnics. I make a batch every Sunday and they become breakfast, snack, and picnic staples all week.
Why they work: They’re tiny, self-contained, protein-packed, and taste great at room temperature. No utensils needed. Kids can eat them in two bites. And you can hide an astonishing amount of vegetables inside.
How to make them:
- Preheat oven to 375F. Grease a 24-cup mini muffin tin generously.
- Whisk together: 8 eggs, 1/4 cup milk, 1/2 tsp salt, pinch of pepper.
- Divide finely diced fillings among the cups — think: broccoli and cheddar, ham and Swiss, spinach and feta, or bacon and tomato.
- Pour egg mixture over the fillings, filling each cup about 3/4 full.
- Bake for 12-15 minutes until puffed and golden.
- Cool completely on a wire rack before packing.
Make-ahead tip: These freeze beautifully. Make a double batch, freeze on a sheet pan, then transfer to a zip bag. Pull out however many you need the morning of your picnic and they’ll thaw by lunchtime (while also helping keep other food cold).
Prep time: 25 minutes. Keeps well for 4-5 hours in a cooler, or all day if frozen and thawing.
6. Hummus and Dipper Boxes
This is the lazy-day picnic meal I’m not even slightly ashamed of. Sometimes you just need to assemble, not cook.
Why they work: It’s basically a charcuterie board in a container, and kids love the autonomy of choosing what to dip into what. The variety means picky eaters can find something they like, and the hummus provides a solid protein and fiber base.
How to assemble:
- Put a generous scoop of hummus in a small leak-proof container (or use a silicone muffin cup as a built-in well inside a larger container).
- Surround with dippers: pita triangles, pretzel sticks, cucumber rounds, bell pepper strips, cherry tomatoes, snap peas, breadsticks, and baby carrots.
- Add a few extras: cubed cheese, rolled-up deli meat, a handful of olives, or some dried fruit.
Budget tip: Store-bought hummus is perfectly fine. If you want to make it cheaper, homemade hummus from canned chickpeas costs about $0.80 per batch versus $4-5 for store-bought. I have a whole guide to budget meal planning for families if stretching your grocery dollars is a priority.
Prep time: 5 minutes. Keeps well for 4-5 hours in a cooler.
7. Fruit Kebabs
Putting fruit on a stick is the oldest trick in the parenting playbook, and it still works every single time. There’s something about the act of sliding fruit off a skewer that makes it feel less like “eating your fruit” and more like “having a treat.”
Why they work: Fruit that’s pre-cut and accessible gets eaten. Fruit that requires peeling, cutting, or effort at the picnic site does not. Kebabs are also portion-controlled and extremely portable.
How to make them:
- Choose fruits that hold up well: strawberries (hulled and halved if large), grapes, pineapple chunks, cantaloupe cubes, blueberries, watermelon cubes, mandarin segments, and kiwi rounds.
- Thread onto wooden skewers or reusable bamboo picks, alternating colors.
- Pack in a flat container lined with a paper towel to absorb excess juice.
- Optional: pack a small container of yogurt or Nutella for dipping.
What to avoid: Banana (turns brown), apple (turns brown unless treated with lemon juice), and pear (too soft, falls off the skewer). If you want to include apple, toss the pieces in lemon water and pack them separately.
Prep time: 10 minutes. Best eaten within 2-3 hours for peak freshness.
8. Cold Noodle Bowls
This one surprised me. I started making these as a personal lunch and my kids kept stealing bites until I had to start making their own portions. There’s something about cold noodles with a savory-sweet sauce that transcends age.
Why they work: Cold noodles are specifically designed to be eaten cold (unlike reheated pasta, which is a compromise). The sauce coats every strand, so there’s no dry-bite risk. And they can be eaten with just a fork — or chopsticks if your kids are into that.
How to make them:
- Cook 8 oz soba noodles, rice noodles, or thin spaghetti according to package directions. Drain, rinse with cold water, and toss with 1 tsp sesame oil.
- Make the sauce: 3 tbsp soy sauce (or tamari for gluten-free), 2 tbsp rice vinegar, 1 tbsp honey, 1 tbsp sesame oil, 1 tsp grated ginger, squeeze of lime.
- Toss noodles with sauce. Divide into individual containers.
- Top with: shredded carrots, sliced cucumber, edamame, sesame seeds, and sliced green onion.
Kid-friendly modification: If your kids aren’t into “Asian flavors” yet, use a simpler sauce: 2 tbsp peanut butter + 1 tbsp soy sauce + 1 tbsp honey + warm water to thin. Basically peanut noodles. My kids call them “magic noodles” and have never once questioned the name.
Prep time: 20 minutes. Keeps well for 5-6 hours in a cooler — one of the best make-ahead options.
9. Cheese and Cracker Stackers
This is the picnic version of a Lunchable, except actually nutritious and about a third of the price.
Why they work: Kids love building their own little stacks. It’s interactive, customizable, and feels like a snack rather than a meal — which at a picnic is exactly what you want. The assembly process also slows down eating, which means kids actually register that they’re getting full rather than inhaling everything and asking for more five minutes later.
How to assemble:
- Pack separately: whole grain crackers (choose sturdy ones that won’t crumble — Triscuits, Wheat Thins, or water crackers work well), cubed or sliced cheese (cheddar, Gouda, Swiss, or pepper jack), sliced deli meat (turkey, ham, or salami), and extras.
- Good extras: apple slices, grapes, dried cranberries, mini pickles, cherry tomatoes, or cucumber rounds.
- Pack each item in its own section of a bento box or in separate small containers.
Why not just buy Lunchables? Cost, mostly. A homemade version costs $1.50-2.00 per serving. A Lunchable costs $3-5 and includes way more sodium, preservatives, and packaging. Plus, you control the quality of the ingredients.
Prep time: 5 minutes. Keeps well for 4-5 hours in a cooler.
10. Stuffed Pita Pockets
Pita pockets are the structural upgrade that sandwiches desperately need for outdoor eating. The pocket contains everything. Nothing slides out. The bread is sturdier than sliced bread. And they’re naturally portion-sized.
Why they work: The pocket design means fillings stay inside, even when a kid is running around between bites. Pita also doesn’t get soggy as fast as regular bread because it’s denser. And the round shape is easy for small hands to grip.
How to make them:
- Cut pita rounds in half to create two pockets.
- Spread the inside with hummus, cream cheese, or mashed avocado (your moisture barrier).
- Fill with: shredded chicken + lettuce + diced tomato, or falafel + cucumber + tzatziki, or turkey + cheese + shredded carrots, or egg salad + arugula.
- Wrap each half tightly in foil or beeswax wrap.
Pro tip: Don’t overfill. Half-full pitas keep their shape and structural integrity. Overstuffed pitas split at the bottom, and then you’re back to sandwich chaos.
Prep time: 10 minutes. Keeps well for 4 hours in a cooler.
11. Rice Paper Rolls (Vietnamese-Style)
Yes, I know I already included spring rolls. These are different. Rice paper rolls are a heartier version with protein, and they’ve become one of our most-requested picnic foods.
Why they work: They’re light but filling, completely contained, and honestly gorgeous. Bringing rice paper rolls to a picnic makes you look like you have your life together in a way that a bag of sandwiches simply does not. (Perception matters when you’re running on four hours of sleep.)
How to make them:
- Soak rice paper wrappers one at a time in warm water until pliable.
- Fill with: cooked shrimp (halved lengthwise and placed cut-side down for a pretty presentation), rice vermicelli, lettuce leaves, shredded carrots, cucumber, fresh herbs (mint, basil, cilantro), and avocado slices.
- Roll tightly: fold bottom up, sides in, then roll forward.
- Pack individually wrapped in damp paper towels, then in a sealed container.
- Include hoisin-peanut dipping sauce on the side.
For younger kids: Skip the shrimp and use shredded rotisserie chicken instead. Call them “rainbow wraps” and watch them disappear.
Prep time: 30 minutes for a batch of 8-10 rolls. Best eaten within 3 hours.
12. Energy Bite Boxes
This is the picnic lunch for days when you didn’t plan ahead and need to assemble something in fifteen minutes flat. Energy bites plus supporting players equals a complete meal with zero cooking.
Why they work: Energy bites are dense with nutrition — oats, nut butter, honey, and whatever add-ins you choose provide protein, fiber, healthy fats, and sustained energy. Pairing them with fruit and a few other items rounds out the meal without any heat or utensils required.
How to make the energy bites:
- Mix: 1 cup rolled oats, 1/2 cup peanut butter (or sunflower butter for nut-free), 1/3 cup honey, 1/2 cup mini chocolate chips, 2 tbsp ground flaxseed, 1 tsp vanilla.
- Refrigerate mixture for 30 minutes, then roll into 1-inch balls.
- Makes about 24 bites. Store in the fridge for up to a week.
The box assembly:
- 4-5 energy bites per person
- Fresh fruit (strawberries, grapes, mandarin segments)
- Cheese cubes or string cheese
- A handful of pretzels or crackers
- A few veggie sticks with a small ranch container
Make-ahead bonus: Energy bites are one of the best batch-prep foods. Make them on Sunday and you have picnic (and snack and lunchbox) fuel for the entire week.
Prep time: 5 minutes to assemble boxes (if bites are premade). Bites keep for 5-6 hours out of the fridge.
13. Deconstructed Taco Cups
Tacos at a picnic sounds insane. Deconstructed taco cups, however, are genius. You’re giving kids all the components of a taco to assemble and eat however they want, minus the structural failure of a taco shell.
Why they work: Kids who love tacos love the fillings, not the shell. The shell is just a vehicle that breaks and spills. By deconstructing, you let them eat their favorite taco components with chips instead, which are sturdier, more portable, and honestly more fun.
How to assemble:
- The protein layer: Cook 1 lb ground turkey or beef with taco seasoning. Cool completely and pack in a container. (This tastes great at room temperature or slightly cool.)
- The layers: Shredded cheese, diced tomatoes, shredded lettuce, black beans (drained and rinsed), corn kernels, sour cream in a small container, and salsa in another small container.
- The vehicle: Sturdy tortilla chips or mini tostada rounds.
- Pack everything in a bento-style box or a collection of small containers.
Assembly at the picnic: Scoop meat and toppings onto chips. Eat. Repeat. Even my two-year-old figured this out independently, which honestly surprised me more than it should have.
Prep time: 20 minutes (mostly cooking the meat). Keeps well for 3-4 hours in a cooler.
14. Caprese Skewers
These are the most adult-friendly item on this list, but don’t write them off for kids. My children eat these like candy, and I’m convinced it’s because (a) they’re on sticks and (b) fresh mozzarella is one of the mildest, most universally appealing cheeses on the planet.
Why they work: Three ingredients. No cooking. Beautiful to look at. They’re the kind of food that makes a picnic feel like an occasion rather than just eating outside. And from a nutrition standpoint, you’re getting protein (mozzarella), vitamins A and C (tomatoes), and healthy fats (the olive oil drizzle).
How to make them:
- Thread onto small wooden picks or cocktail skewers: one cherry tomato, one small fresh mozzarella ball (ciliegine size), and one fresh basil leaf.
- Arrange in a flat container.
- Pack a small container with balsamic glaze for drizzling (not balsamic vinegar — the glaze is thicker and sweeter, which kids prefer).
- Optional: drizzle with olive oil and sprinkle with salt before packing.
Seasonal tip: During spring and summer when seasonal produce is at its peak, the tomatoes are so sweet they barely need anything else. Out-of-season cherry tomatoes can be a bit mealy, so this one really shines from April through September.
Prep time: 10 minutes. Keeps well for 3-4 hours in a cooler.
15. Trail Mix Yogurt Parfaits
This is dessert disguised as lunch and I’m not sorry about it. Yogurt parfaits are filling, protein-rich, customizable, and feel like a treat. At a picnic, “treat-feeling” food gets eaten. That’s the whole game.
Why they work: The key is packing the layers separately so nothing gets soggy. Granola that’s been sitting in yogurt for two hours is just sad oatmeal. Granola that gets sprinkled on fresh yogurt at the picnic site is crunchy, satisfying perfection.
How to pack them:
- Layer 1 (at home): Spoon thick Greek yogurt into a small jar or container. Keep cold.
- Layer 2 (pack separately): A zip bag or small container of trail mix — granola, nuts, dried fruit, mini chocolate chips, coconut flakes, and/or seeds.
- Layer 3 (pack separately): Fresh fruit — sliced strawberries, blueberries, raspberries, or diced mango.
- At the picnic: Let kids build their own parfaits by adding trail mix and fruit to their yogurt. This is half the fun.
Nutrition boost: Use full-fat Greek yogurt for sustained energy and satiety. A 3/4 cup serving has about 15 grams of protein. With trail mix and fruit on top, this is a legitimately balanced meal.
Prep time: 5 minutes. Yogurt keeps well for 3-4 hours in a cooler; assemble on-site.
How to Keep Picnic Food Safe
I want to take a serious moment here, because food safety at picnics is one of those things that’s really easy to be casual about — until someone gets sick. The rules are simple but important.
The Temperature Danger Zone
The USDA identifies the “temperature danger zone” as between 40F and 140F (4C to 60C). Bacteria that cause foodborne illness multiply rapidly in this range, doubling every 20 minutes in some cases. Most picnic foods live in this zone the moment they leave your fridge.
The two-hour rule: Perishable food should not sit at temperatures above 40F for more than two hours total. On hot days (above 90F), that window shrinks to one hour.
What counts as perishable: Anything with meat, dairy, eggs, cooked grains, or cut fruits and vegetables. So basically… everything on this list.
The Ice Pack Math
Here’s a practical framework I use:
| Situation | Ice Pack Strategy | Expected Cold Time |
|---|---|---|
| Quick trip (1-2 hours, mild weather) | 1-2 ice packs in an insulated bag | 2-3 hours |
| Half-day outing (3-4 hours, moderate weather) | 3-4 ice packs layered between containers | 4-5 hours |
| Full day or hot weather (5+ hours or above 85F) | Frozen water bottles + ice packs, or actual ice in a hard cooler | 6-8 hours |
| Beach day or extreme heat | Hard cooler with real ice, kept in shade, lid closed as much as possible | 6-10 hours |
Pro tip: Frozen juice boxes or water bottles count as ice packs AND beverages. Double duty. I always freeze at least two the night before a picnic.
Foods That Are Naturally Safer
Some foods are lower risk for outdoor eating because they’re less hospitable to bacteria:
- Whole fruits (uncut apples, bananas, oranges) — the skin is a natural barrier
- Dried foods (crackers, pretzels, dried fruit, trail mix) — low moisture inhibits bacterial growth
- Acidic foods (pickles, foods dressed with vinegar-based dressings) — low pH slows bacteria
- Nut butters — shelf-stable and safe at room temperature for hours
- Hard cheeses (cheddar, Parmesan, Gouda) — much safer than soft cheeses at ambient temps
When in Doubt, Throw It Out
I know it feels wasteful. I know those pasta salad cups took twenty minutes to make. But if food has been sitting in warm temperatures and you’re not sure how long it’s been, don’t risk it. The cost of food poisoning — especially in children — is infinitely higher than the cost of the food. When my husband says “it’s probably fine,” I remind him of the Great Potato Salad Incident of 2024, and he stops arguing.
Making Picnics a Regular Thing
Here’s what I want to leave you with: picnics don’t have to be special events. They don’t require a Pinterest-worthy spread, a scenic overlook, or a free Saturday. Some of our best picnics have been Tuesday-night dinners on a blanket in the backyard.
The Weeknight Picnic
This is my secret weapon for hard days. When the kitchen feels claustrophobic and everyone is cranky and dinner feels like a mountain — I grab a blanket, pack whatever we would have eaten inside into containers, and we eat on the back porch or in the yard. Same food, completely different experience. The kids think it’s an adventure. I get fresh air. Everyone’s mood improves.
You don’t even need to cook differently. Leftover pasta in a container, some fruit, and a handful of crackers eaten on a blanket is a picnic. Give yourself permission to lower the bar.
The “Picnic Box” System
The thing that made picnics go from “occasional stressful event” to “easy default option” for our family was creating a dedicated picnic box. It’s just a plastic bin in our garage with:
- A blanket
- Reusable plates and cups
- A set of utensils
- Napkins
- Wet wipes
- Sunscreen
- A garbage bag
- A frisbee
When everything is already packed and ready, the activation energy drops to almost zero. “Want to have a picnic?” goes from a 45-minute production to a 15-minute grab-and-go.
Making It Part of Your Rhythm
In our family, Saturday lunch is almost always a picnic from April through October (weather permitting). Sometimes it’s elaborate — one of the fifteen ideas above, prepped with care. Sometimes it’s peanut butter on crackers, apple slices, and string cheese thrown in a bag as we walk out the door. Both count. Both make memories.
The point isn’t perfection. The point is getting outside, eating together without the usual dinner-table power struggles, and giving your kids the sensory experience of food in nature. There’s real research suggesting that children eat a wider variety of foods in novel environments. A 2019 study in the journal Appetite found that changing the eating context — moving from indoors to outdoors, for example — increased children’s willingness to try unfamiliar foods by up to 30%.
So that picky eater who won’t touch a vegetable at the kitchen table? They might just try a snap pea at the park. Stranger things have happened. (My son’s first voluntary bite of bell pepper happened on a picnic blanket, and I nearly cried into my hummus.)
If you want to keep the easy-lunch momentum going on weekdays, check out my bento box lunch ideas for school-day inspiration that uses a lot of the same portable, kid-friendly principles.
Frequently Asked Questions
What’s the best way to keep sandwiches from getting soggy at a picnic?
The best strategy is to avoid wet condiments directly on bread. Spread a thin layer of butter or cream cheese as a moisture barrier, pack tomatoes and lettuce separately, and use sturdier breads like ciabatta or pita. But honestly? My best advice is to skip traditional sandwiches entirely and go with wraps, pinwheels, or pita pockets instead. They handle moisture and travel stress far better than sliced bread ever will.
How far in advance can I prep picnic food?
Most of the ideas on this list can be prepped 12-24 hours in advance. Pasta salads, energy bites, mini quiches, and cold noodle bowls actually taste better the next day. Pinwheel wraps should be rolled the night before but sliced the morning of. Fruit kebabs and rice paper rolls are best made the morning of your picnic. Anything with crackers, chips, or granola should be packed dry and assembled at the picnic site.
What picnic foods are safe without a cooler?
If you’re going cooler-free (brave!), stick to shelf-stable options: whole uncut fruit, nut butter sandwiches on sturdy bread, trail mix, granola bars, pretzels, dried fruit, hard cheese (Parmesan, aged cheddar — they’re safe at room temp for several hours), crackers, and whole raw vegetables like carrots and celery. Avoid anything with dairy, cooked meat, eggs, or cut fruit if you don’t have a way to keep it cold.
How do I pack a picnic for a baby or toddler?
For babies (6-12 months), pack soft finger foods that are easy to gum: ripe avocado strips, steamed sweet potato sticks, banana, soft cheese cubes, and well-cooked pasta. For toddlers (1-3 years), most of the ideas on this list work with simple modifications: cut food into small pieces, remove skewer sticks, choose softer crackers, and avoid whole grapes (cut them lengthwise). Always bring extra water and a bib — outdoor eating with a toddler is messy in the best possible way.
What’s the easiest picnic lunch for a large group or playdate?
Hummus and dipper boxes (Idea #6) or cheese and cracker stackers (Idea #9) are the easiest to scale because they require zero cooking — just multiply the quantities. For something heartier, deconstructed taco cups (Idea #13) work beautifully for groups because you set out all the components and let everyone build their own. The budget meal planning guide has tips on feeding a crowd affordably.
How do I get my picky eater to actually eat at a picnic?
Picky eaters often eat better at picnics than at the table, because the environment is novel and there’s less pressure. Lean into this by offering variety (pack five small things rather than one big thing), including at least two “safe” foods you know they’ll eat, and avoiding any comments about what they are or aren’t eating. The picnic context does a lot of the heavy lifting — the excitement, the fresh air, the freedom to graze rather than sit still. Let the setting work its magic.
Can I make a complete, balanced picnic lunch without any cooking?
Absolutely. A no-cook picnic lunch might look like: hummus + pita + raw veggies (fiber, protein, vitamins), cheese cubes + crackers (protein, calcium, carbs), fresh fruit (vitamins, fiber, natural sugars), trail mix or energy bites (healthy fats, protein), and a yogurt cup (protein, probiotics). That’s all five food groups, plenty of variety, and zero time at the stove. No-cook picnics are a completely legitimate meal, and anyone who tells you otherwise has never packed lunch for three kids while also finding everyone’s shoes.