No-Bake Halloween Treats Kids Can Make Themselves
Discover six no-bake Halloween treats your kids can make, complete with age-specific steps, safety tips, and a free printable kit. Make spooky snacks fun and safe for your little chefs.
- Make six no-bake Halloween treats like Banana Ghost Pops and Graveyard Pudding Cups.
- Empower your kids with fun, safe kitchen tasks that build motor skills.
- Set up a kid-height station with ingredients in small bowls for easy access.
- Download a free printable kit with age charts, recipes, and allergen swaps.
- Use the comparison chart to pick the best treat for your child's age and skill.
This post contains affiliate links. As an Amazon Associate I earn from qualifying purchases.
Last October, my four-year-old peeled a banana at the counter and announced, “This one is going to be a ghost. A sad ghost.” She dipped it in yogurt, pressed on two mini chocolate chips for eyes, and carried it to the freezer herself. I cut the banana and kept my hands in my pockets so I wouldn’t “fix” the crooked eyes.
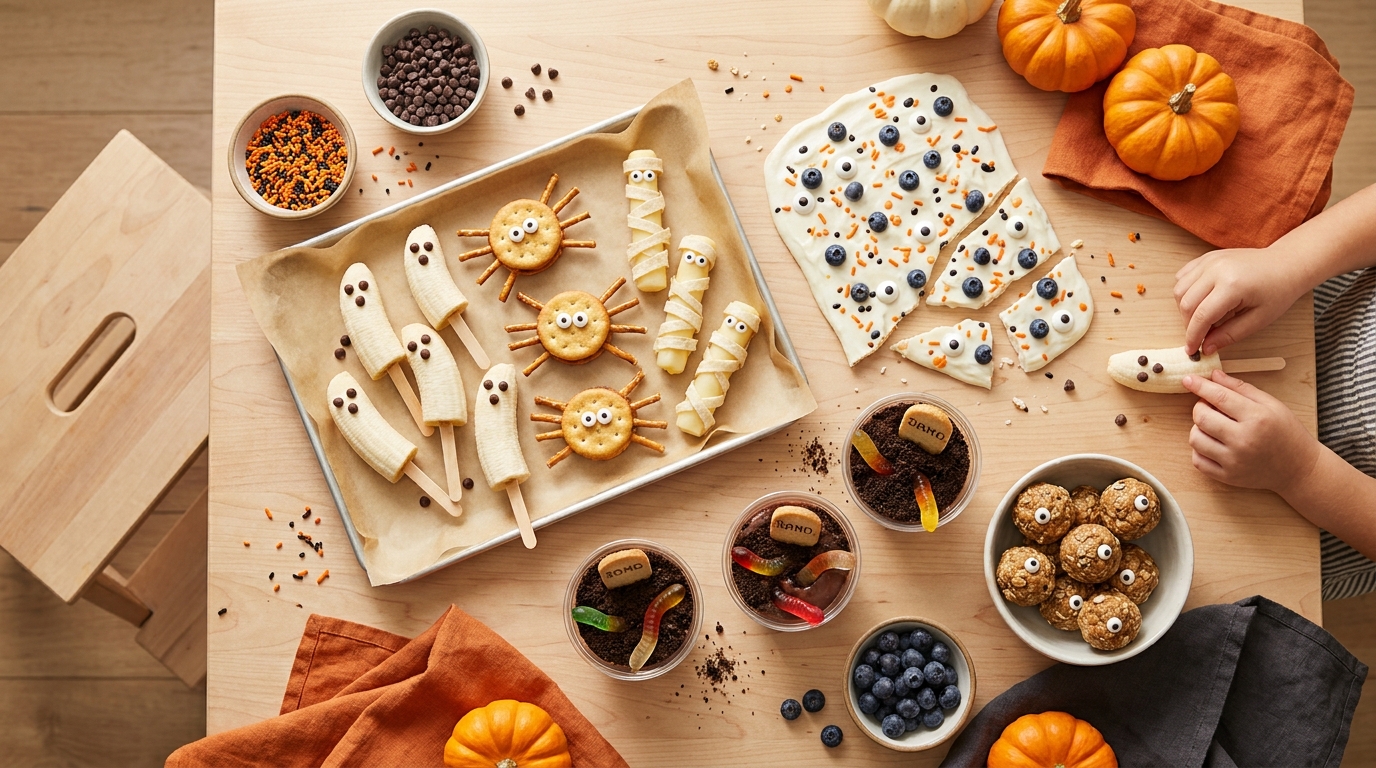
That afternoon taught me that the best Halloween treats for kids to make never need the oven. Here are six: banana ghost pops, spider cracker sandwiches, mummy cheese sticks, monster yogurt bark, graveyard pudding cups, and monster eyeball energy bites. You’ll also get an age-by-age chart of kid-safe steps, safety and allergen notes, and make-ahead storage times.
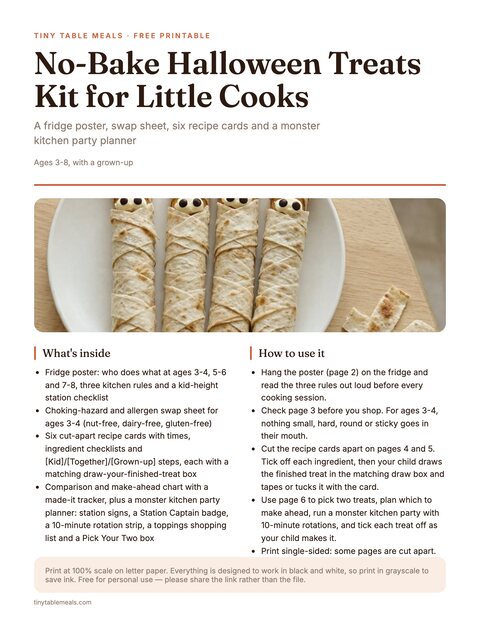
Free printable · 6 pages
No-Bake Halloween Treats Kit for Little Cooks
A who-does-what age chart with kitchen rules and a station checklist, a choking-hazard and allergen swap sheet, six cut-apart no-bake recipe cards each with a draw-your-treat box, and a compare, make-ahead, party planner and made-it tracker page.
Free. Your download link appears right here. You'll also join the Sunday Supper Plan. Unsubscribe anytime. Privacy
One rule runs through every recipe: sharp knives and hot melted chocolate stay with a grown-up at every age.
In this article (16 sections)
- Quick Comparison: Which No-Bake Treat Is Right for Your Kid?
- Why No-Bake Halloween Treats Work for Kids
- Before You Start: Setup, Safety, and Allergens
- Which Steps Can Kids Do by Age?
- Treat #1: Banana Ghost Pops
- Treat #2: Spider Cracker Sandwiches
- Treat #3: Mummy Cheese Sticks
- Treat #4: Monster Yogurt Bark
- Treat #5: Graveyard Pudding Cups
- Treat #6: Monster Eyeball Energy Bites
- Halloween Treat Party Ideas for Kids
- Make-Ahead and Storage Guide
- How to Balance Halloween Treats With Real Food
- Troubleshooting No-Bake Halloween Treats
- Frequently Asked Questions
- Final Tips for Halloween Cooking With Kids
Quick Comparison: Which No-Bake Treat Is Right for Your Kid?
If you only have time for one or two, here is how the six treats compare, including the main allergens to check on labels.
| Treat | Time | Kid-Led Steps | Sugar Level | Main Allergens | Best For |
|---|---|---|---|---|---|
| Banana Ghost Pops | 15 min + freeze | Almost all | Low | Dairy | Youngest cooks, first-timers |
| Spider Cracker Sandwiches | 15 min | All | Low-medium | Wheat; nuts/seed or dairy | Afternoon snack, class parties |
| Mummy Cheese Sticks | 15 min | Most (you cut the tortilla) | Low | Dairy, wheat; mustard if used | Savory fans, lunchboxes |
| Monster Yogurt Bark | 15 min + freeze | All except cutting | Low-medium | Dairy; wheat if cookies are used | Creative decorators |
| Graveyard Pudding Cups | 20 min + chill | Almost all | Medium-high | Dairy, wheat, soy | Party dessert, crushers |
| Monster Eyeball Energy Bites | 20 min + chill | Most | Low-medium | Nuts/seed, oats (gluten) | Make-ahead, school snacks |
Why No-Bake Halloween Treats Work for Kids
Baking asks for things preschoolers are still building: patience (waiting for the oven), precision (level cups, exact times), and heat awareness. A no-bake treat skips all three.
- The result is instant. A three-year-old’s attention span for “cookies in 12 minutes” is roughly zero. A pudding cup is a finished treat the moment the last gummy worm goes in.
- Kids can do the full sequence. Scoop, spread, press, sprinkle, decorate. Those are the exact motor skills preschoolers are practicing anyway.
- The oven stays off. The biggest kitchen injury risks for small kids (hot surfaces, hot oil, sharp tools) mostly disappear.
In my kitchen, kids who help make a food often taste more of it, which is a quiet win with picky eaters.
Before You Start: Setup, Safety, and Allergens
Ten minutes of setup makes everything smoother.
Build a Kid-Height Station
Put a sturdy step stool or a low table at a spot where your child can reach the work surface comfortably. Their elbows should be about level with the surface. If they’re reaching up, they’ll get frustrated; if they’re hunched down, they’ll get tired.
Then set up the “mise en place” in small bowls: one bowl per ingredient, each with a small spoon. Preschoolers do much better with small bowls than with big bags and boxes. Scooping from a bowl is easy, and pouring from a bag is not.
Put a rimmed baking sheet or a big tray under everything. Spills stay on the tray. It also doubles as the carrying surface to the fridge or freezer.
Station checklist
- Sturdy step stool or low table, with elbows level with the surface
- Rimmed baking sheet or big tray under everything
- One small bowl and one small spoon per ingredient
- A damp cloth and a small bowl of water for sticky hands
- Every label checked for allergens
Wash Hands, Then Set the Rules
Hand-washing first, every time. We sing “Happy Birthday” twice, which is about 20 seconds. Then I give three short rules:
- We only taste with a clean spoon (no double-dipping).
- Sharp knives and anything hot are grown-up jobs. The microwave is a grown-up job too until 7-8, when it becomes a together job. A kid-safe nylon knife is for soft foods only, and a grown-up stays right beside ages 3-6.
- If something falls on the floor, it goes in the compost or trash, not our mouths.
Fair warning: they will enforce these on you, too. Mine once pointed out that I’d licked my finger.
Choking Hazards: What to Skip or Change
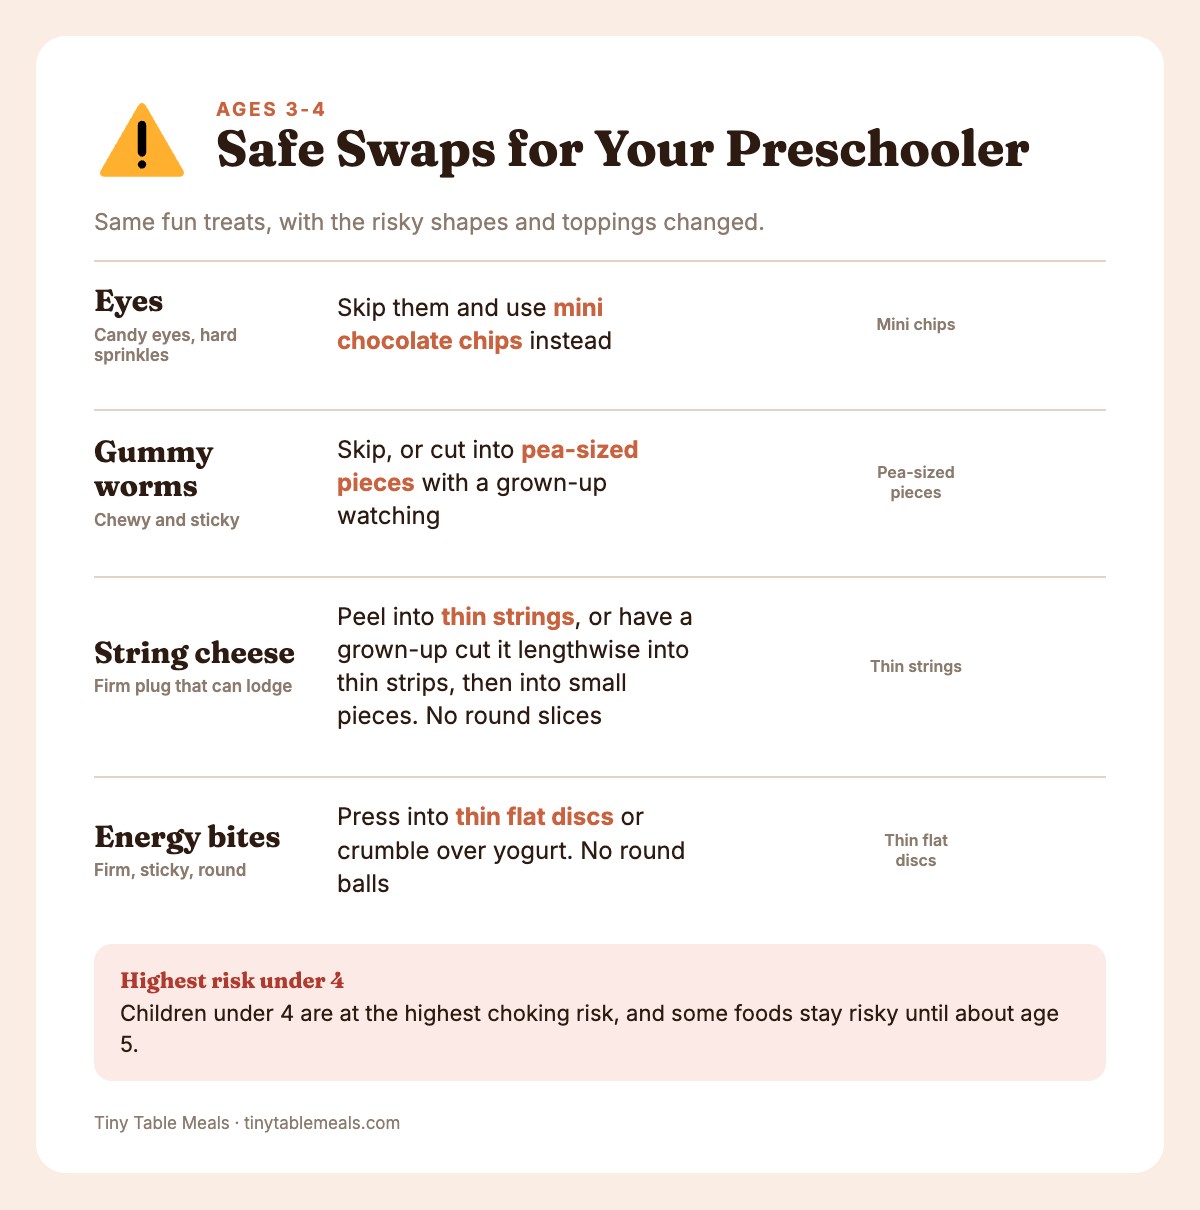
Safety firstThese treats are written for ages 3 and up, not for babies. Have kids sit while they eat, with a grown-up close by.
- Ages 3-4: skip candy eyes and hard sprinkles, and use mini chocolate chips instead.
- Soft toppings: halve blueberries and raisins. Add them a few at a time, not by the handful.
- Under 4: skip popcorn, whole nuts and hard candy.
- Nut and seed butter: spread it thin. Never serve it by the spoonful or as a sticky clump.
- Energy bites: for ages 3-4, press the dough flat into thin discs, or crumble it over yogurt. Don’t serve small round balls.
- Labels: read every one for allergens.
Children under 4 are at the highest choking risk, and some foods stay risky until about age 5. Please adjust these:
| Ingredient | Choking risk for kids under 4 (some foods stay risky until about 5) | What to do |
|---|---|---|
| Whole nuts and large seeds | Hard, round, easy to inhale | Skip, or use finely ground / nut-free butter |
| Whole grapes, cherry tomatoes | Round, slippery | Quarter lengthwise |
| Regular marshmallows | Sticky, can lodge | Use mini marshmallows, or flatten and cut |
| Hard candies, jelly beans | Hard, round | Skip in favor of soft candy |
| Popcorn | Irregular, can lodge | Skip for under 4 |
| Gummy candy (gummy worms) | Chewy, sticky, can lodge | Under 4: skip, or cut into pea-sized pieces with a grown-up watching. For a soft swap, use mini chocolate chips or halved blueberries. Fruit leather is not a safer swap, because it is sticky and chewy too. |
| Raisins | Sticky | Halve or chop for ages 3-4, or skip |
| Hard sprinkles, candy eyeballs | Hard, small, round | Ages 3-4: skip and use soft decorations like mini chocolate chips. Ages 5-6: with a grown-up right there. |
| String cheese | Firm plug that can lodge | Ages 3-4: take off the tortilla wrap, then peel into thin strings. Or a grown-up cuts it lengthwise into thin strips, then into small pieces. No round slices. |
| Nut or seed butter | Thick and sticky, can lodge | Spread thin on a cracker. Never by the spoonful or in a clump. |
| Energy bites | Firm, sticky, round | Ages 3-4: flatten into thin discs like small flat cookies, or crumble over yogurt. No round balls. |
If your child is under three, my post on toddler-safe Halloween snacks with no choking-hazard shapes covers that younger group in more detail. Everything here is written for ages 3 to 8.
Allergen Swaps
Halloween treats are full of nuts, dairy, wheat, and eggs, so check before you buy.
- Nut-free: Swap peanut or almond butter for sunflower seed butter (soy nut butter only if soy is not an issue). Read every label, including chocolate chips, cookies, candy eyes and sprinkles, and watch for cross-contact.
- Dairy-free: Use dairy-free yogurt and chocolate chips for the pops and bark. Make the pudding cups with oat or soy milk, and use dairy-free cookies. Use seed butter instead of cream cheese for spreads. Mummy cheese sticks are not easily dairy-free, so try hummus-wrapped tortilla rolls instead (most hummus contains sesame).
- Gluten-free: Use gluten-free crackers, cookies, and pretzels. Certified gluten-free oats for the energy bites.
- Egg-free: None of the recipes use egg as a main ingredient. Packaged items (pudding, crackers, tortillas, cookies, candy eyes, icing) can contain egg, sesame or soy, so check labels.
- Mustard: The mummy cheese sticks can use mustard as the glue for the eyes. If mustard is an issue, use cream cheese (or seed butter for dairy-free). Read the deli turkey label too if you use that swap.
If you’re making treats for a classroom, check the school’s policy first. Many schools restrict nuts, and some only allow store-bought treats.
Which Steps Can Kids Do by Age?
Here are the common no-bake tasks and who can do them safely at each age.
Good to know✅ = can do alone with a quick demo. 👐 = do it together, with a grown-up right there. 🚫 = grown-up only.
Safety firstThis post uses three knife words.
- Kid-safe nylon knife: soft foods only. Together at ages 3-6, solo at 7-8.
- Table knife: spreading at any age. Cutting firm foods is grown-up only at ages 3-6, together at 7-8.
- Sharp knife: grown-up only, at every age.
The microwave is a grown-up job for ages 3-6 and a together job at 7-8. A grown-up melts the chocolate and lets it cool to just warm before kids drizzle.
| Task | Ages 3-4 | Ages 5-6 | Ages 7-8 |
|---|---|---|---|
| Washing hands, washing fruit | ✅ | ✅ | ✅ |
| Peeling a banana or clementine | ✅ | ✅ | ✅ |
| Scooping with a spoon | ✅ | ✅ | ✅ |
| Spreading with a table knife or spoon back | ✅ | ✅ | ✅ |
| Pressing on candy eyes or hard sprinkles | 🚫 (soft toppings only) | 👐 | ✅ |
| Pressing on soft toppings (mini chocolate chips, halved blueberries) | ✅ | ✅ | ✅ |
| Stirring a bowl (cold ingredients) | ✅ | ✅ | ✅ |
| Crushing cookies in a zip bag with hands or rolling pin | ✅ | ✅ | ✅ |
| Rolling a ball of dough between palms | ✅ | ✅ | ✅ |
| Dipping into a bowl of yogurt | 👐 | ✅ | ✅ |
| Measuring dry ingredients | 👐 | ✅ | ✅ |
| Opening jars and containers | 👐 | ✅ | ✅ |
| Cutting soft foods with a kid-safe nylon knife | 👐 | 👐 | ✅ with a quick demo |
| Cutting firm foods (cheese, apples) with a table knife | 🚫 | 🚫 | 👐 |
| Using the microwave | 🚫 | 🚫 | 👐 |
| Melting chocolate | 🚫 | 🚫 | 👐 (stirring only) |
| Using a sharp knife for anything | 🚫 | 🚫 | 🚫 |
| Handling hot melted chocolate or hot bowls from the microwave | 🚫 | 🚫 | 🚫 |
How I Use the Chart
For each recipe below, I mark the steps with a small tag:
- [Kid]: your child can do this alone.
- [Together]: your child does it with you nearby or hand-over-hand.
- [Grown-up]: you do this part, usually while your child watches or does something else.
A 3-year-old and an 8-year-old will move through the same recipe very differently. The 8-year-old might do all the [Together] steps alone, while the 3-year-old might need you for the cheese. That’s normal.
For what kids can do at every stage, see the age-by-age guide to teaching kids to cook. I check it before I hand my kids a new tool. The free No-Bake Halloween Treats Kit for Little Cooks pairs well with the recipes below.
Treat #1: Banana Ghost Pops
These are the treats that started this whole article. They’re sweet but mostly fruit, and they freeze beautifully. A preschooler can do every step except the cutting.
Good to knowThese won’t look like the photos, and that’s fine. On all six treats, eyes will land in odd places. Resist the urge to fix them, because crooked treats taste better to the kid who made them.
Safety firstKids stay seated while eating a pop. Let it soften for 2-3 minutes and have them bite small pieces. For ages 3-4, slide the banana off the stick and serve it in a bowl or as slices. Kids 5 and up can eat it on the stick. Never let a child walk or run with a stick.
What You Need
- 3 ripe-but-firm bananas
- 6 smooth, food-safe craft sticks or popsicle sticks
- 1 cup thick vanilla Greek yogurt (or coconut yogurt)
- Mini chocolate chips (about 2 tablespoons)
- A tray lined with parchment or a silicone mat
Steps
- [Kid] Wash hands and peel the bananas. Preschoolers love this part.
- [Grown-up] Check each stick for splinters and toss any that feel rough. Then cut each banana in half crosswise and push a stick into the cut end of each half.
- [Kid] Spoon the yogurt into a shallow bowl or a mug. A mug is great because it’s easy to hold steady.
- [Together] Roll or dip each banana in the yogurt, using the back of a spoon to cover any bare spots. Ages 3-4 need a hand tipping the bowl. Ages 5 and up can do this alone.
- [Kid] Press two mini chocolate chips on for eyes. Add a third for a “boo!” mouth if they want. Hand ages 3-4 only the two or three chips they need.
- [Kid] Lay each ghost on the lined tray.
- [Together] Carry the tray to the freezer. Freeze for about 2 hours, until firm.
- [Grown-up] Let each pop soften for 2-3 minutes before serving. For ages 3-4, slide the banana off the stick and serve it in a bowl, or cut it into slices. Kids 5 and up can eat it on the stick while seated.
Tips
- If the yogurt slides off, chill the bananas for 15 minutes first, or use a thicker yogurt.
- For extra cling, mix a spoonful of cream cheese into the yogurt.
- If a 3-4-year-old struggles with hard frozen food, serve banana slices in a cup of yogurt with a spoon instead.
- Wrapped in a snack bag, these are best within 1-2 weeks in the freezer. The banana may brown slightly. Keep them frozen until serving, then let each pop soften for 2-3 minutes before your child eats it.
Treat #2: Spider Cracker Sandwiches
A snack-time spider that’s as much a craft as it is a bite. This one is great for the afternoon slump before dinner.
What You Need
- 16 round buttery crackers (such as Ritz-style)
- ⅓ cup sunflower seed butter, peanut butter, or cream cheese
- 32 thin pretzel sticks (4 sticks per spider, snapped in half)
- Mini chocolate chips or halved raisins (for eyes)
- A plate
Steps
- [Kid] Lay out 8 crackers on the plate, flat side up.
- [Kid] Spread a thin layer of seed butter, nut butter or cream cheese on each one. A table knife or the back of a spoon works. Don’t worry about neatness.
- [Together] Break the pretzel sticks in half so you have 64 short legs. A 3-year-old can snap them with a hand-over-hand demo, and a 6-year-old can do it alone.
- [Kid] Press four pretzel halves into the butter on each side so the legs stick out like a spider’s.
- [Kid] Top each with a second cracker, pressing gently.
- [Kid] Dab a tiny bit of butter on the top cracker and press on two mini chocolate chips or halved raisins for eyes.
Safety firstSpread nut or seed butter thinly, never in a thick clump, and don’t hand it over by the spoonful.
Keep ages 3-4 seated and supervised, and sweep up pretzel shards from snapping.
Make It Easier or Harder
- For 3-year-olds: Use only two legs per side. Fewer pieces means less frustration.
- For 7-8-year-olds: Add a “web” by drizzling lines of melted chocolate on the plate. A grown-up melts the chocolate and lets it cool to just warm first.
- Nut-free version: Use sunflower seed butter or cream cheese. Cream cheese is dairy, so pick seed butter if you also need dairy-free. Keep cream cheese versions in the fridge and eat them within a day. Throw out any that sit at room temperature for more than 2 hours.
Treat #3: Mummy Cheese Sticks
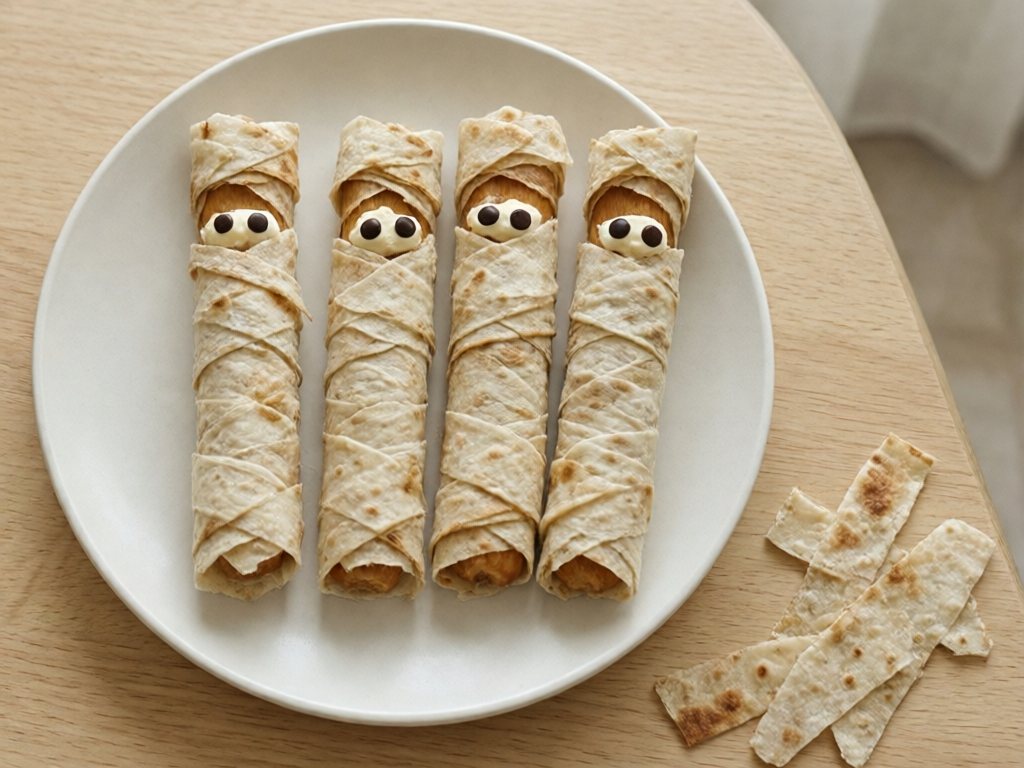
Savory is a nice break from all that sugar. These are also quick, and kids like the wrapping.
Safety firstFor ages 3-4, the wrapped mummy is for making, not for biting whole. Before they eat, take off the tortilla. Then peel the cheese into thin strings, or have a grown-up cut it lengthwise into thin strips and then into small pieces. Don’t slice it into rounds, because coin shapes can lodge.
Kids sit while they eat, with a grown-up close by.
What You Need
- 6 string cheese sticks
- 2 small flour tortillas (or 1 large). Optional swap: 6 slices of mild deli turkey, kept cold
- A little cream cheese or mustard (the “glue” for the eyes)
- Mini chocolate chips, or small pieces of black olive (cut in half)
- A table knife or spoon for the cream cheese, or just a clean fingertip
Steps
- [Grown-up] Cut the tortillas into thin strips about ½ inch wide. This takes a sharp knife and a steady hand, so it’s yours to do.
- [Kid] Unwrap the string cheese. Opening the packaging is a good fine-motor task for 4-year-olds.
- [Kid] Wrap a strip of tortilla around the cheese, overlapping a little. Leave a small gap near the top for the face.
- [Kid] Keep wrapping until the cheese is covered. If the strip runs out, start another one. Mummies are messy, and that’s the look.
- [Kid] Dab two dots of cream cheese or mustard in the gap, and press on mini chocolate chips (or olive pieces) for eyes.
- [Grown-up] For ages 3-4, unwrap the mummy before eating. Peel the cheese into thin strings, or cut it lengthwise into thin strips and then into small pieces. Skip round slices. Tear the tortilla into small pieces. Kids 5 and up can bite theirs while seated.
Tips
- Tortilla strips stick better when they’re slightly damp. Brush them with a tiny bit of water or just use the cream cheese as glue.
- For a protein boost, wrap with deli turkey instead. See my high-protein meals and snacks guide for more ideas that keep kids full between meals.
- Make them right before eating. Keep them cold, eat them the same day, and discard anything left out over 2 hours.
- Ages 3-4 eat theirs unwrapped. The Safety first note above has the details.
- Allergen check: the cheese and cream cheese are dairy, the tortillas are wheat, and mustard is an allergen for some kids. Read the deli turkey label too.
Good to knowDeli turkey is an optional swap for the tortilla. Keep it cold until you wrap, and eat the mummies the same day. Anyone who is pregnant should ask their provider about deli meat, or heat it until steaming.
Treat #4: Monster Yogurt Bark
This is the one for big, creative kids, and it looks very impressive for what it takes. It’s also the “make once, snack all week” option.
What You Need
- 2 cups thick vanilla Greek yogurt
- 1 tablespoon maple syrup
- A quarter-sheet pan or 9×13 inch rimmed pan, lined with parchment paper
Toppings (about 2 tablespoons of each, in separate small bowls)
- Mini chocolate chips
- Blueberries (halved for ages 3-4)
- Sprinkles in orange, purple, and black (skip hard sprinkles for ages 3-4)
- Crushed cookies or cereal
- Candy eyeballs (the edible kind; for ages 3-4, use mini chocolate chips instead)
Steps
- [Kid] Pour the yogurt into a bowl and stir in the maple syrup. Cold stirring is a perfect preschool job.
- [Kid] Spread the yogurt onto the parchment in an even layer about ¼ inch thick. Use the back of a spoon, and let your child make it rectangular, round, or blobby.
- [Kid] Decorate! Let them create a monster face: eyeballs, chocolate chip teeth, blueberry nose, sprinkle hair. For ages 3-4, use mini chocolate chips for the eyes and skip hard sprinkles. Ages 5-6 add candy eyes with a grown-up right there.
- [Together] Carry the tray flat to the freezer. Freeze for 2-3 hours or until solid.
- [Grown-up] Let the bark soften for 2-3 minutes, then cut it into pieces with a sharp knife. Frozen yogurt can be firm, so don’t smash it with your hand.
Tips
- Leave a little space around the edge of the parchment so you can lift the whole thing out.
- Store the pieces in a freezer bag with a layer of parchment between them. They are best within 2-3 weeks.
- Keep the pieces frozen until serving, then let them soften for 2-3 minutes on the counter before kids bite in.
Treat #5: Graveyard Pudding Cups
This one is the crowd-pleaser, and the closest to a “dessert” on the list. It’s very forgiving. Check labels for milk, soy and wheat. For kids under 4, skip the gummy worms or cut them into pea-sized pieces.
What You Need
- 2 cups prepared chocolate pudding (store-bought cups or a box mix made with cold milk)
- 8-10 chocolate sandwich cookies or graham crackers (for “dirt”)
- 6 clear cups or small jars
- 6 oval cookies (like Milano-style) for tombstones, or graham cracker pieces
- Gummy worms (for under 4, skip or cut into pea-sized pieces)
- A zip-top bag and a rolling pin (or a heavy cup)
- A tube of decorating icing or a tiny bit of melted chocolate (for writing “RIP”)
Steps
- [Kid] Put the cookies in a zip-top bag, squeeze out the air, and seal. Double-bag them so the bag doesn’t split.
- [Kid] Crush them! Use a rolling pin, heavy cup, or small fists. Many kids love this step. Let them go until the cookies are fine crumbs.
- [Together] Spoon the pudding into the cups, about ⅓ cup each. If the pudding comes from a box, an older child can whisk the milk and powder while you hold the bowl.
- [Kid] Sprinkle a thick layer of cookie “dirt” over the pudding.
- [Kid] Stick a gummy worm halfway into the dirt so it looks like it’s crawling out. For under 4, use a pea-sized piece or leave it off.
- [Together] Write “RIP” on the tombstone cookies with decorating icing. Younger kids can draw squiggles instead of letters, and older kids can write their own names.
- [Kid] Push a tombstone into the dirt at the back of each cup.
Tips
- Chill the pudding for 30 minutes so it firms up. If making ahead, add the crumbs, gummy worms and tombstones just before serving, since crumbs go soggy and worms get slimy. Keep the pudding refrigerated.
- For a less sweet cup, use plain Greek yogurt as the “pudding.” Stir in a spoonful of cocoa and a drizzle of maple syrup.
- If you’re making these for a class, use clear plastic cups and check for allergies.
- Many chocolate sandwich cookies are made on equipment shared with nuts and wheat, so read the label.
Treat #6: Monster Eyeball Energy Bites
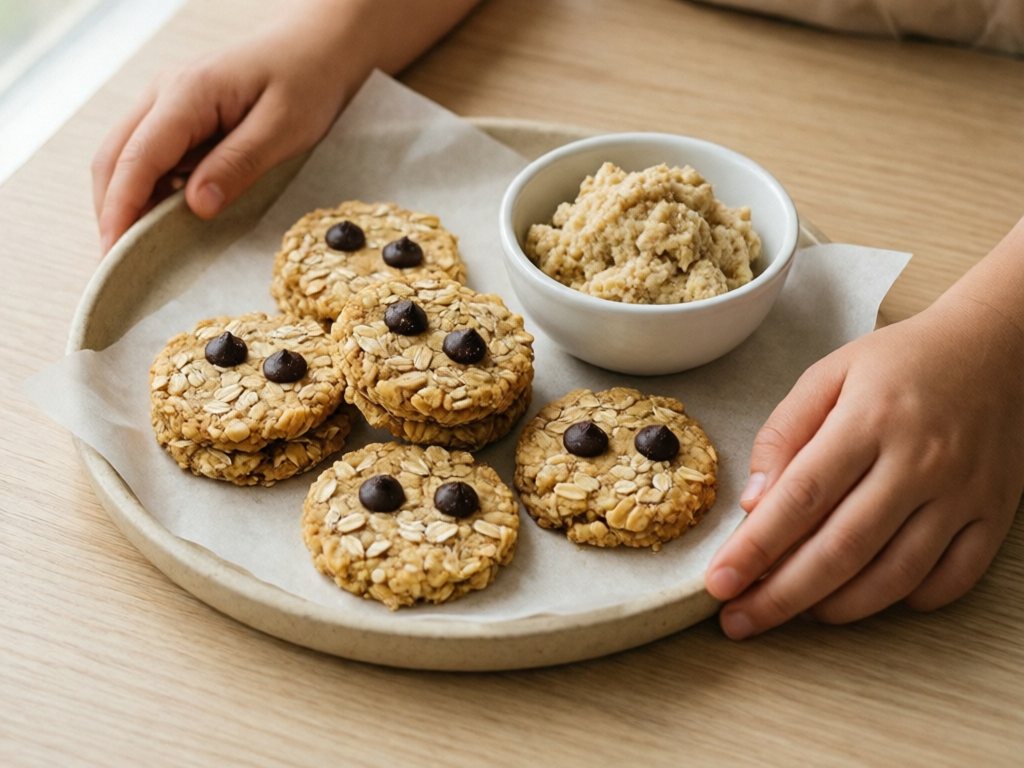
These are the most “real food” treat on the list. I put them out when I want a Halloween snack that doesn’t need a sugar apology. They’re a classic no-bake energy bite with a spooky twist.
Safety firstEnergy bites are firm and sticky, and a smaller ball is not a safer one. For ages 3-4, press each bite flat into a thin disc, like a small flat cookie, or crumble the dough over yogurt. Use mini chocolate chips for the eyes.
Kids sit while they eat and take small bites, with a grown-up close by.
What You Need
- 1 cup old-fashioned oats (certified gluten-free if needed)
- ½ cup sunflower seed butter or nut butter
- ⅓ cup honey or maple syrup
- ¼ cup mini chocolate chips
- 2 tablespoons ground flaxseed (optional)
- 1 teaspoon vanilla
- Candy eyeballs or white chocolate chips with a mini chocolate chip pressed in (for ages 3-4, use mini chocolate chips only)
- A mixing bowl and a sturdy spoon
Steps
- [Kid] Dump the oats, flax, and chocolate chips into the bowl. A 3-year-old can scoop with a small cup.
- [Together] Add the seed butter, honey, and vanilla. The butter can be stiff, so an older child can stir with a spoon while you hold the bowl steady.
- [Kid] Stir until everything is combined and the mixture holds together when pinched. If it’s crumbly, add a teaspoon of honey. If it’s too sticky, add a spoonful of oats.
- [Together] Chill the bowl for 20-30 minutes. This makes the dough less sticky and easier for small hands to roll.
- [Kid] Scoop a tablespoon of dough and roll it between your palms into a ball. For ages 3-4, press each ball flat into a thin disc, like a small flat cookie. Preschoolers do this well, and the “wrinkled” shapes look more monster-like anyway.
- [Kid] Press a candy eye (or a white chocolate chip with a mini chocolate chip) onto each ball or disc. For ages 3-4, use mini chocolate chips only. Ages 5-6 press on candy eyes with a grown-up right there.
- [Together] Put the bites on a tray and chill for another 15 minutes, then store in an airtight container.
Tips
- These bites are for ages 3 and up, not for babies. Honey is only for kids over 12 months, so use maple syrup if any child under 1 is in the house.
- If your child dislikes the texture of whole oats, pulse them in a blender for a few seconds first for a finer, doughier bite.
- These keep for a week in the fridge and up to a month in the freezer.
Beyond Halloween, energy bites like these are an easy way to sneak in fiber and healthy fat. I write more about this in my fiber-rich meals and snacks guide.
Halloween Treat Party Ideas for Kids
Once you have a couple of these down, you can turn them into a “monster kitchen” party.
The Station Setup
Safety firstBefore the party, ask every guest’s parent about food allergies and dietary needs.
- Go nut-free: use sunflower seed butter or cream cheese, never peanut or other nut butter. If a guest is allergic to seeds, dairy, wheat or soy, swap that ingredient or skip that treat.
- One spoon per bowl: give every bowl its own spoon or table knife, and don’t let them move between bowls.
- Keep the labels: leave the ingredient packages at each station so parents can check them.
- Clean hands: kids wash hands before they start and again before they eat.
My allergy-friendly party food guide has more swaps.
Set up three stations around the kitchen or table, one per type of job. Each station has everything the kids need in small bowls, plus a printed (or hand-drawn) picture of the finished treat.
- Decorating station: Yogurt bark or ghost pops. Toppings in bowls.
- Assembly station: Spider cracker sandwiches and mummy cheese sticks.
- Crushing station: Graveyard pudding cups (the cookie-crushing is the star).
Rotate groups of kids every 10 minutes. Keep one grown-up at the station that needs the most help (usually the one with the knife).
Keeping Younger Kids Involved
Mixed-age groups are normal at a party, and it’s fun for the older ones to be “helpers.” I give the 7- and 8-year-olds an official job: Station Captain. They set out the soft toppings, show the little ones how to do a step, and wear a special hat. It takes the pressure off me, and the older ones feel proud.
Safety firstStation Captains help with soft toppings only: mini chocolate chips, halved blueberries and cookie crumbs.
- Hard and chewy toppings: a grown-up keeps the candy eyes, hard sprinkles and gummy worms, portions them, and hands them out. Captains don’t pass these around.
- Ages 3-4: they get the age-adjusted versions only. That means mini chocolate chips for eyes, no hard sprinkles, and gummy worms skipped or cut into pea-sized pieces.
- Tag-along toddlers: these treats are written for ages 3 and up, so keep the topping bowls out of their reach.
Dress Up the Food, Not the Chaos
A few cheap props help:
- Orange and black paper plates or napkins
- A few plastic spiders for the table. Keep them away from kids under 4, who can choke on small parts.
- Spooky-looking labels on the treats (“Witch’s Toes,” “Bat Wings”). Kids love gross-sounding names.
- Mini aprons, or old T-shirts worn backward
Make-Ahead and Storage Guide
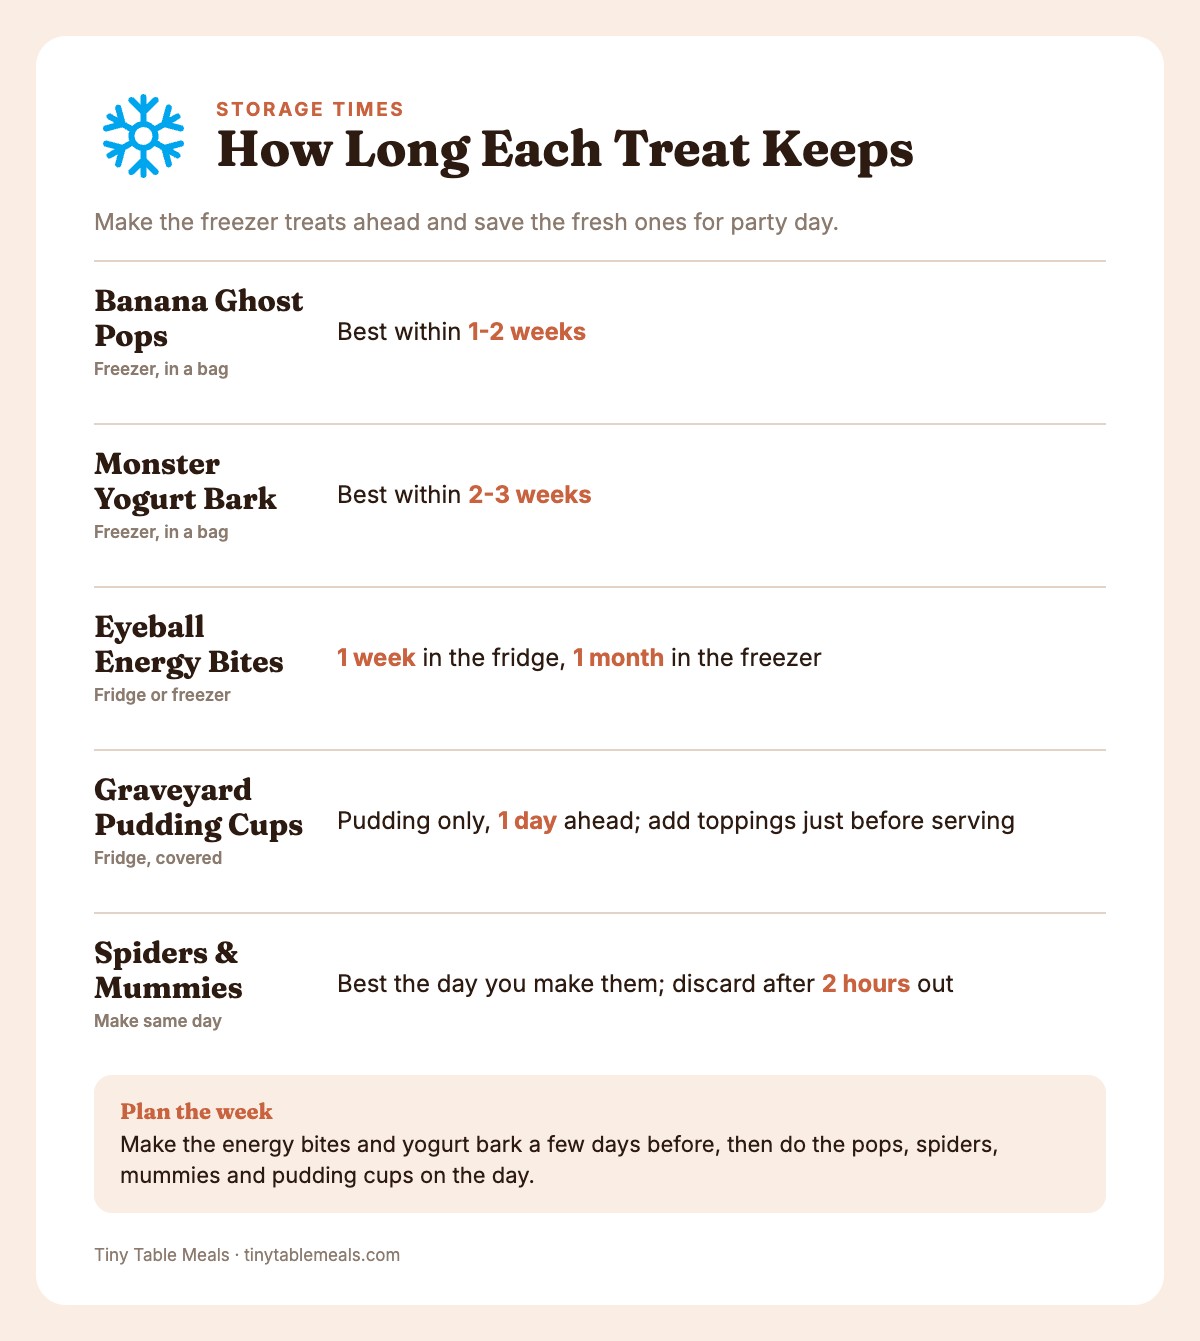
You can spread the work across a few days. That helps when October is already packed with costumes and school parties.
| Treat | Make Ahead? | Store | How Long |
|---|---|---|---|
| Banana Ghost Pops | Yes | Freezer only, in a bag | Best within 1-2 weeks |
| Spider Cracker Sandwiches | Same day is best | Airtight container; refrigerate if made with cream cheese | 1 day (crackers soften); discard after 2 hours at room temperature |
| Mummy Cheese Sticks | Same day only | Keep cold in the fridge | Eat the same day; discard after 2 hours out |
| Monster Yogurt Bark | Yes | Freezer only, in a bag | Best within 2-3 weeks |
| Graveyard Pudding Cups | Pudding only; add crumbs, worms and tombstones just before serving | Fridge, covered | 1 day |
| Monster Eyeball Energy Bites | Yes | Fridge or freezer | 1 week / 1 month |
My favorite approach is to make the energy bites and yogurt bark a few days before. Then I do the pops, spiders, mummies and pudding cups on the day. That way you have a mix of fresh-made and ready-to-go.
How to Balance Halloween Treats With Real Food
Halloween is a sugar-heavy holiday, and I’m not here to take that away. Candy is part of the fun. But there are a few easy ways to keep the balance:
- Serve treats with a meal or snack, not instead of one. A ghost pop after a real lunch feels very different than one at 4 p.m. when everyone is cranky.
- Include protein and fiber. Cheese, yogurt, seed butter, and oats slow the sugar down. Mummy cheese sticks and eyeball energy bites do this naturally.
- Let the kids decide how much to eat. I put a plate of treats out and let my kids choose. When treats aren’t forbidden, they stop being such a big deal.
- Eat dinner before trick-or-treating. A simple, filling dinner means less candy-grazing later. I have a list of fast Halloween dinners to eat before trick-or-treating that take under 30 minutes.
Ready for an oven project next? The end-of-school-year treats kids can help bake work for fall too. Swap the summer sprinkles for orange and purple and you’re set. For anything involving the oven, a grown-up handles the hot parts at every age. Kids help with the mixing and decorating.
Troubleshooting No-Bake Halloween Treats
Even with the simplest recipes, things happen. Here are the problems I hear about most often.
| Problem | Fix |
|---|---|
| The yogurt slides off the banana | Chill the bananas first and use very thick, Greek-style yogurt. Regular yogurt is too thin. |
| The kids keep eating the toppings | Expect it. Set out 2 extra tablespoons of mini chocolate chips and call it the “tasting tax.” Portion toppings into small bowls for the youngest. |
| My 3-year-old loses interest after one step | That’s normal. Let them do their favorite step (crushing, pressing, sprinkling) and finish the rest yourself. They’ll come back to it. |
| My 7-year-old says it’s “too babyish” | Give them a harder job: team leader, menu writer, or inventor of a new spooky treat. |
| Everything is sticky | Keep a damp cloth and a small bowl of water at the station. A little water on the palms keeps energy-bite dough from sticking. |
| The kids won’t eat what they made | Let them enjoy the making and put the treat away for later. Don’t push or comment. They often ask for it the next day. |
Frequently Asked Questions
What are the easiest Halloween treats for kids to make with no baking?
Banana ghost pops and spider cracker sandwiches are the easiest for beginners. Both use just a few ingredients, have no tools beyond a spoon, and can be done mostly by a 3- or 4-year-old. The yogurt bark is also very simple and gives lots of room for creativity.
At what age can kids make these Halloween treats on their own?
Most 3- and 4-year-olds can do the spreading, pressing, sprinkling, and stirring steps with a quick demo.
By 5 or 6, many kids can handle most steps alone. A kid-safe nylon knife is still a together job. The microwave and cutting firm foods with a table knife stay with a grown-up.
By 7 or 8, kids can use a nylon knife alone. Cutting firm foods with a table knife and using the microwave are together jobs. Sharp knives and hot melted chocolate stay grown-up jobs at every age.
How can I make these Halloween snacks nut-free for school?
Swap nut butters for sunflower seed butter or cream cheese (soy nut butter only if soy is not an issue). Read every label, including chocolate chips, cookies, candy eyes and sprinkles, for nut warnings and cross-contact. Follow your school’s allergy policy, and ask the teacher if you’re unsure.
Are marshmallows and gummy candy safe for preschoolers?
They can be a choking risk for kids under 4, especially whole or large pieces. Use mini marshmallows and flatten and cut larger ones. For kids under 4, skip gummy worms or cut them into pea-sized pieces. Always have kids sit while they eat and stay close by. If you’re unsure whether something is safe, a pediatrician or your child’s care provider is the best person to ask.
Can I make these Halloween treats ahead of time for a class party?
Yes, for some of them. Yogurt bark and banana pops go in the freezer, and energy bites keep in the fridge or freezer. Pudding cups can be made a day ahead; add crumbs, gummy worms and tombstones just before serving. Spider crackers and mummy cheese sticks are best made the day of.
How do I keep the sugar down without making the treats boring?
Choose treats with protein, fiber, or fruit as the base: banana pops, yogurt bark, mummy cheese sticks, and energy bites. Use mini chocolate chips instead of big handfuls, and let kids add one or two special toppings instead of five.
Serve treats after a real meal or with milk, and keep the mood relaxed. Treats that feel forbidden tend to get overeaten.
What if my child doesn’t want to touch sticky or messy ingredients?
That’s very common, and it’s okay. Offer a spoon or a small spatula so they don’t have to use their hands. Keep a damp cloth nearby so they can wipe off whenever they like. Let them start with the dry steps, like sprinkling or crushing cookies in a bag, and work toward stickier ones over time. Never force it, since a calm, positive experience matters more than finishing the recipe.
Final Tips for Halloween Cooking With Kids
My daughter pulled that sad banana ghost out of the freezer a couple of hours later. She took one bite and told me, with total seriousness, “This is the best food I ever made.”
It was a banana in yogurt with two chocolate chips. But she was proud, and that’s what I was hoping for.
So pick one treat from this list, set up a small station, and step back. Let the eyes go on crooked. Let the cookie crumbs go everywhere. The treats will be gone by tomorrow, but the feeling of “I made that” sticks around a lot longer. Happy Halloween, and happy no-bake cooking.