Spring Break Lunches Kids Can Actually Help Make (No Reheating Required)
Spring break lunches don't have to be a daily battle. Learn how to empower your kids to create their own simple, no-reheat meals, turning lunch into a fun, structured activity that reduces your stress.
- Adopt a simple, consistent lunch formula for spring break.
- Use structured, kid-built lunches to shape the day and manage hunger.
- Prioritize quick, low-mess, no-negotiation lunches to save your energy.
- Opt for no-reheat lunches to boost kid independence and meal flexibility.
- Involve kids in assembly tasks like spreading, layering, and rolling.
It’s day three of spring break. You’ve already made pancakes twice, negotiated over cereal, and somehow ended up at a drive-through for lunch yesterday despite your best intentions. The kids are in the living room building a fort out of every pillow in the house, and it’s 11:15 a.m. In forty-five minutes they’re going to materialize in the kitchen asking what’s for lunch, and honestly? You have no idea.
This is the quiet crisis of spring break that nobody puts on the Instagram highlight reel. School handles lunch Monday through Friday for the better part of nine months. Then suddenly you have a week (or two) of needing to conjure midday meals out of thin air, with fewer groceries than you planned for, surrounded by children who are bored, sugared-up, and have very loud opinions about what they will and will not eat.
The good news: it doesn’t have to be complicated, and it definitely doesn’t have to be a solo operation. Spring break is actually a tremendous opportunity to get your kids in the kitchen in a way that school-year time pressure rarely allows. With the right lunch framework — simple, no-reheat builds that even young kids can assemble themselves — you can turn the lunch scramble into something that’s actually fun, fills bellies with real food, and gives you a few minutes of structured activity to boot. Let’s do this.
Why Spring Break Lunches Need a Different Strategy
Here’s the thing about spring break: it’s not like summer. It’s a compressed week or two, which means you’re not trying to build elaborate systems or get the kids into long-term routines. You just need to survive lunch, ideally without losing your mind or serving chicken nuggets every single day.
The Three Big Spring Break Lunch Problems
Problem #1: No school meal to carry the nutritional load. During the school year, you only need to think about breakfast and dinner. Lunch is handled. Spring break puts it back on your plate (literally), and unless you’ve thought ahead, it defaults to whatever’s easy — which is usually not the most balanced option.
Problem #2: Kids are home, bored, and grazing all morning. When kids are active and stimulated at school, they show up to lunch actually hungry. When they’re floating around the house in their pajamas watching videos all morning, their hunger patterns get irregular. They pick, they snack, then they’re “not hungry” at lunch, then they’re ravenous at 3 p.m. A structured, kid-built lunch gives the day a shape that helps with this.
Problem #3: You’re tired and possibly also on break. Spring break is a time when your energy and motivation are at a seasonal low point. The last thing you want is an elaborate cooking project. You want quick, you want low-mess, and you want everyone to eat it without a negotiation.
The solution to all three problems is the same: a simple, consistent lunch formula that kids can execute with minimal supervision, using ingredients that are easy to stock and don’t require any cooking at lunchtime.
Why No-Reheat Lunches Are a Game-Changer During Break
We’re specifically focusing on no-reheat lunches here, and here’s why. First, the microwave becomes a battleground when kids are helping — who pushes the buttons, how long, did they cover the bowl, is it hot enough, is it too hot? It adds steps and supervision that defeat the purpose.
Second, no-reheat lunches translate directly to park lunches, lake lunches, and back-porch picnic lunches without any adjustment. You can pack exactly what you’d serve at home and head out the door. For a week when you’re trying to get outside and take advantage of the season, that flexibility is genuinely valuable.
Third — and this is the parenting psychology piece — kids feel more independent and capable when they can build something completely from start to finish. Spreading, layering, rolling, assembling: these are real cooking tasks that feel meaningful to a six-year-old. Pressing buttons on a microwave and waiting is less exciting.
The Protein + Produce + Starch Formula
Before we get into the specific lunch builds, let’s talk about the framework that makes all of them work nutritionally. You don’t need to memorize macros or consult a nutrition chart every time you make lunch. You just need to remember three words: protein, produce, starch.
Protein keeps kids full and provides the building blocks for growth. It prevents the 2 p.m. energy crash that turns your spring break afternoon into a meltdown marathon. High-protein meals and snacks for kids don’t have to be complicated — cheese, deli meat, eggs, hummus, beans, nut butter, and Greek yogurt all qualify and all require zero cooking.
Produce brings vitamins, fiber, water content, and color. During spring break, when schedules loosen and the candy bowl is more accessible, getting some vegetables and fruit at lunch helps maintain a baseline of good nutrition even when everything else is off-schedule.
Starch provides the energy kids need to run, play, create, and not destroy your house. Whole-grain options — whole-wheat bread, whole-grain crackers, whole-grain wraps — give more sustained energy than refined options, but honestly, even a plain white pita is better than no starch at all.
The magic of this formula is its flexibility. It works with picky eaters because you can swap any component without disrupting the structure. It works with what’s in the fridge. It works for kids who hate their food touching and for kids who love mixed-up bowls. It’s a framework, not a rigid recipe.
| Component | Examples | Why It Matters |
|---|---|---|
| Protein | Cheese, deli meat, hummus, hard-boiled eggs, nut/seed butter, Greek yogurt, beans, canned tuna | Satiety, growth, brain function |
| Produce | Cucumber, cherry tomatoes, bell pepper strips, apple slices, berries, carrots, peas, snap peas, avocado | Vitamins, fiber, hydration |
| Starch | Whole-grain bread, wrap, pita, crackers, whole-grain tortilla, cooked pasta, rice cakes | Energy, fiber, sustained focus |
| Bonus (optional) | Healthy fat like avocado or olive oil drizzle, dip like ranch or guacamole | Flavor, absorption of fat-soluble vitamins |
Aim for at least one item from each of the first three columns, and you have a genuinely balanced lunch without having to think too hard about it.
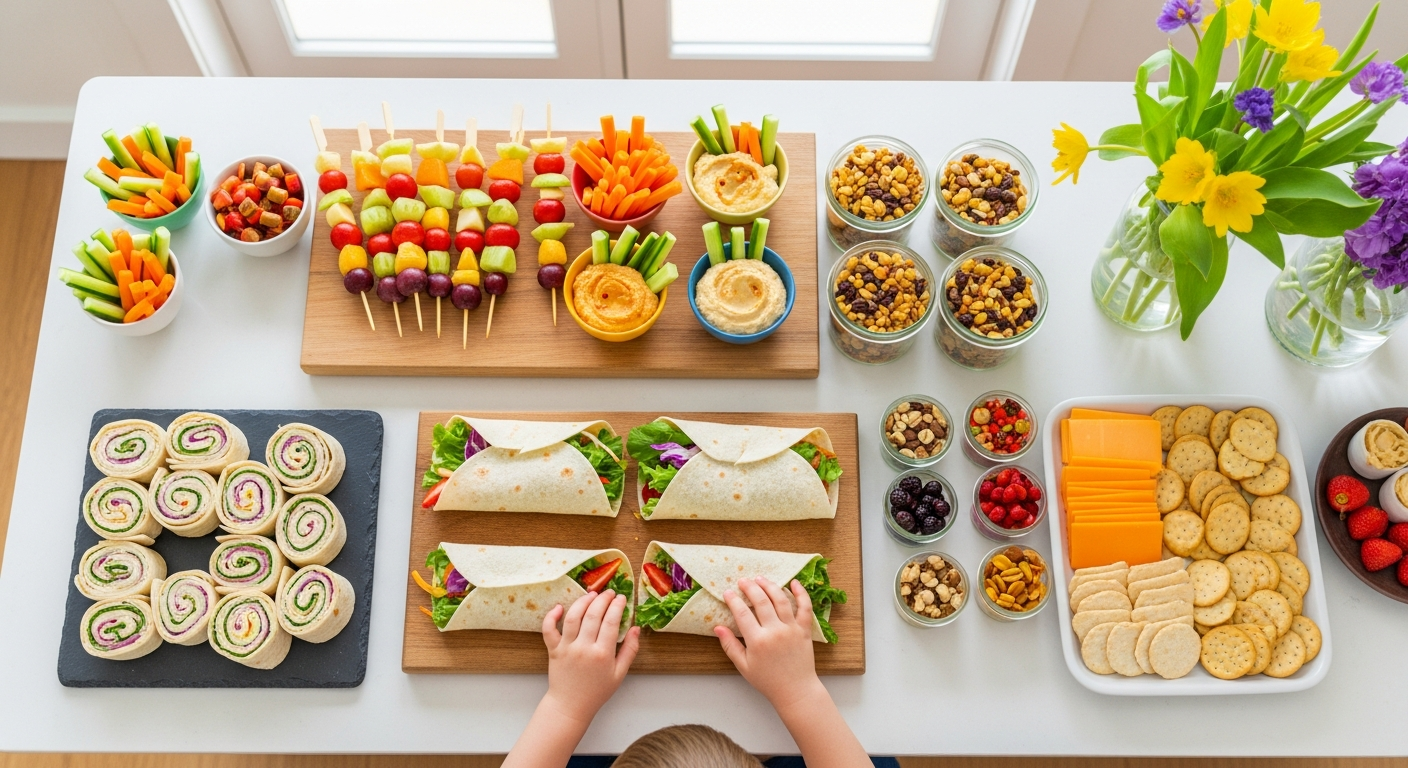
Age-Appropriate Lunch Tasks for Kids
One of the best things you can do this spring break is let your kids actually do the work. Not “help” in the supervisory sense where you hand them a spoon and take it back after two seconds — actually let them make lunch. This requires calibrating the tasks to the age and accepting that it will be slightly messier than if you did it yourself. The payoff is enormous: kids who feel ownership over their food are statistically more likely to eat it, and you get a few minutes of hands-free time.
Here’s what’s genuinely safe and developmentally appropriate at each age:
| Age | Tasks They Can Do | Needs Supervision | Skip Entirely |
|---|---|---|---|
| 3-4 years | Pour pre-measured ingredients, tear lettuce, wash produce under running water, place items in containers, spread soft things (cream cheese, hummus) with a safe spreader | Anything near open packages with sharp edges; pouring liquids | Sharp knives, anything requiring heat, opening cans |
| 5-6 years | All of the above, plus: spread with a butter knife, tear or break foods apart, assemble pinwheels before rolling, layer items in a bowl, peel hard-boiled eggs, crack eggs into a bowl | Peeling raw vegetables, cutting soft items with a butter knife | Sharp knives, anything requiring heat |
| 7-9 years | All of the above, plus: use a child-safe serrated knife to cut soft items (banana, strawberries, soft cheese), measure ingredients, make simple dressings, assemble sandwiches fully independently | Using a regular knife, working near stove/oven | High-heat cooking |
| 10-12 years | Fully assemble all no-reheat lunches independently; read and follow simple recipes; use a sharp chef’s knife with proper technique (supervised); operate the stovetop with guidance | Complex knife work, high-heat stovetop | Nothing, with appropriate supervision |
| 12+ years | Near-full kitchen independence for no-heat lunches; can operate stovetop for simple tasks with supervision | First few times trying new equipment | Nothing age-appropriate |
The key shift in mindset here: your job is to set up the workspace and the ingredients, not to do the work. Pull out a cutting board, set out the components, give a brief demo if needed, and then step back. Let the sandwich be imperfect. Let the wrap be stuffed too full. The mess is worth the benefit — both for them and for your sanity during a long week at home.
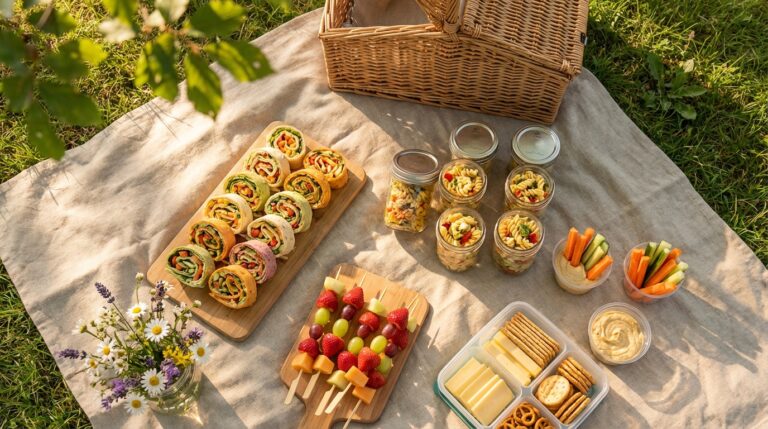
8 No-Reheat Spring Break Lunch Builds (Detailed)
These eight lunches are designed to be assembled cold, travel well in a bag if you go out, keep kids occupied for more than 30 seconds of eating, and actually taste good. Each one includes which part is best for kids to make themselves.
Lunch Build #1: Rainbow Roll-Ups
What you need:
- Large whole-grain or spinach tortillas (the green ones are visually exciting)
- Cream cheese or hummus (about 2 tablespoons per wrap)
- Deli turkey or ham (2-3 slices)
- Shredded or thinly sliced colorful veggies: red bell pepper strips, shredded purple cabbage, julienned carrot, cucumber sticks
- Optional: a handful of spinach leaves
How to build it: Spread the cream cheese or hummus in a thin, even layer across the tortilla, leaving about an inch at one edge. Layer on the protein, then arrange the veggies in a row down the center (this is the part kids love — making a “rainbow”). Roll firmly from the non-bare-edge side, keeping it tight. Slice in half diagonally or into 1-inch rounds.
Protein: ~14g per wrap | Nutrition notes: Great vitamin C from bell peppers, beta-carotene from carrots, folate from spinach
Best kid tasks: Spreading the cream cheese/hummus, arranging the veggies, rolling the wrap (with some guidance for the tight roll), cutting with a safe serrated knife for older kids
Picky eater tip: Let them choose only the veggies they like. A wrap with just turkey, cream cheese, and cucumber still counts.
Lunch Build #2: Build-Your-Own Deconstructed Lunchable
What you need:
- Whole-grain crackers (about 12-15)
- Cubed or sliced cheese (cheddar, pepper jack, mozzarella — whatever’s in the fridge)
- Deli meat or salami, rolled or folded
- Cherry tomatoes, halved
- Apple slices
- A small container of hummus or mustard for dipping
How to build it: This one requires zero “building” — it’s all about arrangement. Set out a plate or divided container and arrange everything in its own section. Part of the appeal is the visual abundance of it; kids love seeing all the components laid out like a little charcuterie board.
Protein: ~16g | Nutrition notes: Calcium from cheese, fiber from whole-grain crackers, antioxidants from tomatoes, quercetin from apple skins
Best kid tasks: This is a perfect fully-independent lunch for ages 5 and up. Give them the components and a plate and let them do the whole thing.
Picky eater tip: This format is gold for picky eaters because nothing touches anything else. Sub in whatever each child actually likes — the formula works with almost any protein-produce-cracker combination.
Lunch Build #3: Greek Pita Pocket Party
What you need:
- Whole-wheat mini pitas
- Hummus (store-bought is great)
- Cucumber, thinly sliced
- Cherry tomatoes, halved
- Kalamata olives (if your kids like them)
- Feta cheese crumbles
- Optional: rotisserie chicken, shredded
How to build it: Slice each pita across the top to open the pocket. Spread a generous spoonful of hummus inside. Stuff with cucumber, tomatoes, feta, and olives. Add shredded chicken if using.
Protein: ~15g (without chicken) / ~22g (with chicken) | Nutrition notes: Plant-based protein and fiber from hummus and chickpeas, probiotics and calcium from feta, healthy fats from olives
Best kid tasks: Spreading hummus inside the pita (a fun tactile task), stuffing the pita with toppings, measuring out olive portions
Why kids love it: Something about pita pockets feels special and restaurant-like. The stuffing process is engaging, and the compact shape is easy to eat.
Lunch Build #4: Sunflower Butter and Apple “Sushi”
What you need:
- 1 large whole-grain tortilla
- 2-3 tablespoons sunflower seed butter (or peanut butter)
- 1 apple, cored and cut into thin sticks
- Optional: 1 tablespoon honey, a sprinkle of granola or hemp seeds, raisins
How to build it: Lay the tortilla flat. Spread the sunflower seed butter evenly across the entire surface. Arrange the apple sticks in a line about 2 inches from one edge. Drizzle with honey and sprinkle with granola if using. Roll tightly from the apple-side edge. Slice into 1-inch rounds — they look like sushi rolls, which is why kids go absolutely wild for this one.
Protein: ~10g | Nutrition notes: Healthy fats and protein from seed butter, fiber and vitamin C from apple, omega-3s from hemp seeds if added
Best kid tasks: Spreading the seed butter, arranging the apple sticks, rolling (a good two-person job), pressing down to slice with a butter knife
Note on nut-free schools: Sunflower seed butter is already a safe swap here. This makes a great lunch that travels to any environment.
Lunch Build #5: Tuna Salad Crackers and Cucumber Boats
What you need:
- 1 can chunk light tuna in water, drained
- 2-3 tablespoons plain Greek yogurt (or mayo — up to you)
- 1 teaspoon Dijon mustard
- Salt, pepper, optional: relish or diced celery
- 1 English cucumber
- Whole-grain crackers
How to build it: Mix the tuna with yogurt, mustard, and any mix-ins until combined. Cut the cucumber in half lengthwise, then use a spoon to scoop a shallow channel down the center of each half, creating a “boat.” Fill each boat with tuna salad. Serve with crackers on the side.
Protein: ~25g | Nutrition notes: Omega-3 fatty acids from tuna, probiotics from Greek yogurt, electrolytes from cucumber, B vitamins throughout
Best kid tasks: Draining the tuna (with supervision for the can edge), mixing the salad, scooping out the cucumber, loading the boats
Why it works for spring break: The cucumber boats format makes tuna salad feel special rather than like a boring sandwich. Kids are more likely to eat something they’ve assembled into a fun shape.
Lunch Build #6: Cheese Quesadilla Wedges with Dipping Bar
We know — quesadillas technically require heat. But here’s the trick: make these in the morning or the night before, refrigerate them, and serve at room temperature. A pre-made quesadilla sliced into wedges is surprisingly delicious cold and holds up well for several hours in a lunch box.
What you need:
- Whole-grain flour tortillas
- Shredded cheese (about 1/3 cup per quesadilla)
- Optional add-ins: black beans (rinsed), corn, finely diced bell pepper, baby spinach
- Dipping options: salsa, guacamole, sour cream, Greek yogurt ranch dip
How to build it (morning prep): Lay a tortilla flat. Sprinkle cheese and any add-ins on one half. Fold over. Cook in a dry skillet over medium heat for 2-3 minutes per side until golden and cheese is melted. Cool completely, then cut into wedges and refrigerate.
At lunch: Pull out the pre-made wedges, arrange on a plate or in a container with small portions of each dip.
Protein: ~13g with just cheese; ~16g with black beans added | Nutrition notes: Calcium from cheese, fiber and plant protein from beans, lycopene from salsa
Best kid tasks: Setting out the dipping bar, choosing their combinations, cutting with a safe knife (older kids on the pre-cooled quesadilla)
Lunch Build #7: Spring Chopped Salad Jars
This one is more for ages 8 and up who are ready to assemble something a bit more involved, or younger kids with significant help.
What you need:
- Wide-mouth mason jars or any tall container (the layering is part of the visual appeal)
- Dressing (keep it simple: olive oil + lemon + pinch of salt, or store-bought ranch)
- Chopped romaine or butter lettuce
- Cherry tomatoes, halved
- Cucumber chunks
- Shredded rotisserie chicken or canned chickpeas
- Shredded parmesan or feta crumbles
- Whole-grain croutons or crushed whole-grain crackers
- Optional spring additions: sugar snap peas, radish slices, thinly sliced strawberries
How to build it: Layer in this order: dressing first (at the bottom, so lettuce doesn’t wilt), then chickpeas or chicken (these can sit in dressing), then harder veggies (cucumber, tomatoes), then softer produce (snap peas, strawberries), then lettuce on top, then cheese and croutons. Seal and refrigerate. When ready to eat, shake or dump into a bowl and toss.
Protein: ~20g with chicken; ~14g with chickpeas | Nutrition notes: Complete protein from chicken; fiber, folate, and plant protein from chickpeas; vitamins A and C from romaine; antioxidants from tomatoes
Best kid tasks: Measuring the dressing, adding each layer, shaking the jar before eating
Why it works: The jar format makes salad feel exciting and different. Seeing the colorful layers through the glass is genuinely satisfying, and kids love the ritual of shaking it before eating.
Lunch Build #8: DIY Mini Bagel Pizzas (Cold Assembly)
Another one that requires minimal morning prep but zero lunchtime heat.
What you need:
- Whole-grain mini bagels, sliced and lightly toasted in the morning
- Pizza sauce or marinara (about 1 tablespoon per half)
- Shredded mozzarella (already melted if you do a quick broil) or fresh mozzarella slices
- Toppings: sliced olives, bell pepper strips, mini pepperoni, fresh basil leaves
How to build it: Toast the bagel halves in the morning. Spread with pizza sauce. Top with cheese. If you want melted cheese, pop under the broiler for 2 minutes — then cool completely before packing. At lunch, kids add their own fresh toppings.
Protein: ~14g per serving (2 bagel halves) | Nutrition notes: Calcium from mozzarella, lycopene from tomato sauce, vitamin C from bell peppers
Best kid tasks: Spreading the sauce, choosing and adding toppings, arranging on a plate
Picky eater tip: The build-your-own toppings element is everything. Kids who would refuse a pre-made pizza happily eat the same pizza when they controlled what went on it.
Quick-Reference Lunch Comparison Table
| Lunch Build | Prep Time | Best Ages | Total Protein | Nut-Free? | Travels Well? |
|---|---|---|---|---|---|
| Rainbow Roll-Ups | 10 min | 4+ | ~14g | Yes (with hummus) | Yes |
| Deconstructed Lunchable | 5 min | 3+ | ~16g | Yes | Yes |
| Greek Pita Pocket | 8 min | 5+ | 15-22g | Yes | Yes |
| Sunflower Butter Sushi | 10 min | 4+ | ~10g | Yes | Yes |
| Tuna Cucumber Boats | 10 min | 6+ | ~25g | Yes | Yes |
| Quesadilla Wedges + Dip Bar | 5 min (using pre-made) | 3+ | 13-16g | Yes | Yes |
| Spring Chopped Salad Jar | 15 min | 8+ | 14-20g | Yes | Yes |
| Mini Bagel Pizzas | 10 min (using morning-toasted bagels) | 5+ | ~14g | Yes | Yes |
Batch Prep on Sunday: Setting Yourself Up for a Smooth Week
Spring break isn’t just one long day — it’s five to ten days in a row, and if you can do a 30-40 minute Sunday prep session, you’ll thank yourself all week long. For a deeper dive into the art of meal prepping for the whole week, toddler meal prep lunches has a full system you can adapt for any age.
Here’s a focused spring break prep that takes about 35 minutes and makes lunchtime dramatically easier:
Wash and dry all produce. Berries, grapes, lettuce — washing everything at once means it’s ready to grab. This alone saves 5 minutes per lunch per day.
Pre-slice the slow veggies. Carrots into sticks, cucumbers into rounds or sticks, bell peppers into strips. Store each in a container with a damp paper towel to keep them crisp. These last 5-6 days.
Hard-boil a dozen eggs. Keep them unpeeled in the fridge (they last a week). Peel as needed. Hard-boiled eggs add protein to literally any lunch with zero effort at lunchtime.
Make a big batch of tuna salad. One recipe covers 3-4 lunches. Store in a sealed container. It keeps for 3-4 days and can go in pitas, on crackers, in cucumber boats, or in a lettuce wrap.
Pre-make 2-3 quesadillas. Cook, cool, wrap in parchment, and refrigerate. Reheat briefly if desired, or serve at room temperature.
Set up the lunch station. On the counter or a low shelf your kids can reach: a basket with crackers, a spot for the fruit bowl, and a designated “lunch container” area. When kids know where everything lives, they can actually build their own lunch independently.
Pre-portion dips and spreads. Fill small containers with hummus, guacamole, cream cheese, or nut butter. Having single-serve portions ready means no one’s digging into the communal hummus with a carrot stick for the fourth time.
| Prep Task | Time | Lunches It Serves |
|---|---|---|
| Wash and dry all produce | 8 min | All week |
| Pre-slice veggies | 10 min | 5 days |
| Hard-boil 12 eggs | 3 min active, 12 min passive | 4-5 days |
| Make big batch tuna salad | 5 min | 3-4 lunches |
| Pre-make quesadillas | 10 min | 2-3 lunches |
| Pre-portion dips | 5 min | All week |
| Total active time | ~35 min | All 5-7 days of break |
Packing for Outings: Park Days and Spring Break Adventures
Spring break is prime park-day season, and a solid packed lunch can be the difference between a smooth afternoon outside and an expensive, rushed trip through a drive-through because everyone’s hangry. The no-reheat lunch builds in this article are designed to travel — here’s how to pack them well.
The cold pack matters more than you think. A thin ice pack from the dollar section keeps food safe and palatable for about 3-4 hours in an insulated bag. If you’re out longer, pack a small frozen water bottle alongside — it thaws slowly and keeps temperature down.
Pack dense, not voluminous. A pita pocket takes up less space than an open-face arrangement. Salad jars are more efficient than loose bowls. Wraps cut in half fit neatly side by side.
Give everyone a job. At home, kids assemble. At the park, they unpack and set up. Even a 4-year-old can pull their container out of the bag and open it independently, which frees you to deal with the sunscreen situation without also serving lunch.
Pack extras that don’t need refrigeration. Whole-grain crackers, a banana, a small bag of trail mix, and an individual water bottle means you have buffer food if someone decides they don’t like what you packed (it happens) or the afternoon runs long.
Spring break lunch packing checklist:
- Insulated bag
- Ice pack (or frozen water bottle)
- Main lunch container with protein + produce + starch
- Small dip container if relevant (seal tightly)
- Extra crackers or fruit
- Napkins (pack double what you think you need)
- Utensils if needed
- Water bottles for everyone
For more ideas on budget-friendly ways to plan family meals and outings, budget meal planning for families is full of practical strategies that apply beautifully to spring break planning.
Handling Picky Eaters During Break
Spring break has a way of amplifying picky eating. Kids are out of routine. They’re eating at irregular times. They’ve been at Grandma’s or had a few extra treats. And suddenly your child who “used to eat wraps” is announcing they don’t eat wraps anymore and only want butter noodles.
First: take a breath. This is developmentally normal and stress is normal, and neither of those things means you’re failing.
Here are the strategies that actually hold up during the break scramble:
Don’t announce the menu in advance. When kids know what’s for lunch before it’s in front of them, they have time to build resistance. Serve it, explain it briefly (“we’re making pita pockets today — here’s all the stuff you can put in”), and let the interest develop at the table.
The safe food rule. Include at least one food you know your child reliably eats in every lunch. This takes the pressure off — if nothing else works, they’ll eat the crackers or the apple slices or the cheese. Once they’re relaxed, they’re more likely to try something else. This is discussed in more detail in our post on understanding your child’s eating style if you want to dig deeper.
Involve them in the choice. “We can do roll-ups or a lunchable-style plate today — which one do you want to make?” Giving a choice between two acceptable options gives kids control without opening a free-for-all negotiation.
Deconstructed is usually fine. If your child won’t eat a wrap, serve the exact same ingredients on a plate, separated. Turkey on one side. Cheese on another. Cucumber sticks here. Hummus there. Same nutrition, less meltdown. Many picky eaters have texture or mixed-food sensitivities that make assembled foods harder, and deconstructed plates genuinely work better for them.
Expect some days to be harder than others. Spring break is exciting and overstimulating, and that affects appetite unpredictably. Some days kids will eat everything. Some days they’ll eat nothing you offer. As long as they’re eating something and getting water, a bad lunch day is just a bad lunch day — not a pattern.
Don’t cook something special. The lunch is the lunch. Offering to make a separate meal when they refuse communicates that refusal gets rewarded. Serve it, leave it available for 20-30 minutes, then move on. No drama, no second meal.
Nutritional Snapshot: A Week of Spring Break Lunches
Here’s how a spring break lunch week could look if you rotate through these builds, and what the nutritional picture looks like across the week:
| Day | Lunch Build | Estimated Protein | Key Nutrients |
|---|---|---|---|
| Monday | Rainbow Roll-Ups | 14g | Vitamin C, beta-carotene, B vitamins |
| Tuesday | Greek Pita Pockets with shredded chicken | 22g | Omega-3s (olive oil), calcium, plant fiber |
| Wednesday | Tuna Cucumber Boats + crackers | 25g | Omega-3s, electrolytes, B12 |
| Thursday | Deconstructed Lunchable | 16g | Calcium, antioxidants, fiber |
| Friday | Sunflower Butter Sushi + fruit | 10g | Healthy fats, vitamin C, potassium |
| Saturday (park day) | Mini Bagel Pizzas + salad jar | 28g combined | Complete protein, vitamins A, C, K |
| Sunday | Spring Chopped Salad Jar | 20g | Complete protein, folate, antioxidants |
Average daily protein across the week: ~19g at lunch alone. Add breakfast and snacks and most school-age kids will comfortably hit the updated USDA guidelines of 1.2-1.6g protein per kilogram of body weight per day.
Mama Munch
Mama Munch is a food-obsessed parent of two who believes every family deserves simple, nutritious meals — even on the busiest weeknights. With a background in nutrition education and years of navigating picky eaters, allergies, and toddler taste buds, she creates practical recipes and meal strategies that actually work for real families.
Frequently Asked Questions
How far ahead can I prep these lunches?
Most components are good for 3-5 days when stored properly. Washed and cut produce: 4-5 days in airtight containers with a paper towel to absorb moisture. Pre-made wraps and rolls: 2-3 days maximum before the tortilla softens. Tuna salad: 3-4 days. Hard-boiled eggs (unpeeled): up to 1 week. Quesadilla wedges: 4 days. If you do a Sunday prep, you’re comfortably covered through Thursday or Friday of spring break.
My kids have a nut allergy. Are these lunches safe?
Every lunch build in this article is designed to work without nuts. The Sunflower Butter Sushi uses sunflower seed butter, which is safe for most nut-allergic families (though always verify with your allergist). All other lunches use cheese, hummus, eggs, tuna, or seeds as protein sources. None require peanuts or tree nuts.
What if I have multiple kids with different food preferences?
This is where the “build-your-own” format shines. The Deconstructed Lunchable and the Spring Chopped Salad Jar both have fully customizable components — each child picks what they want. For wraps and pita pockets, set out all the fillings and let each child build their own. Having an assembly station rather than a pre-made plate is the single best tactic for families with varying preferences.
How do I get a reluctant helper actually interested in making lunch?
Give them an age-appropriate task with a clear visual result. “Your job is to arrange the veggies in a rainbow” is more engaging than “help me make lunch.” For younger kids, give them their own small bowl of crackers to count into a container. For older kids, frame it as a challenge: “Can you make the wrap as tight as possible so nothing falls out?” If they’re uninterested today, don’t force it — try again tomorrow with a different task.
These lunches seem like a lot of components. What’s the true minimum I need?
Honestly? You can make a perfectly solid spring break lunch with: whole-grain bread or crackers, peanut or sunflower seed butter, a piece of fruit, and a cheese stick. That’s protein (seed butter + cheese), produce (fruit), and starch (bread/crackers). Start there on the days when you have nothing in the fridge and work up from there as you get into the rhythm of the week.
What’s the best way to get kids to actually eat vegetables at lunch?
Pair the vegetable with a dip. Kids who won’t touch a plain carrot stick will often eat four of them with ranch or hummus. The texture contrast of something crunchy and cold with a creamy dip is very appealing to most kids. Also: keep portions small and expectations low. Three cucumber rounds on the plate is a win if they eat them all. You don’t need them to eat a full salad.
What if my budget is really tight this spring break?
A week of these lunches can absolutely be done for under $30. The most economical builds are the Deconstructed Lunchable (using block cheese, crackers from a store-brand box, and whatever produce is on sale), the Sunflower Butter Sushi (tortillas + seed butter + one apple), and the Quesadilla Wedges (tortillas + store-brand shredded cheese). Canned tuna is one of the most protein-dense and affordable options available. Frozen fruit for smoothies or sides. And if you have the budget meal planning mindset, you plan your spring break lunches around what’s on sale that week rather than the other way around.
You’ve Got This Week
Spring break doesn’t have to mean a week of scrambled last-minute lunches and takeout runs. With a simple framework, a little Sunday prep, and a willingness to hand some of the work to your kids, you can feed everyone well — without standing at the stove at noon, and without losing your mind.
Pick two or three of these lunch builds that appeal to your family, stock the ingredients on your next grocery run, and set up a little lunch station your kids can access. Then step back. Let them spread, stuff, roll, and arrange. Let them taste-test and customize. Let them be proud of what they made.
The food will be a little messier than if you made it yourself. The wraps will probably be overstuffed. The salad jar will have too many croutons. That’s exactly the point.
A week from now, your kids might remember spring break as “the week we made cool lunches.” That’s a pretty good outcome for a Tuesday at noon.
For more ideas on building healthy habits with your kids at every age, check out our guide to after-school snacks kids can make — many of those strategies translate directly to spring break lunches.